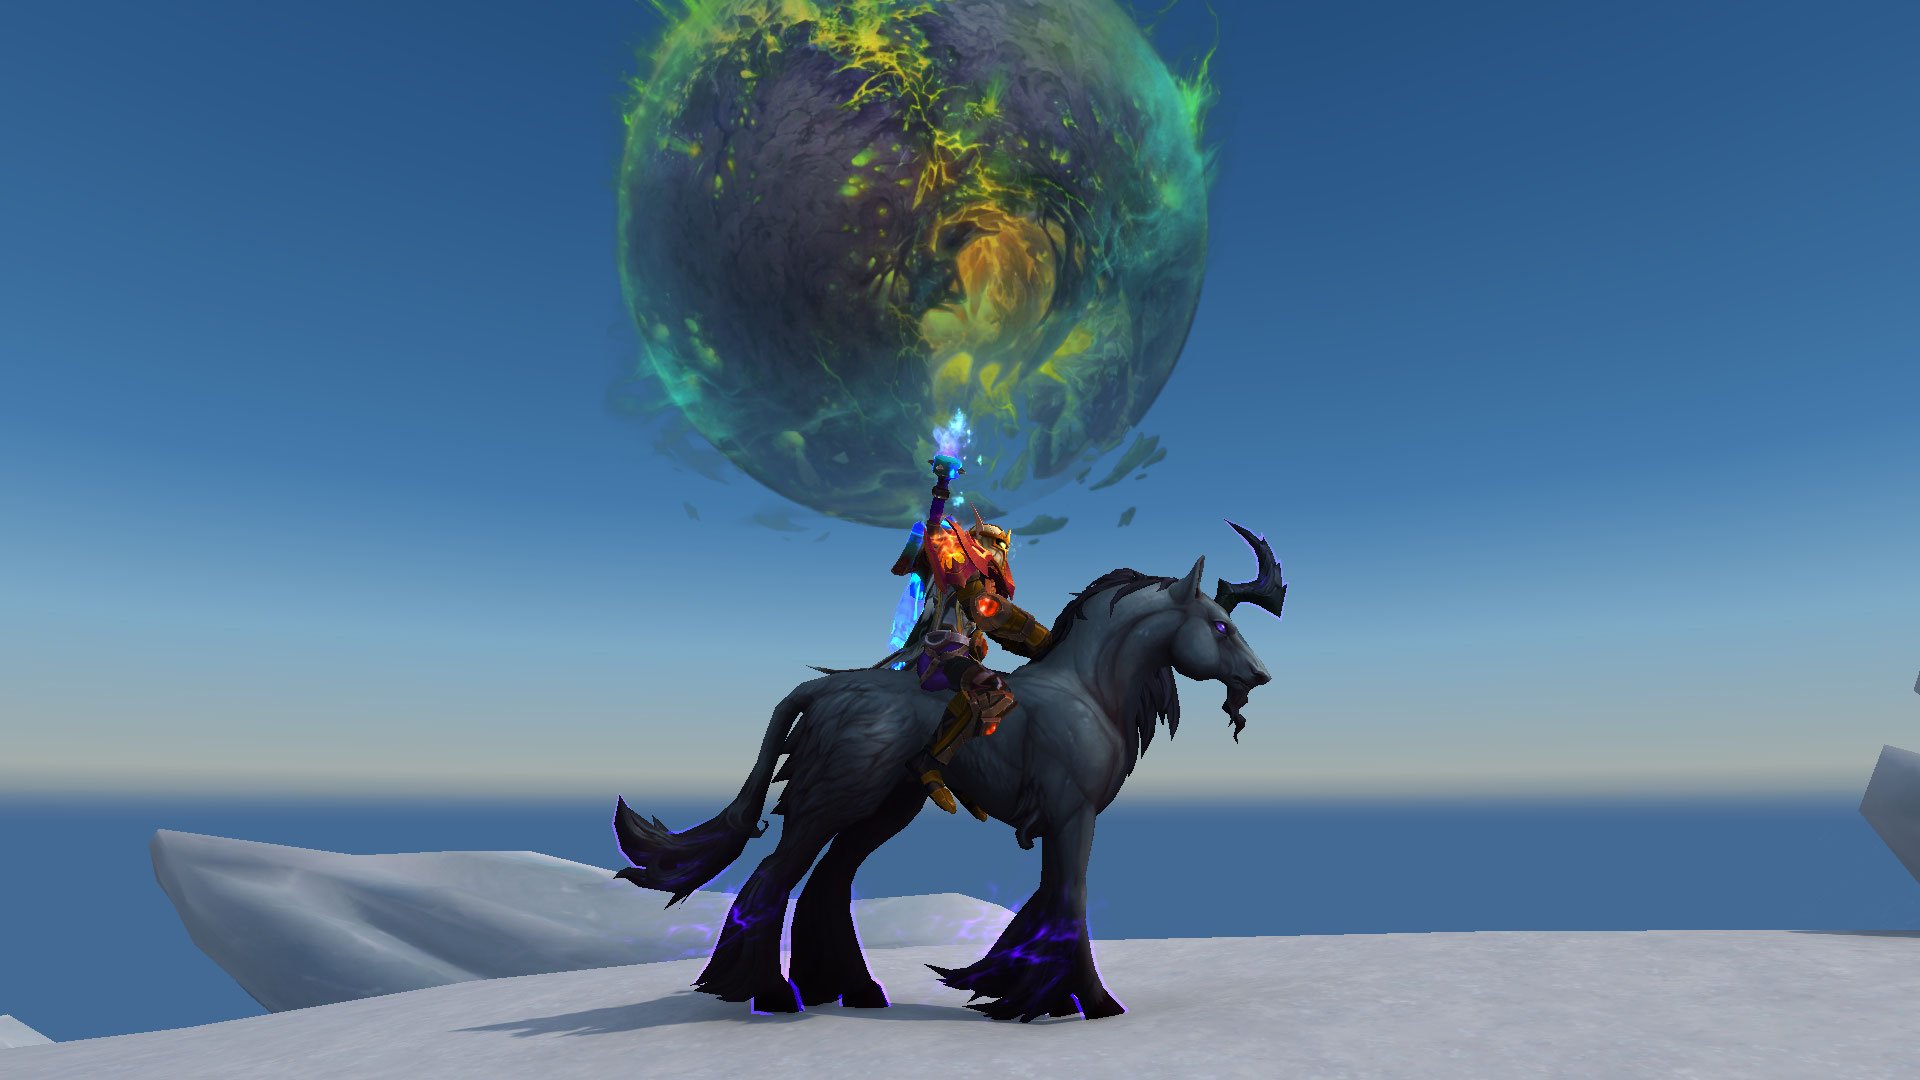
The Lucid Nightmare mount is a hidden or secret easter egg hunt reward similar to Kosumoth the Hungering’s Fathom Dweller mount, and the Riddler’s Mind-Worm mount.
Click the tabs below to start the walkthrough on how to find the Lucid Nightmare Mount.
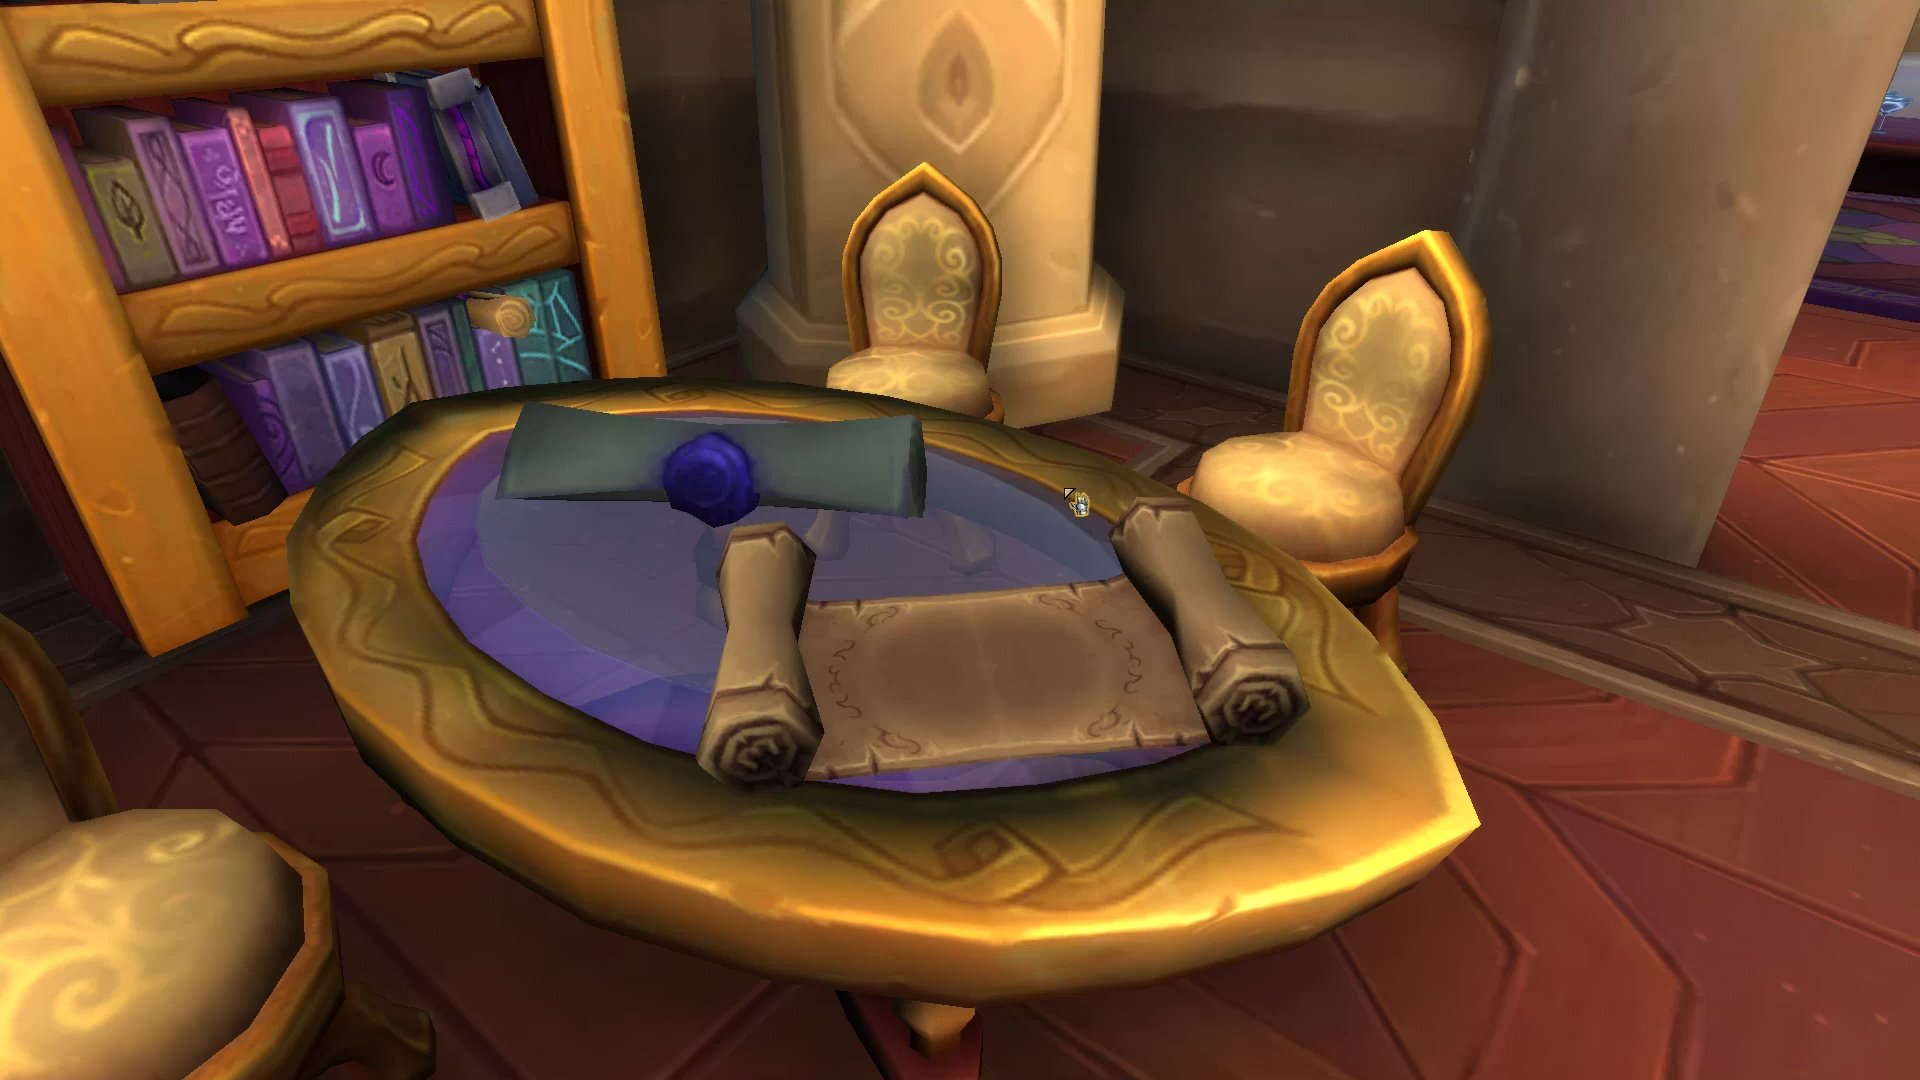
The first part of this hunt starts at the Curiosities & Moore shop in Dalaran (Broken Isles).
1. Go to the second floor.
2. On the table there is an open scroll.
3. Click it. You will see an animated graphic over the scroll looking like a purple brain in chains. This signals the hunt progress is saved.
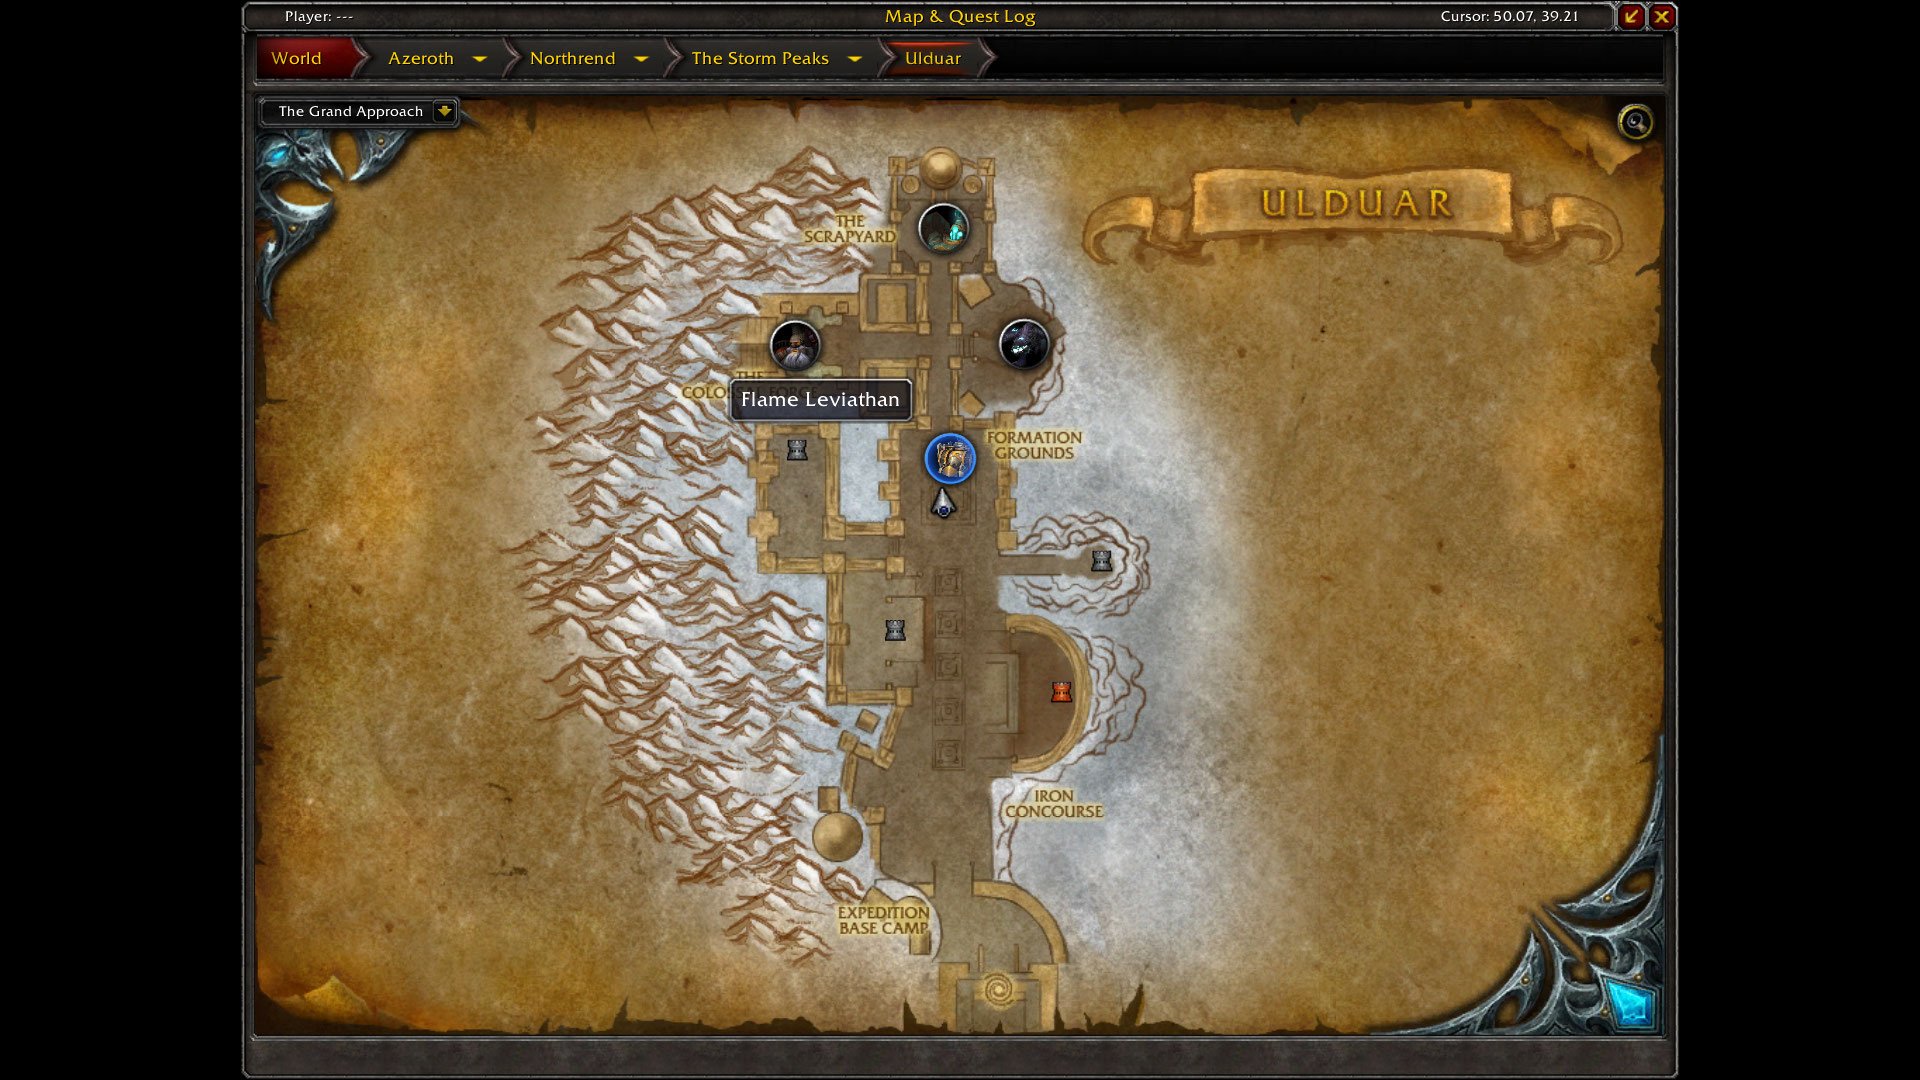
1. If you have the Argent Crusader's Tabard, click it to teleport to the Argent Tournament Grounds in Icecrown, OR go to the center of Dalaran (Broken Shore) to access the Chamber of the Guardian.
2. Take the portal to Wyrmrest Temple.
3. Fly to the Ulduar raid dungeon, and enter.
4. Go straight to the Flame Leviathan boss. Kill all the dwarves and giants by the door to spawn Flame Leviathan, and kill him. He dies in 2 hits at level 110.
5. Go straight to XT-002 Deconstructor. Pull him at the top of the stairs and kill him so that his corpse is out of the way from the center of the room. At level 110, he dies in one hit.
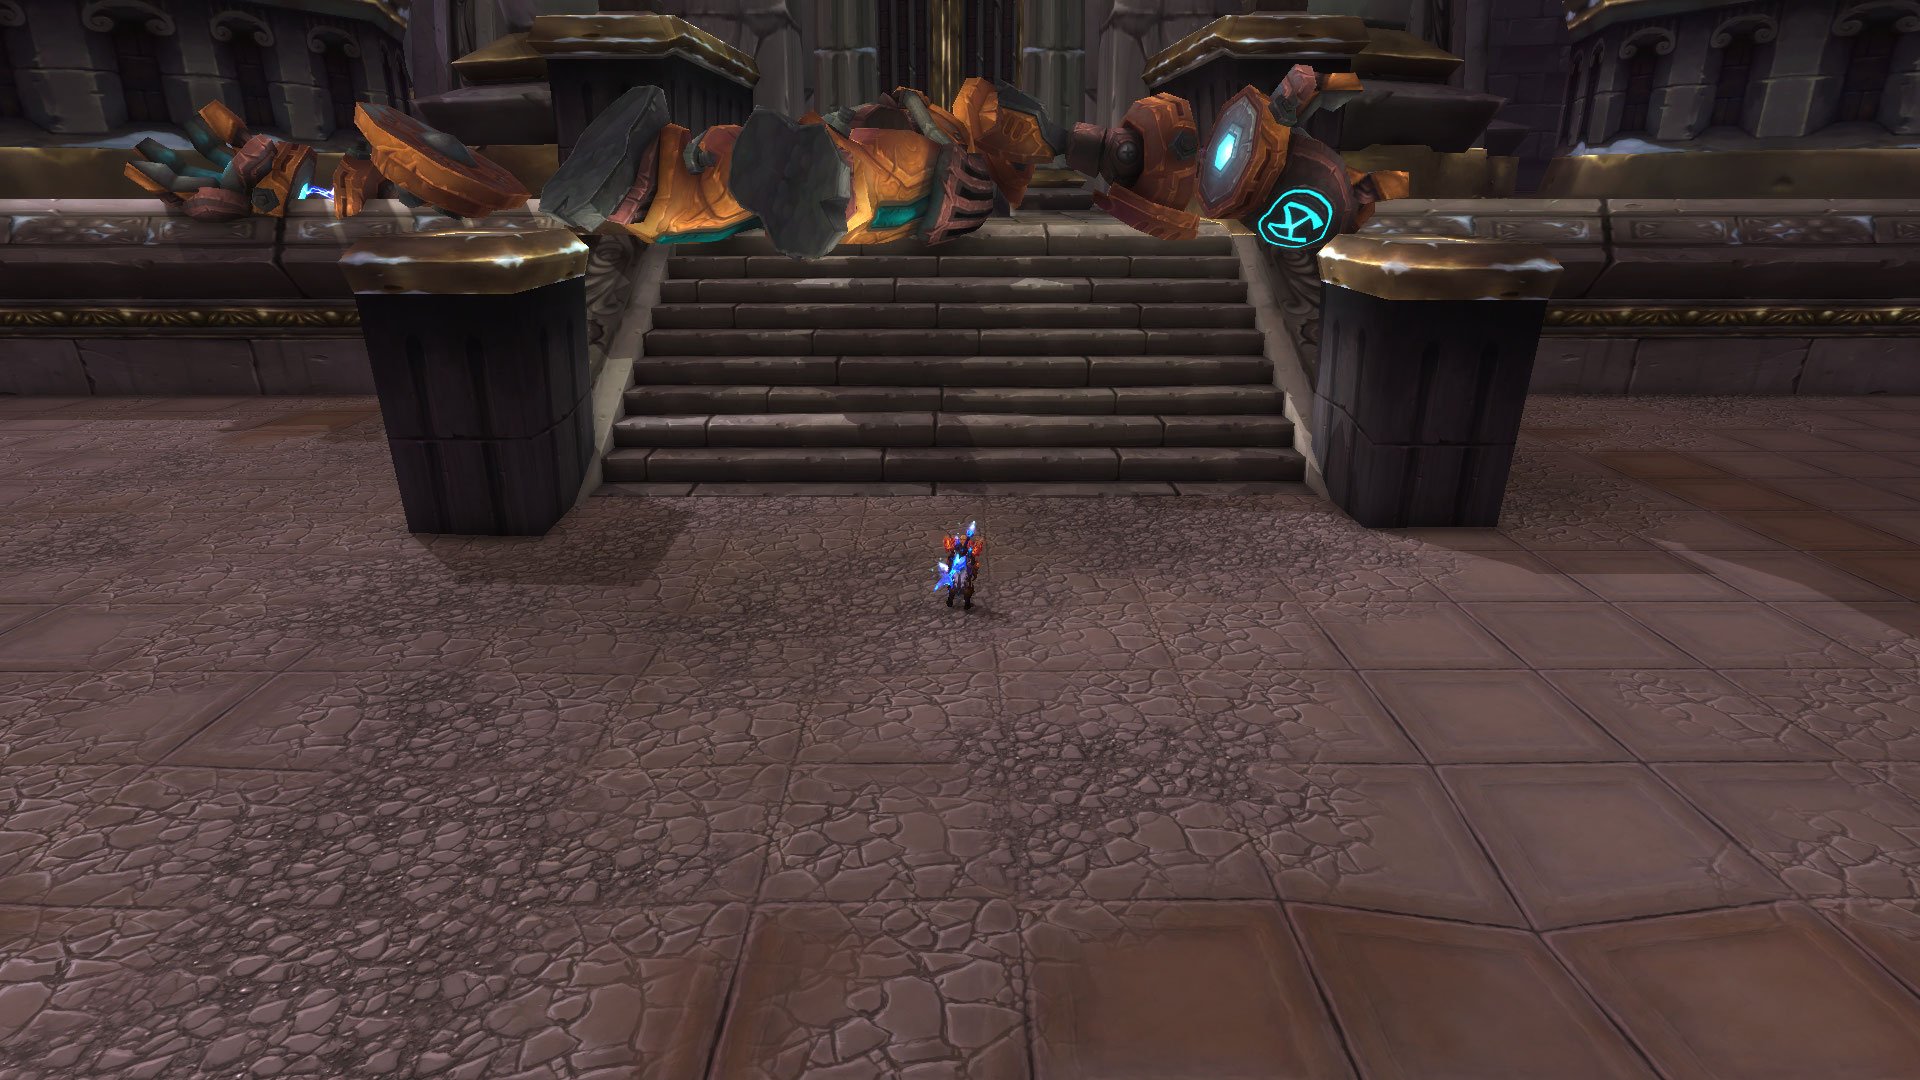
6. Climb the pile of robot parts on the top-left corner of The Scrapyard. Zoom in your camera to click the Rusty Lever. 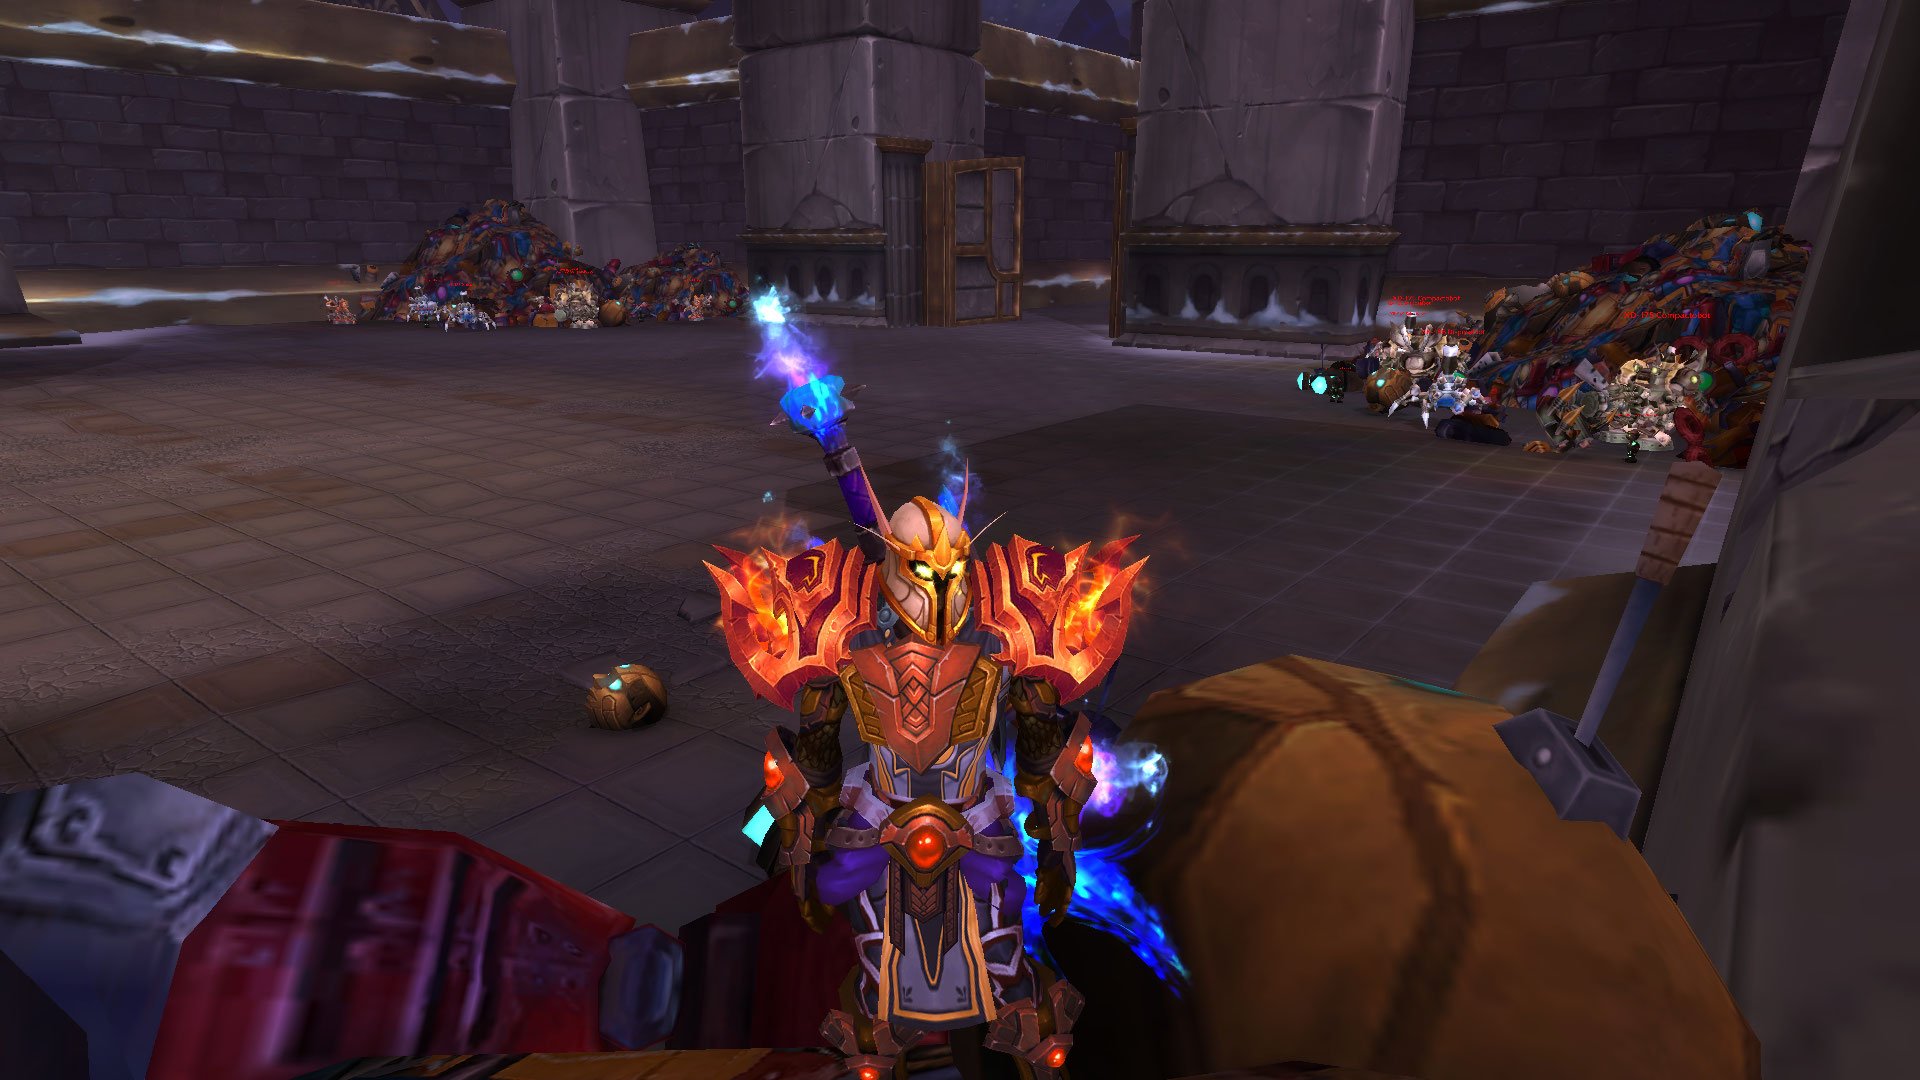
5. A field of 20 x 20 Scrapyard Light spawn.

6. The answer to the riddle is to turn on the lights that form Mimiron's Symbol. The best way to go about it is first turning on the lights that form the cross.
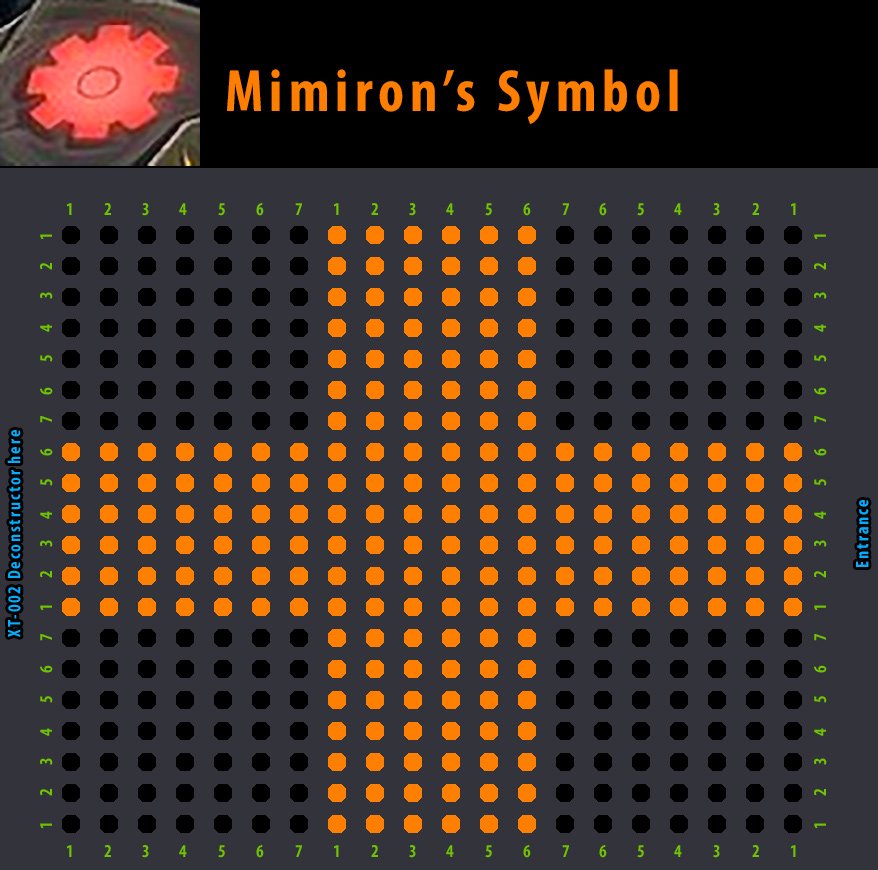
7. Now that the cross is done, focus on the lights located at the smaller squares at the corners. 
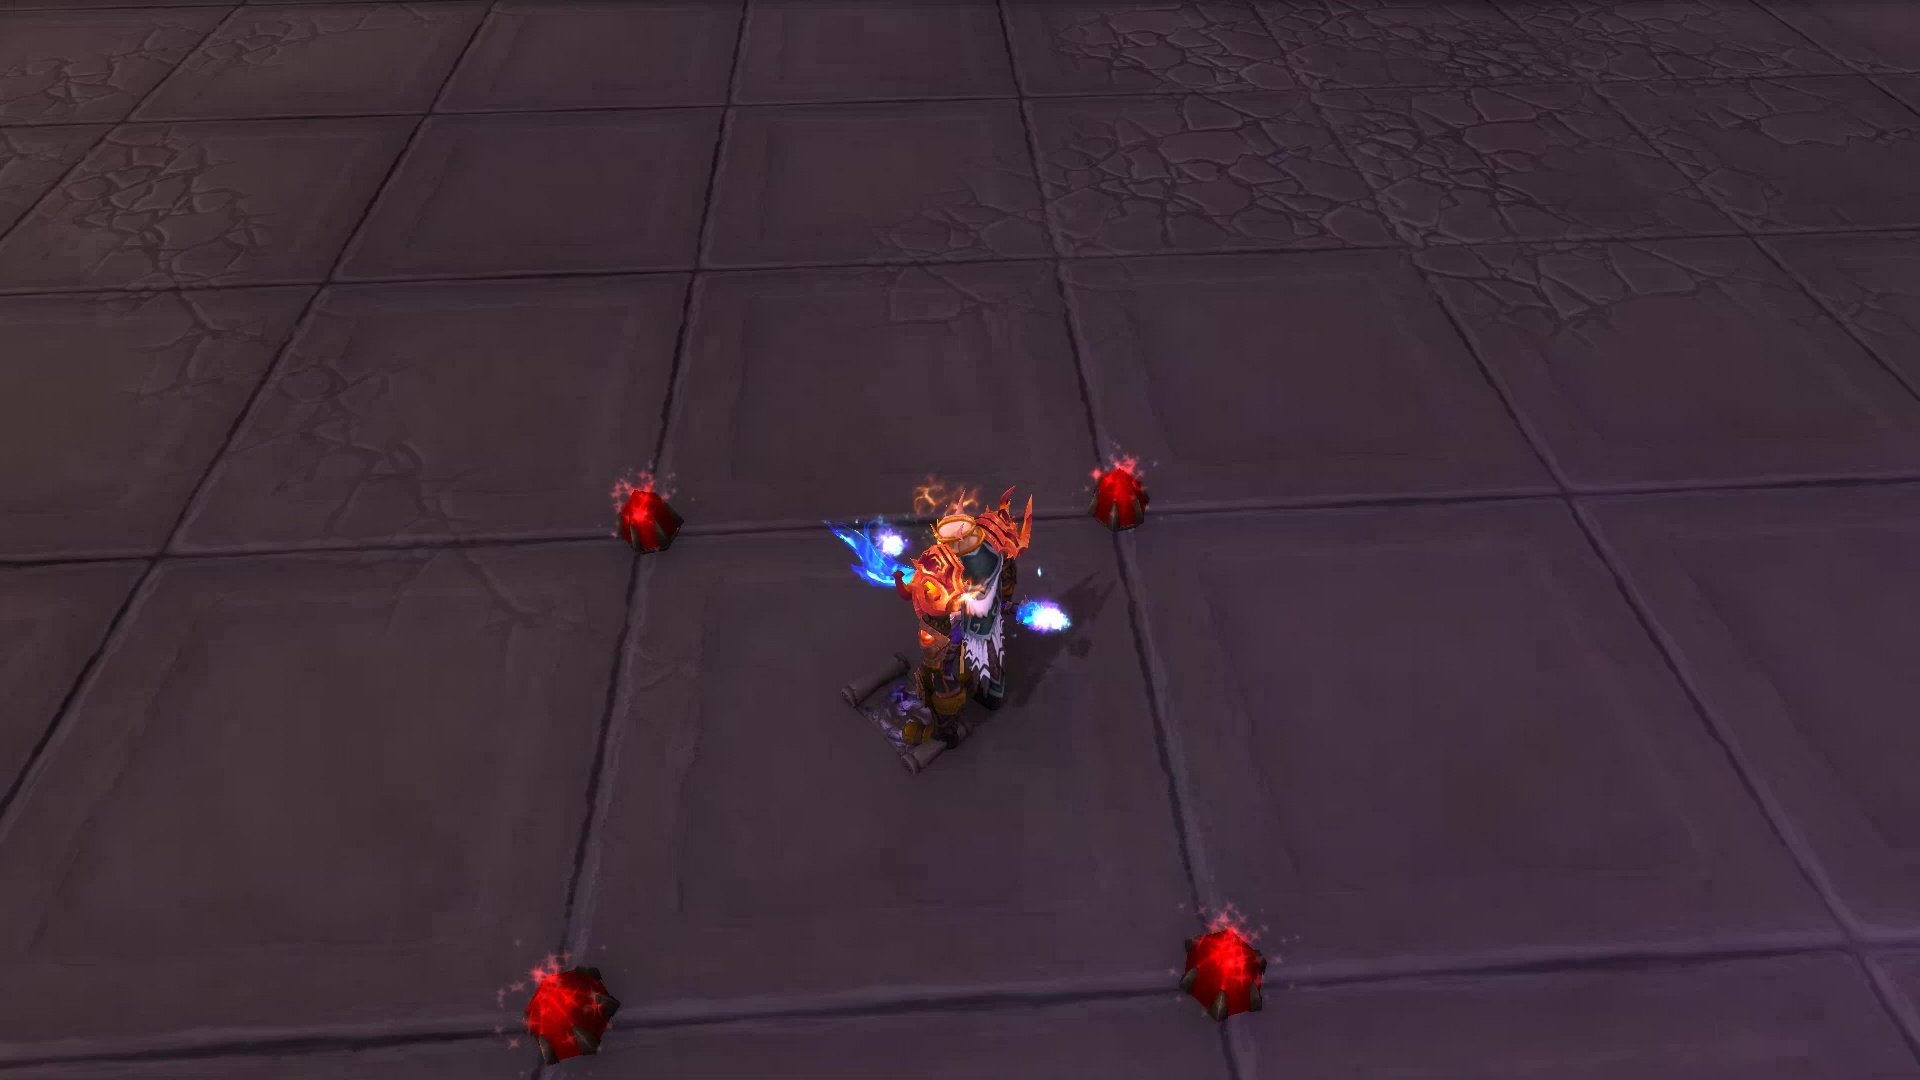
8. When the symbol is complete, all Scrapyard Lights disappear. Four red crystals and a scroll spawns in the center. Click the note.
1. At this point your Dalaran Hearthstone is up. Go back to Dalaran.
2. Take the portal to Orgrimmar OR Stormwind.
3. Take the portal to Uldum.
4. When you spawn at Ramkahen (Uldum), fly west toward Ahn'Qiraj (south of Silithus).
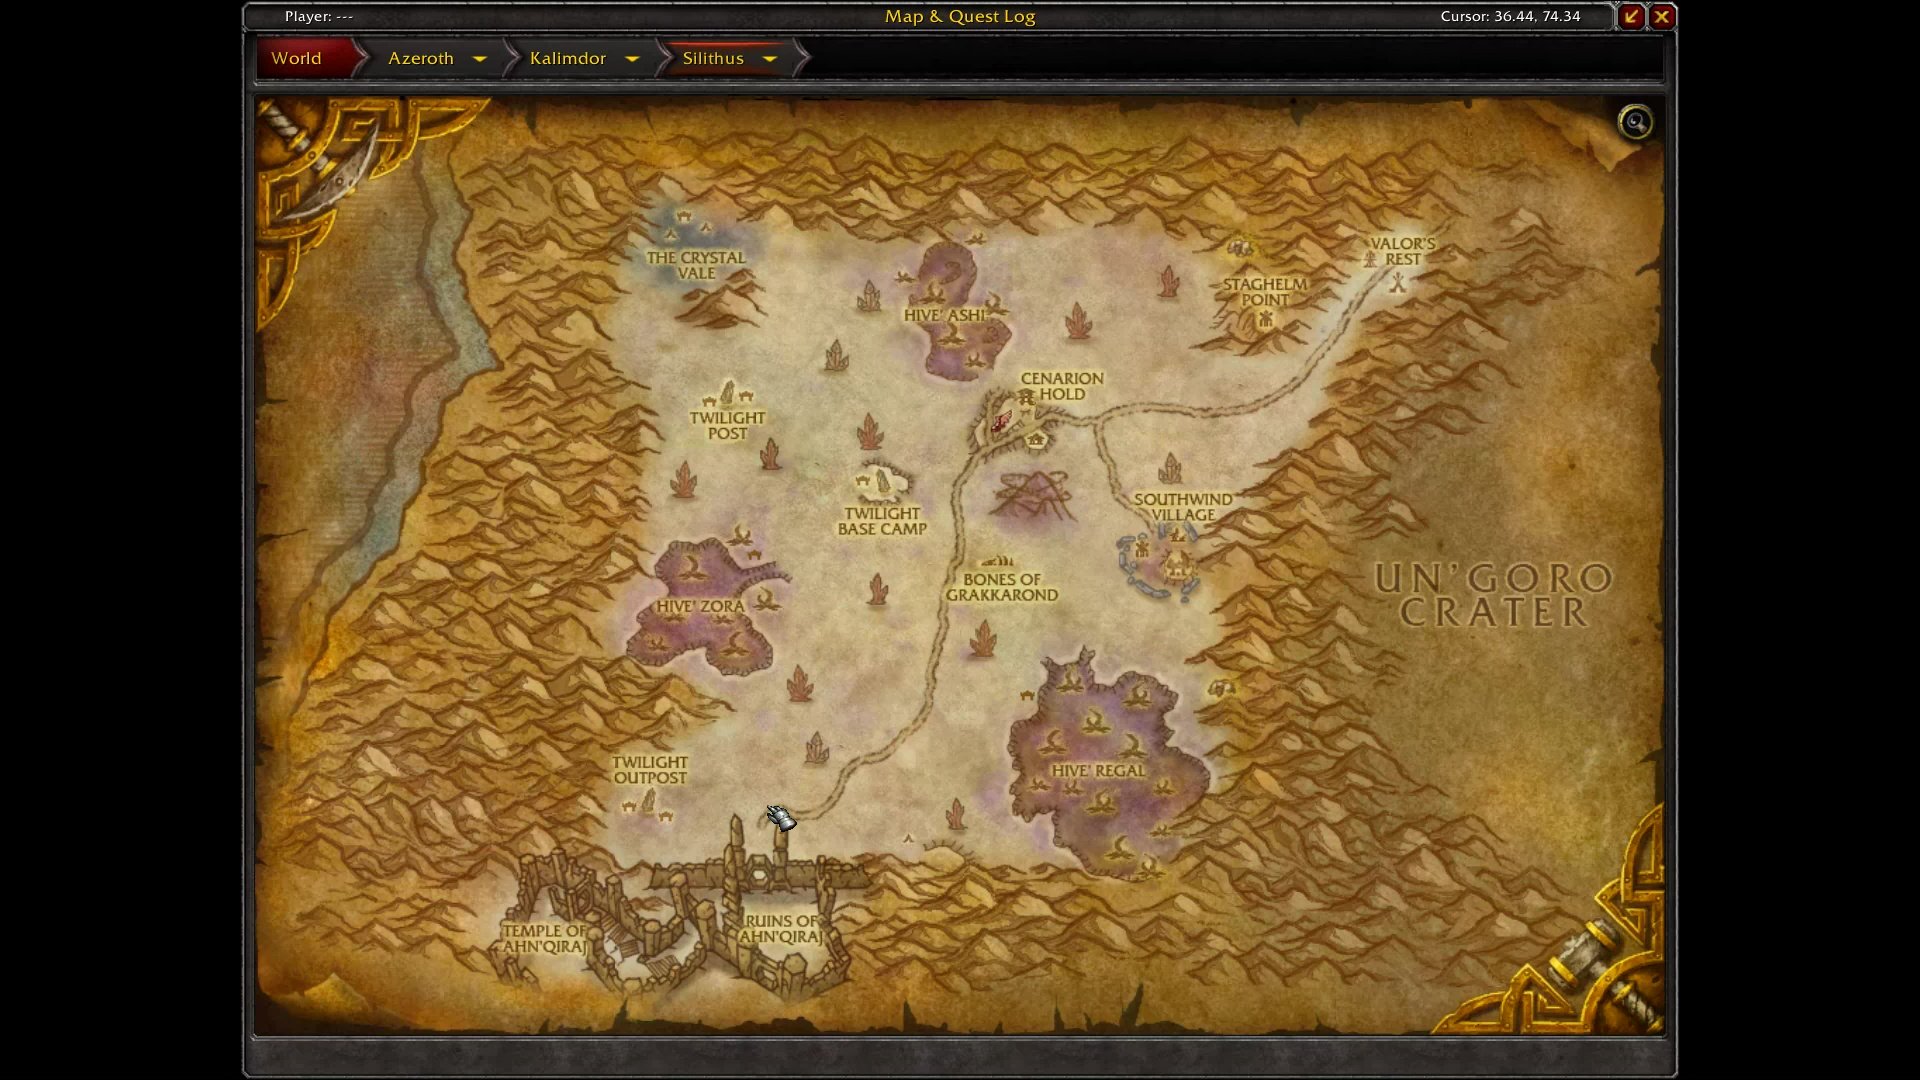
5. Enter the Temple of Ahn'Qiraj raid dungeon.
6. Kill all bosses (except Silithid Royalty, Ouroboros and Viscidus) to open the Twin Emperors room.
7. Reach C'Thun's room. No need to fight him. On the west side, outside C'Thun's room, are the three imprisoned dragons. Behind them is a stair. Go up the stairs. Click the Mind Larva on the table.

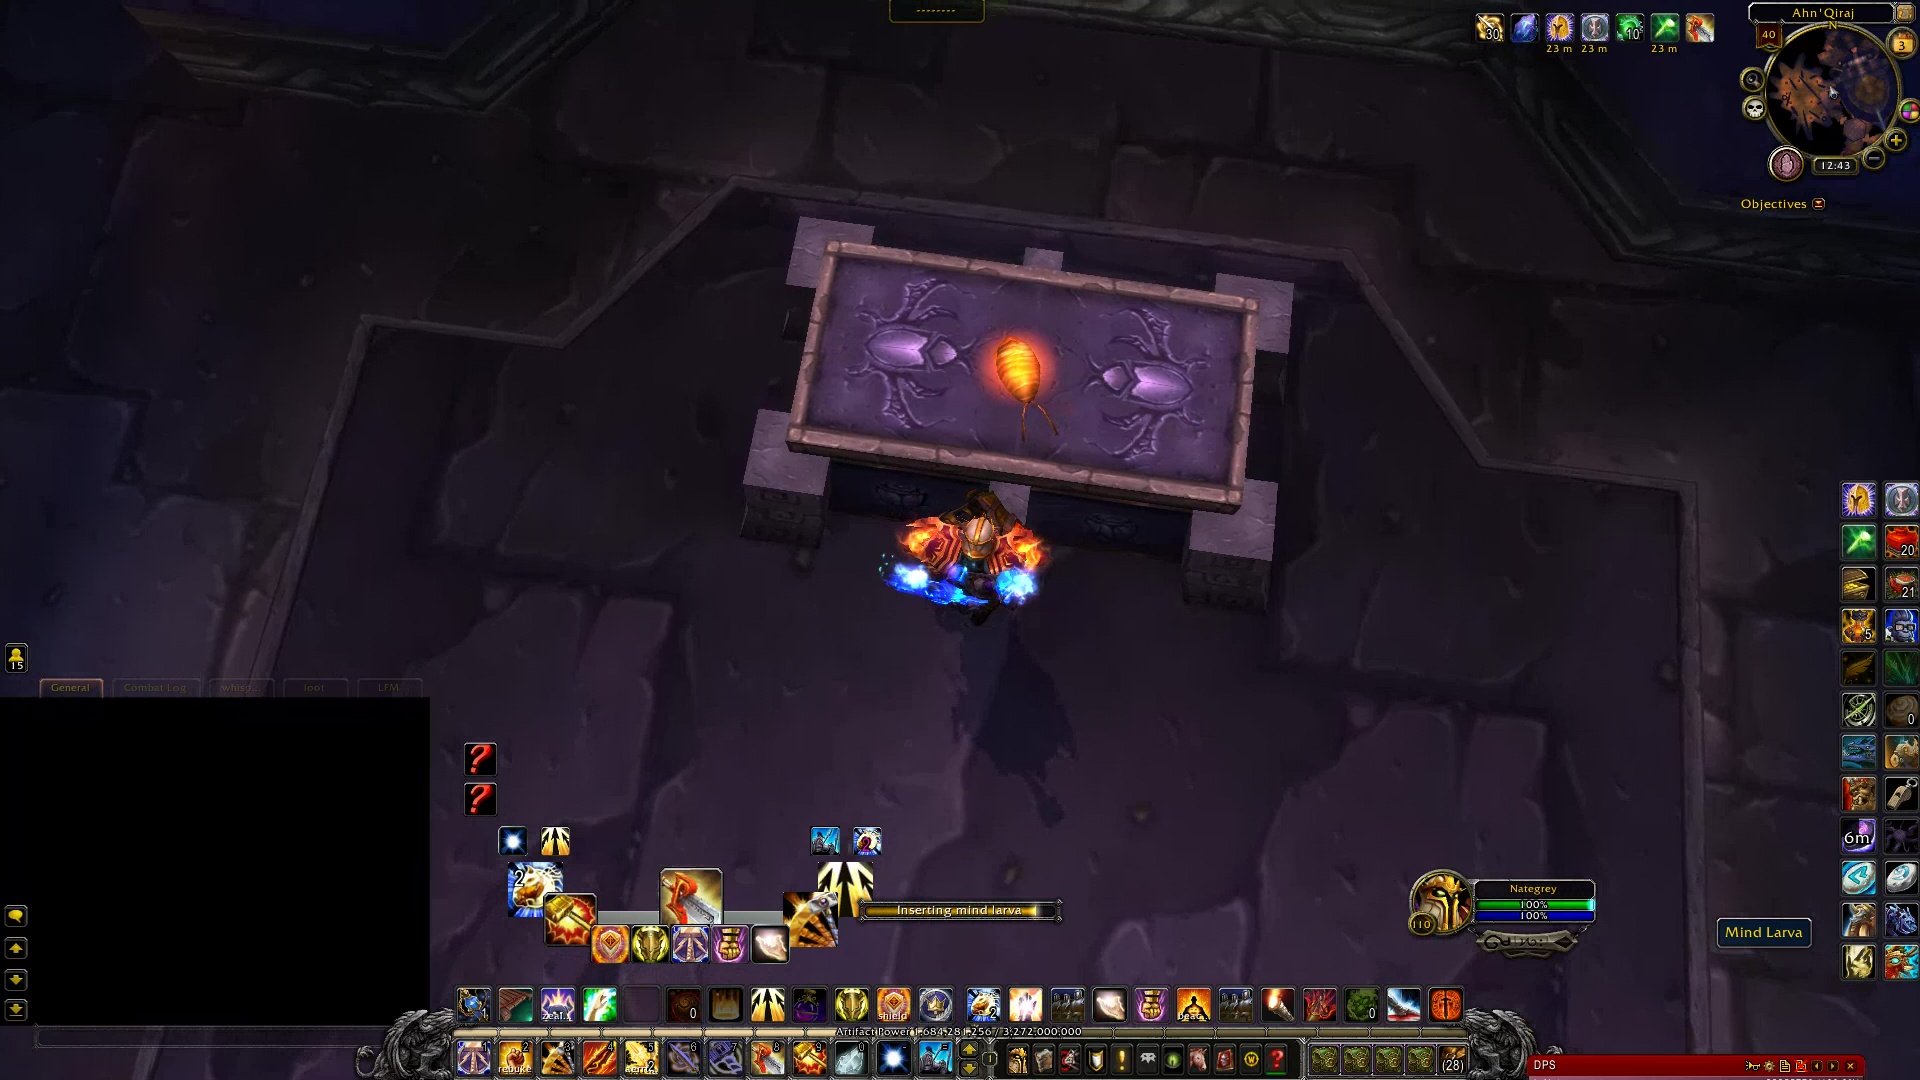
8. A buff is placed on your character enabling the Jewelcraft game. It is like Bejeweled.
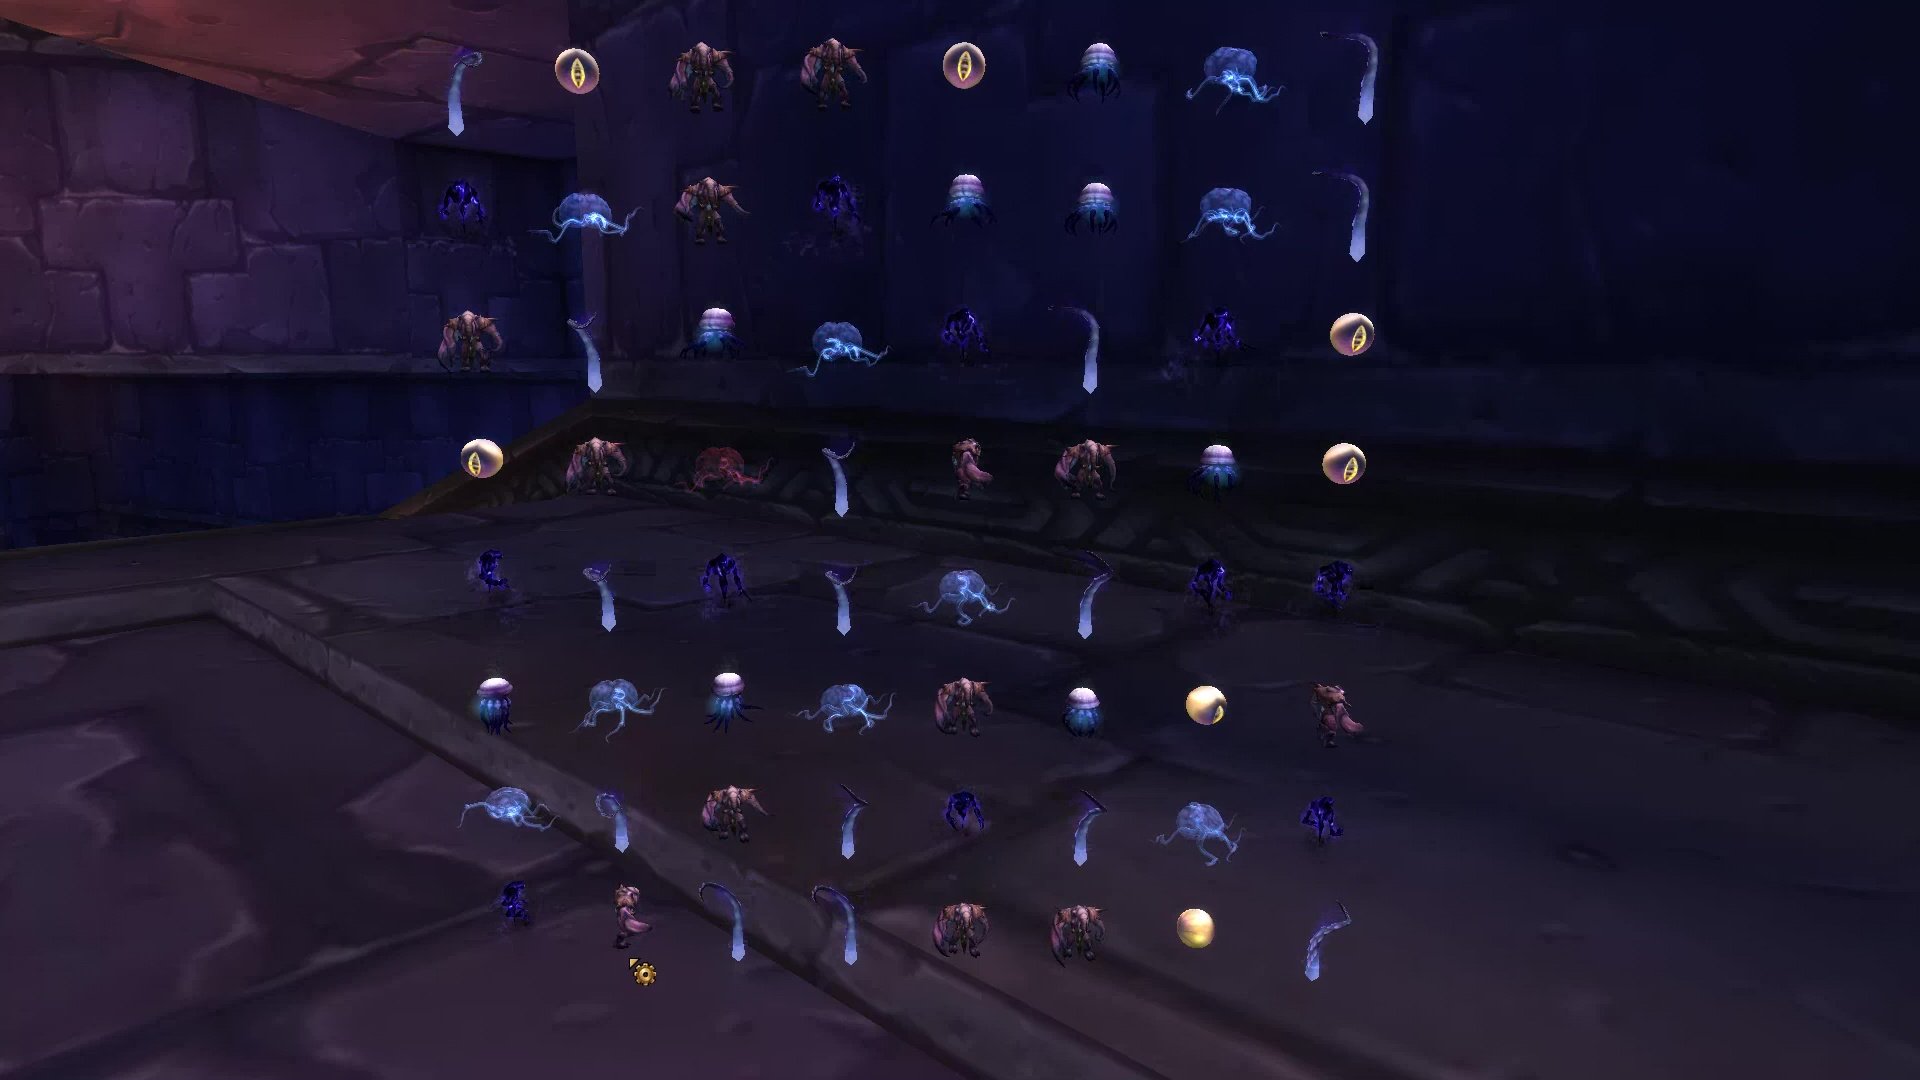
9. Move to the left wall to have a nice dark background. Click a figure, then click the figure you want to replace (works up, down, left or right. No diagonal). The goal is to line up 5 identical figures in a straight line (either vertically or horizontally).

10. When the Bejeweled mini-game ends, go back to the table. Next to the mind larva spawns a scroll. Click it. That takes you to the next part. 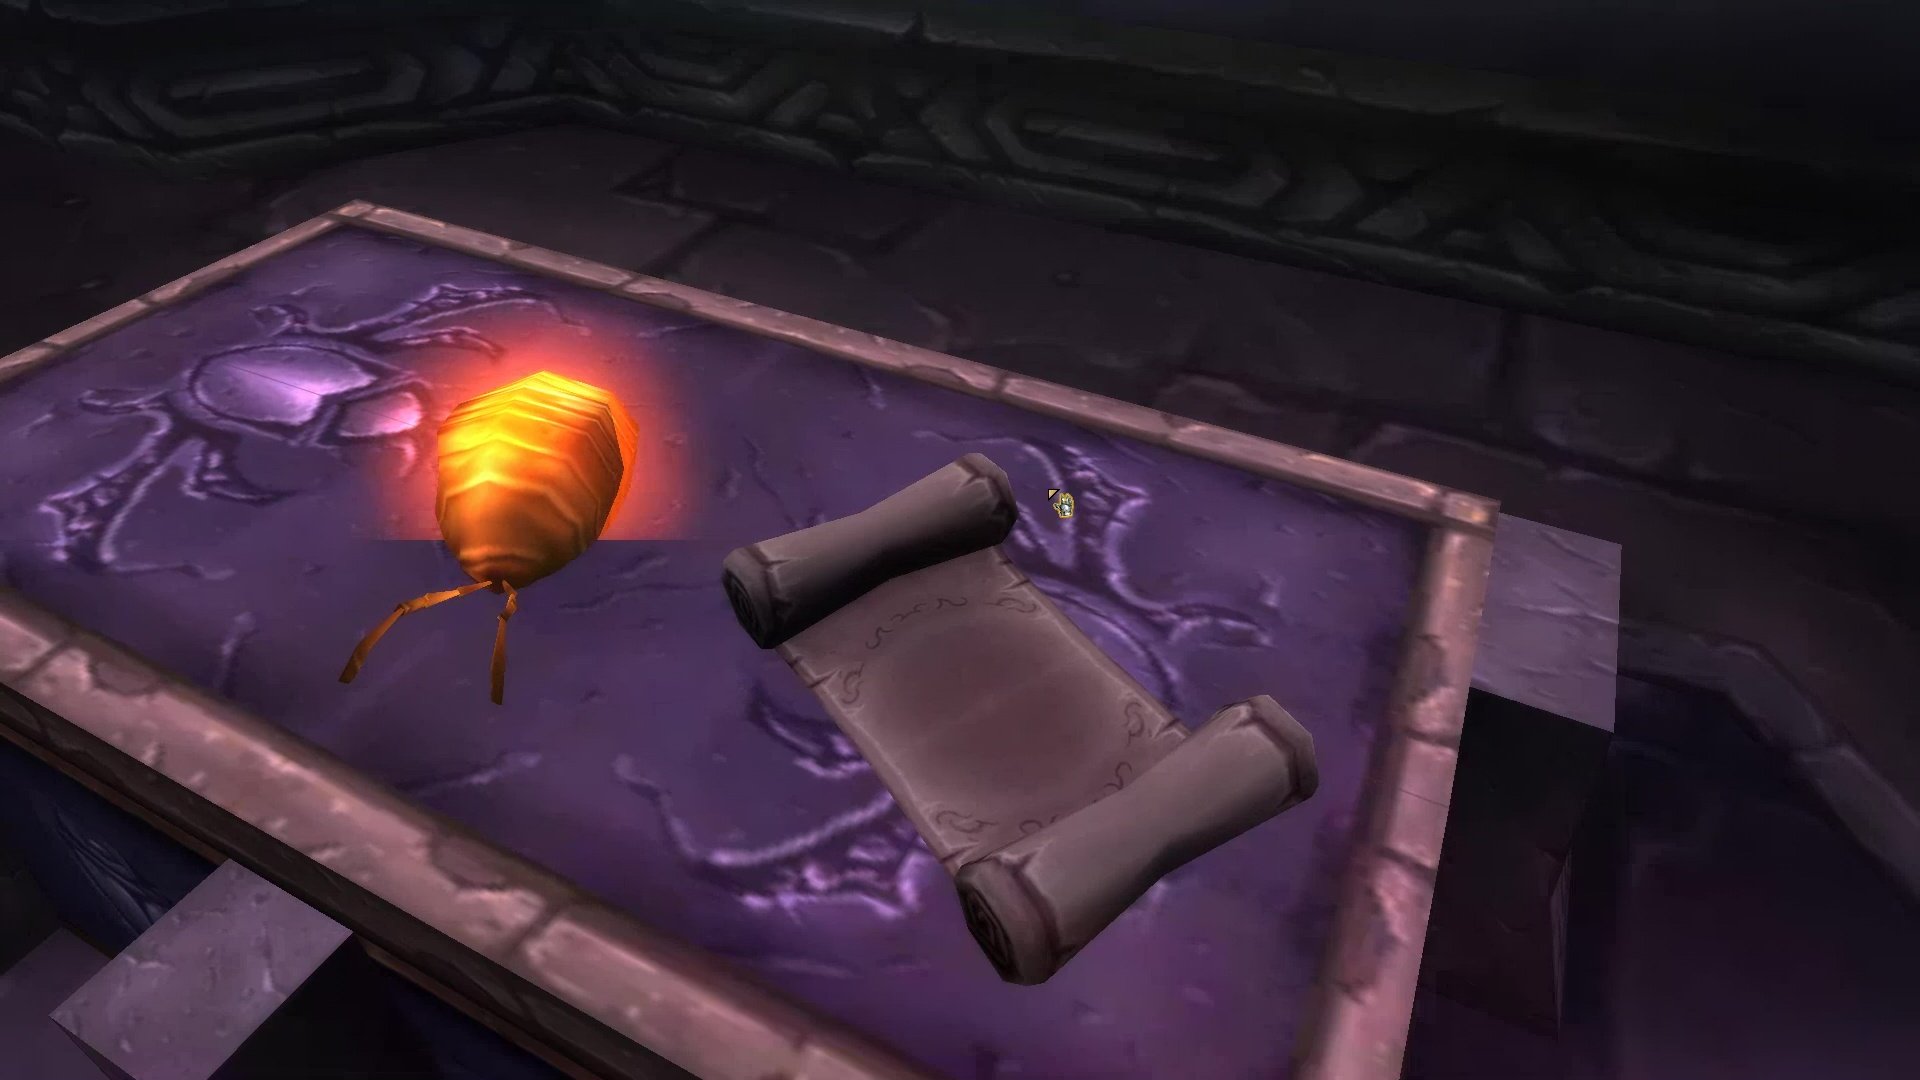
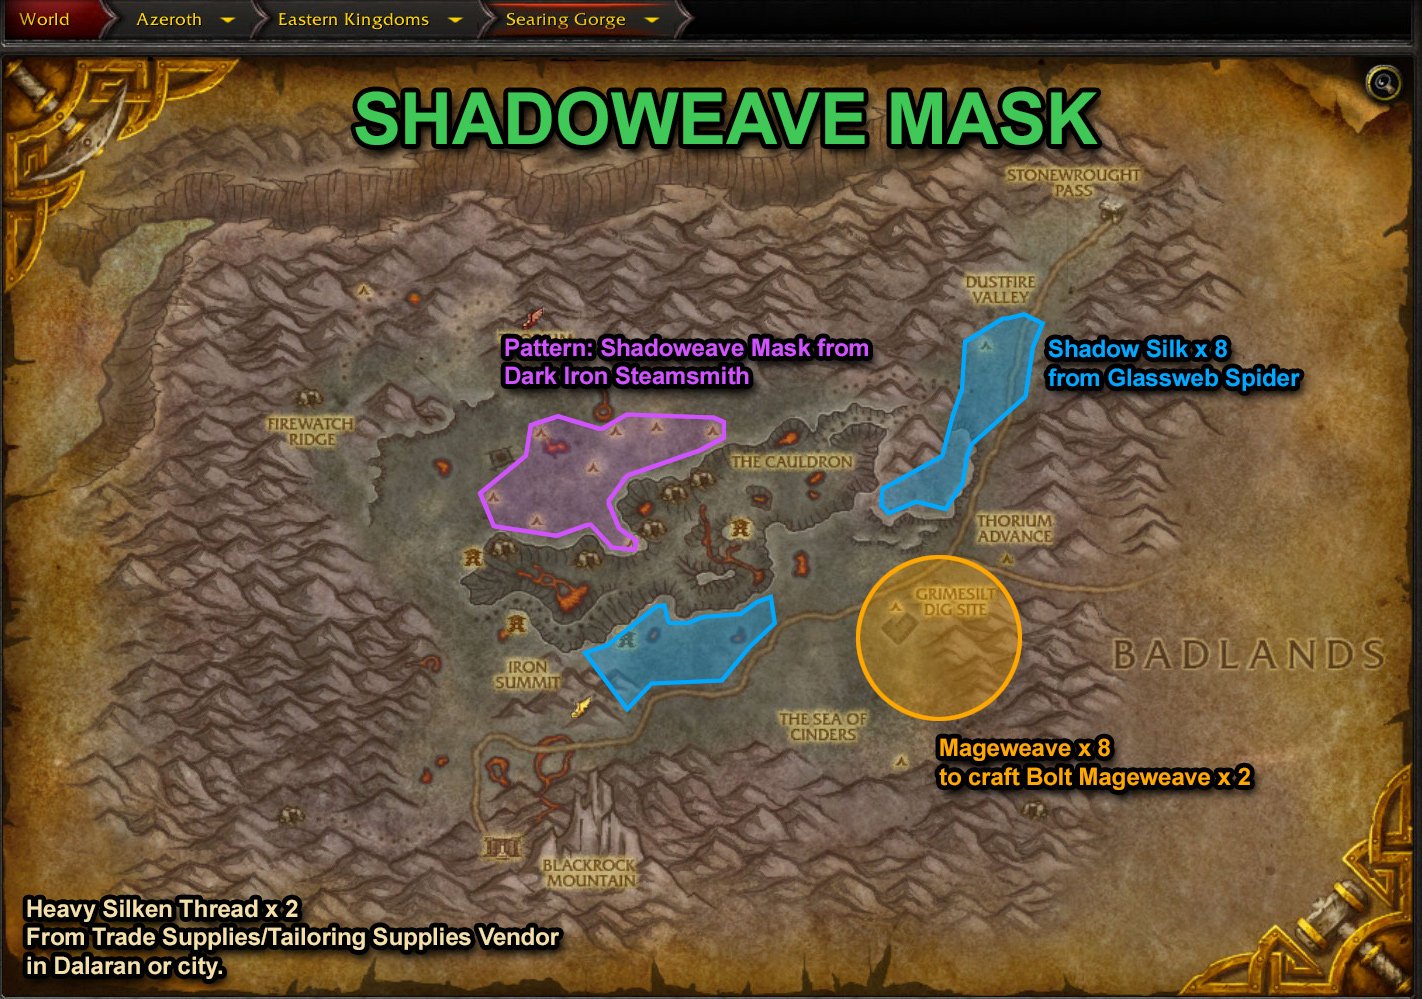
Before you head to Deepholme, you need first to acquire a Shadoweave Mask. Recommended not to buy from Auction House. Too many crooks want to sell it for 80,000 to 200,000 Gold.
If you have a friend with Tailoring, go to him/her. If you are a Tailor or you have an alt character with low level Tailoring that will do.
The Tailoring Pattern for Shadoweave Mask drops ONLY from Dark Iron Steamsmith. These spawn on the north side of the center of Searing Gorge (near tents). They have about a 2 minute respawn. Likely longer than that.
**If you have the Direbrew's Remote from the Brewfest Event, that will teleport you to Blackrock Depths, which is a few steps from Searing Gorge.
1. Wear the Shadoweave Mask.
2. Go to Orgrimmar or Stormwind.
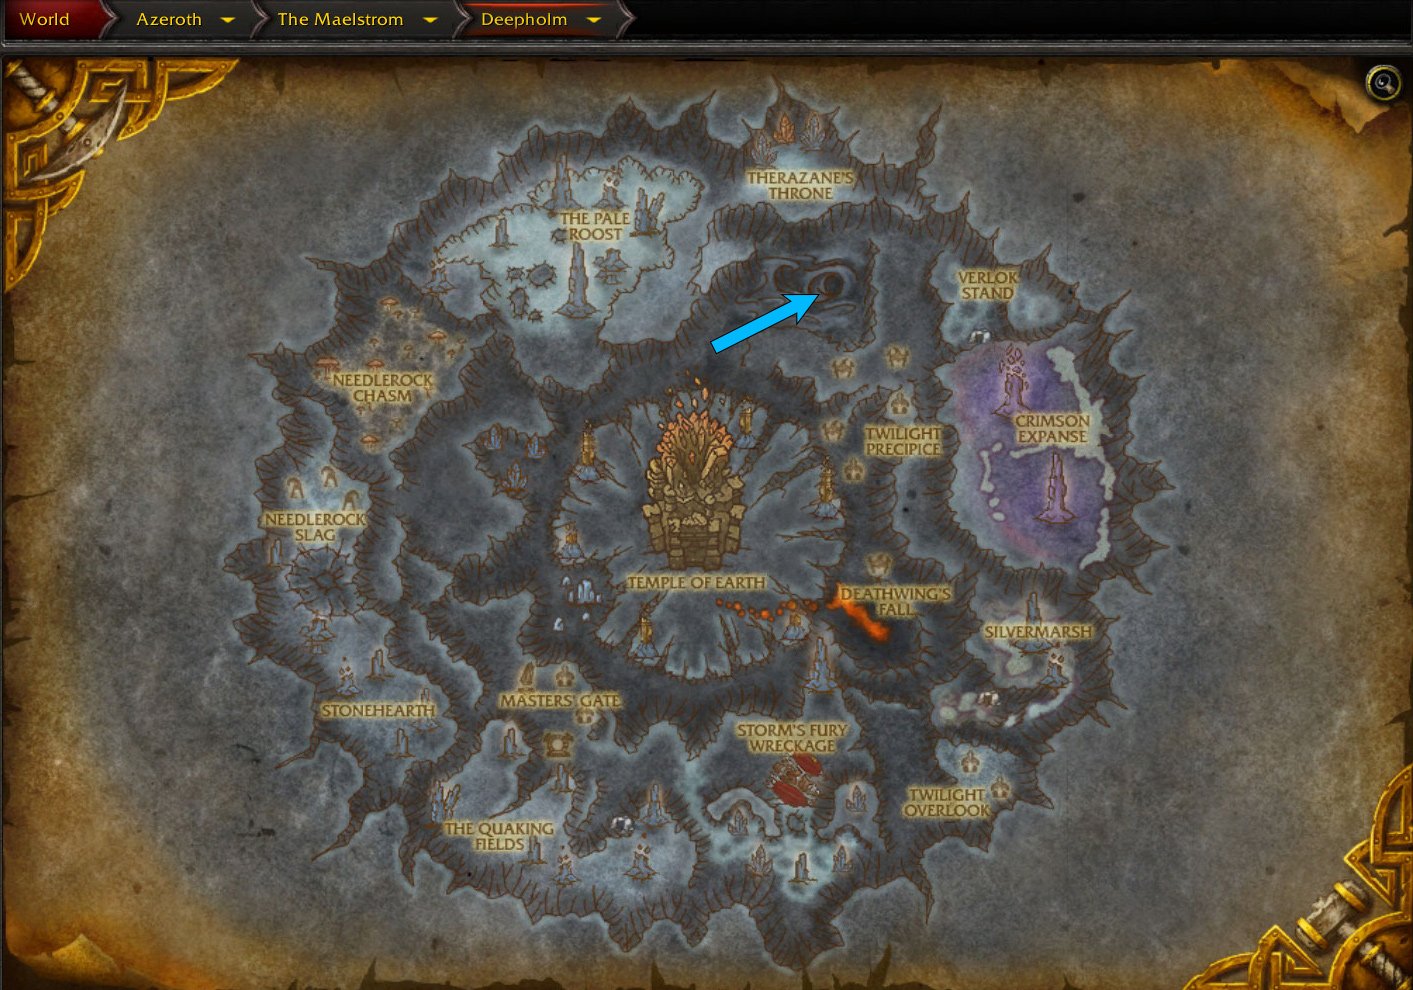
3. Take the portal to Deepholm.
4. In Deepholm, fly north toward the Crumbling Depths, and enter the big hole to navigate the cave.
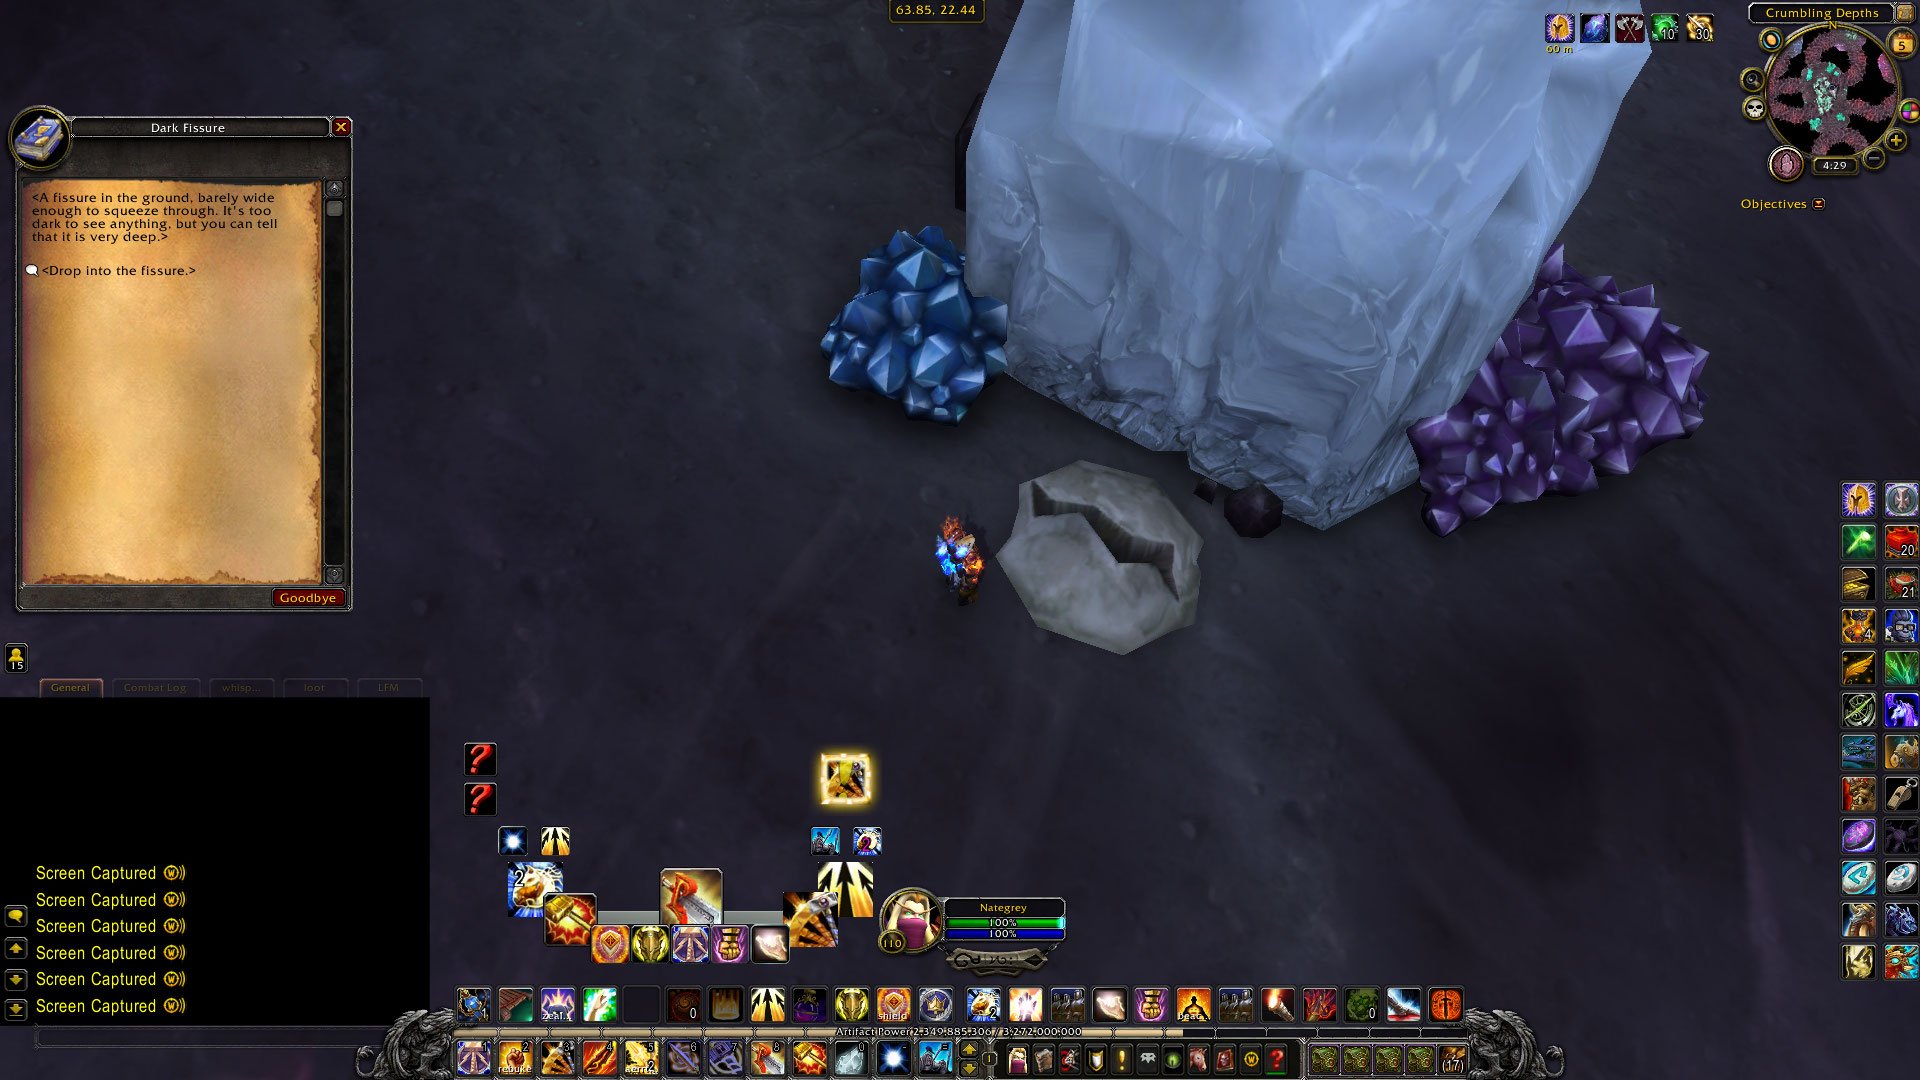
5. Go past the giant worm that runs around the circle. Click the Dark Fissure.

6. Click the dialogue bubble: Drop into the Fissure.
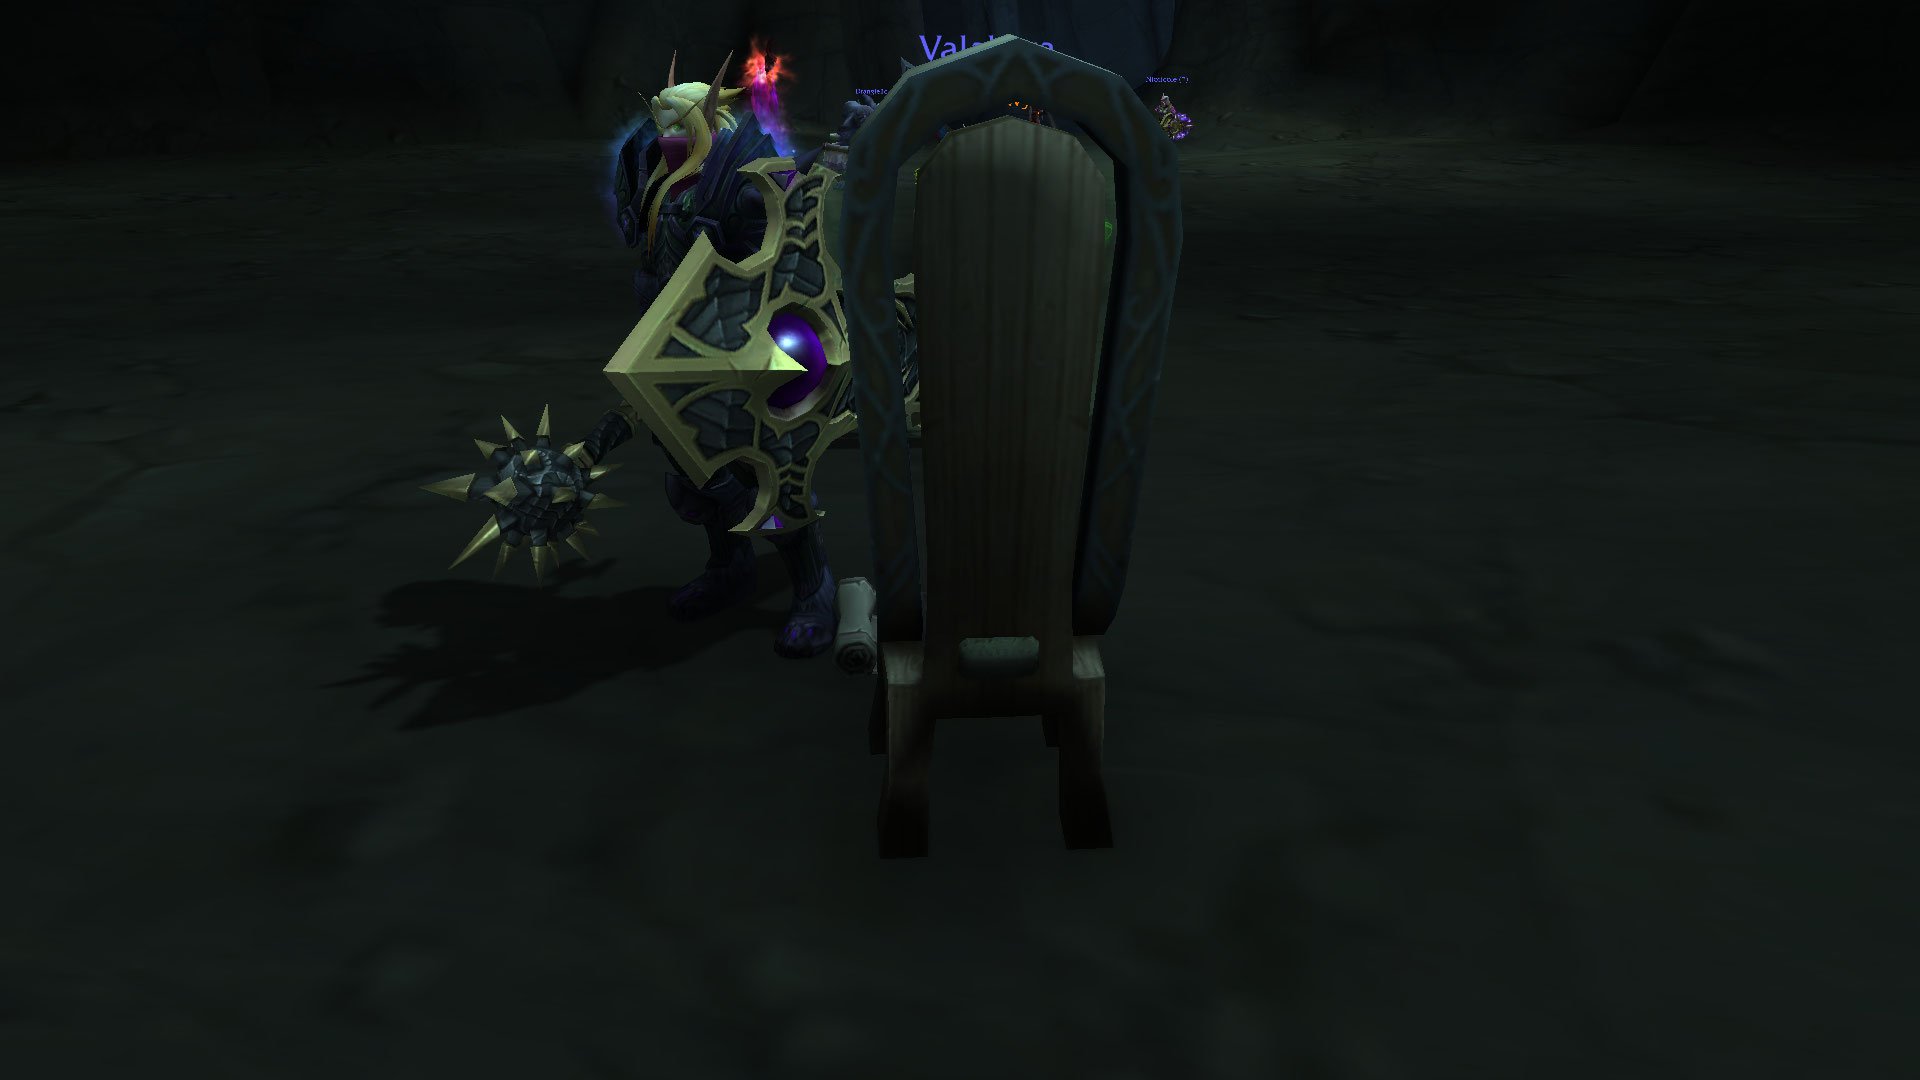
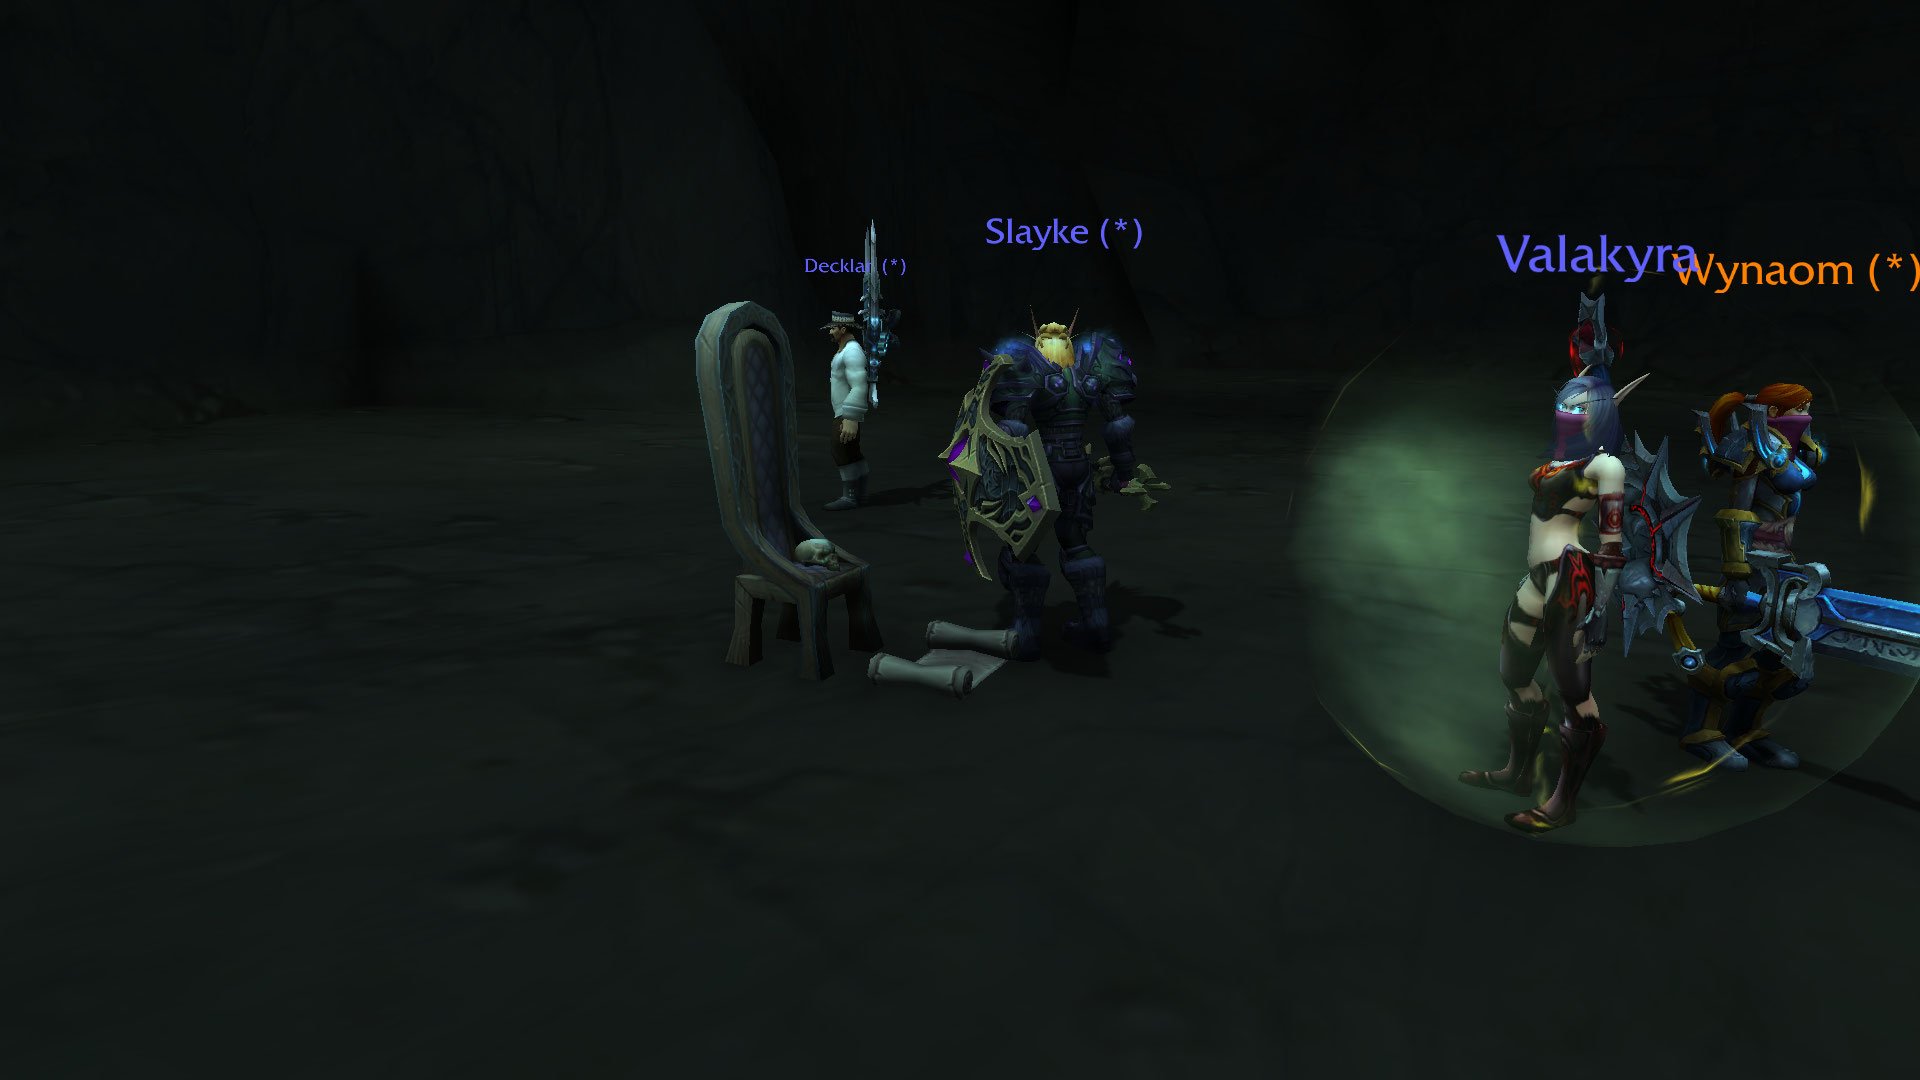
7. There is a chair in the room. Go behind the chair, then click the plaque. The next part requires you were wearing the Shadoweave Mask before you entered the Dark Fissure. The Shadoweave Mask allows you to click the skull on the chair. Clicking the skull spawns a scroll in front of the chair. Click the scroll. (If no scroll appears even if you have the Shadoweave Mask on your head slot, logout and login. It is a phase issue. It happened to me).
Next part: Gnomeregan.
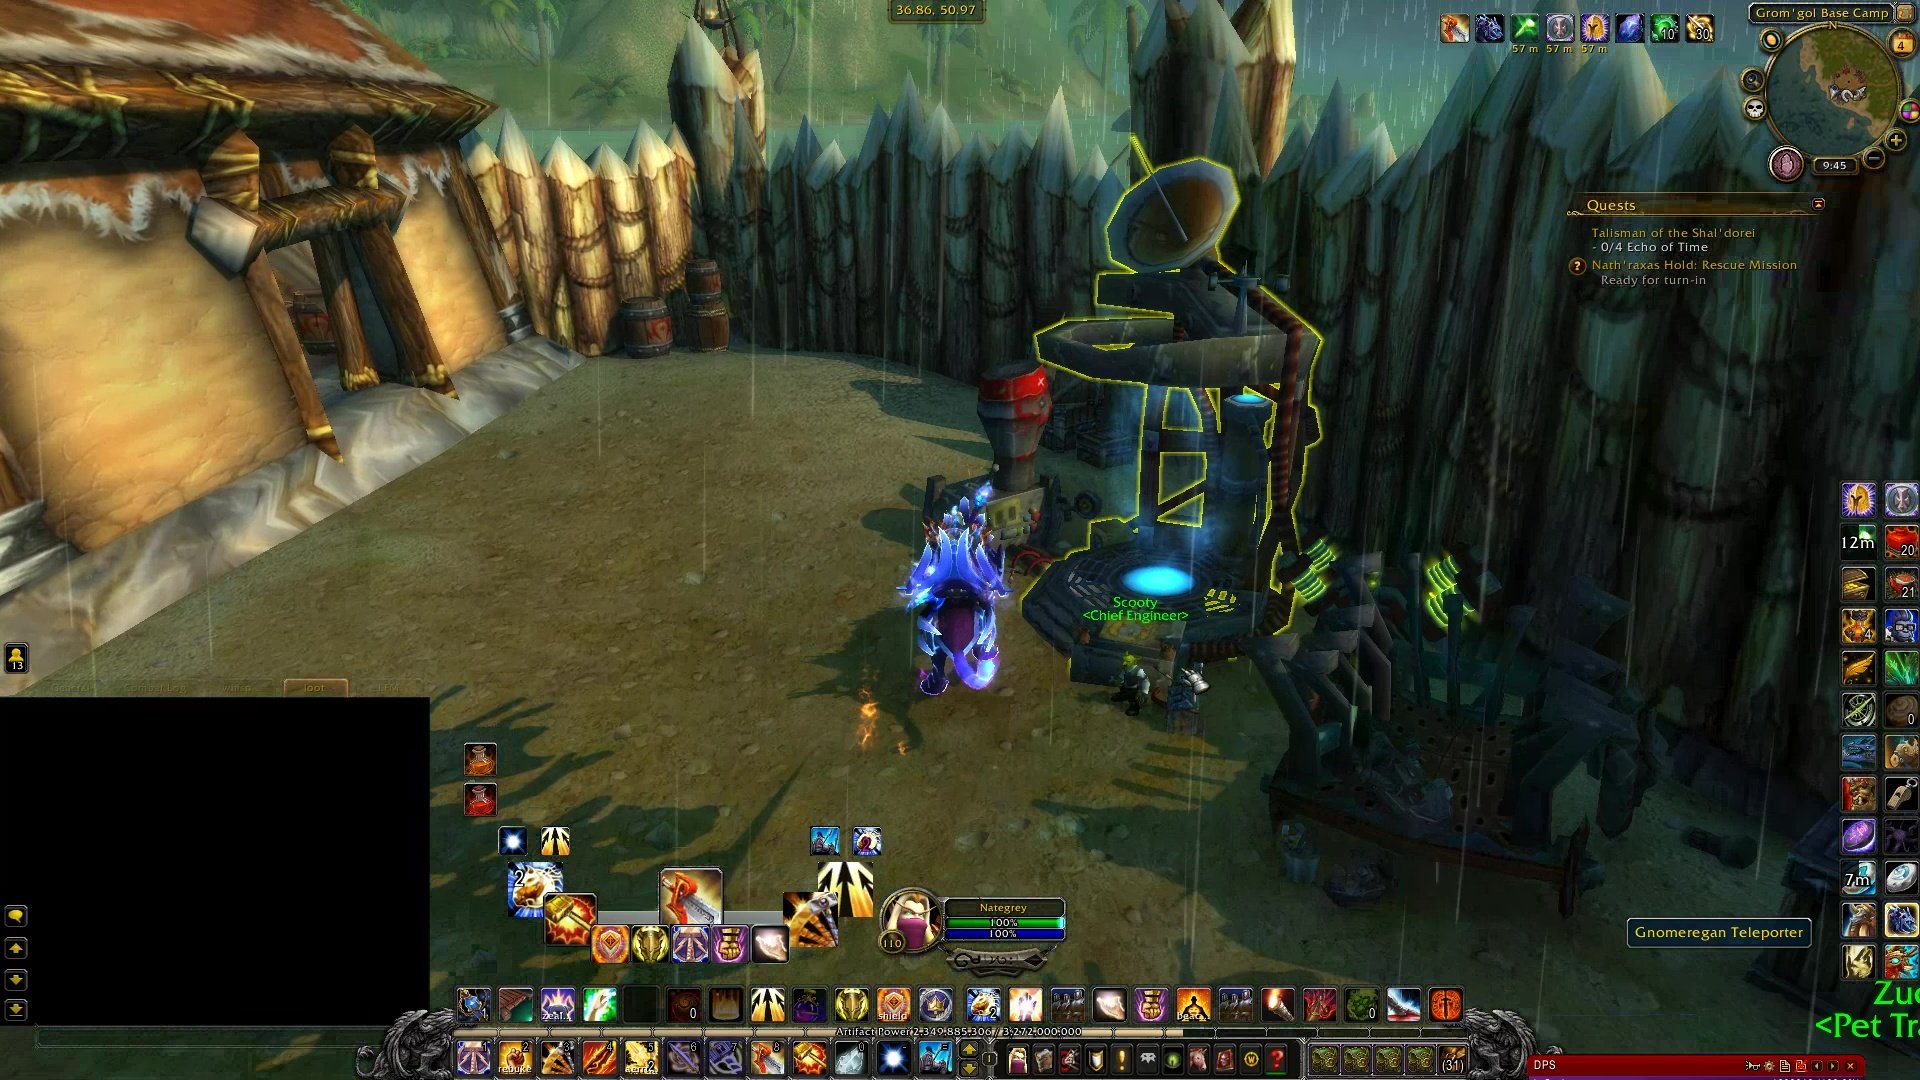
1. ALLIANCE: Go to Iron Forge. Travel to Gnomeregan. HORDE: Go to Orgrimmar or Undercity. Take the Zeppelin to Grom'gol Base Camp (in Stranglethorn Vale). Beneath the Zeppelin tower in Grom'gol is the Portal to Gnomeregan (next to Scooty). Step in (no click needed).
2. Inside the Gnomeregan dungeon, jump down at the Hall of Gears.
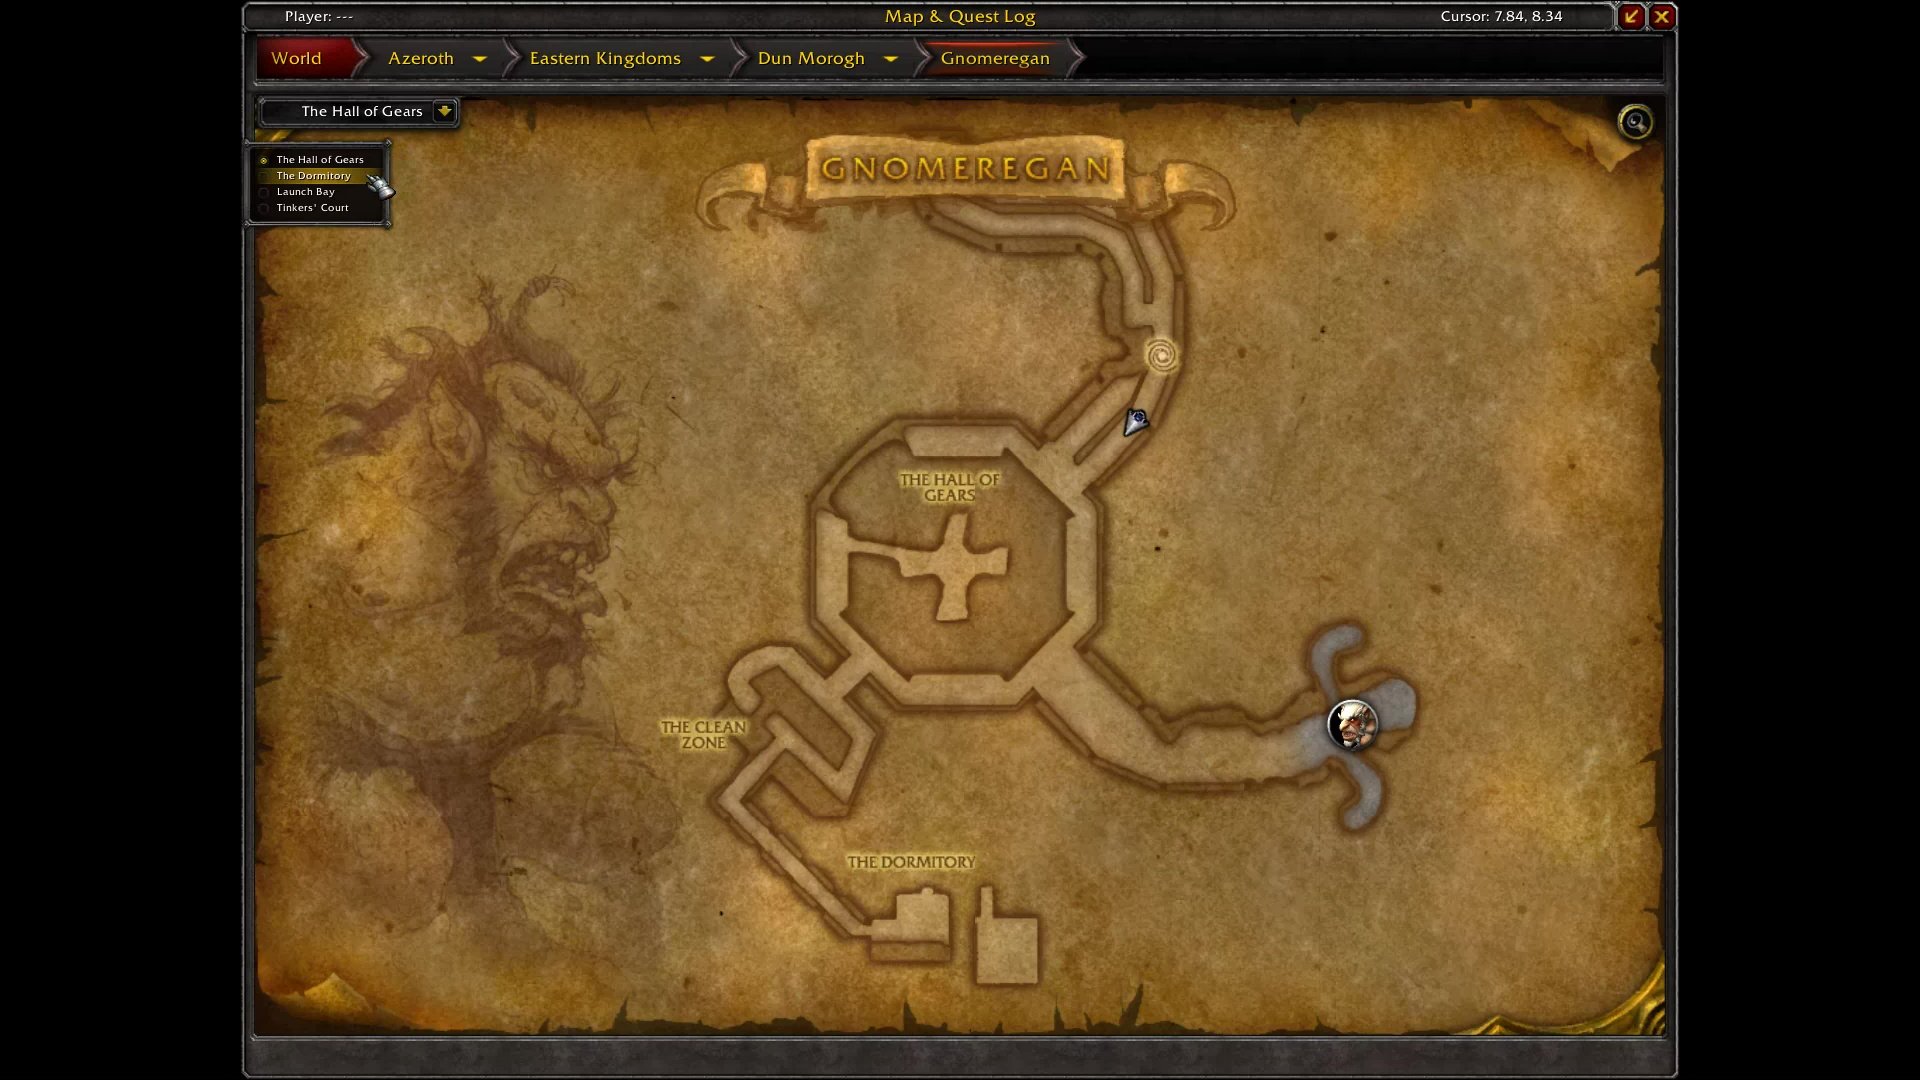
3. After you jump down at Hall of Gears, the map changes to this. Now head west toward the Launch Bay.
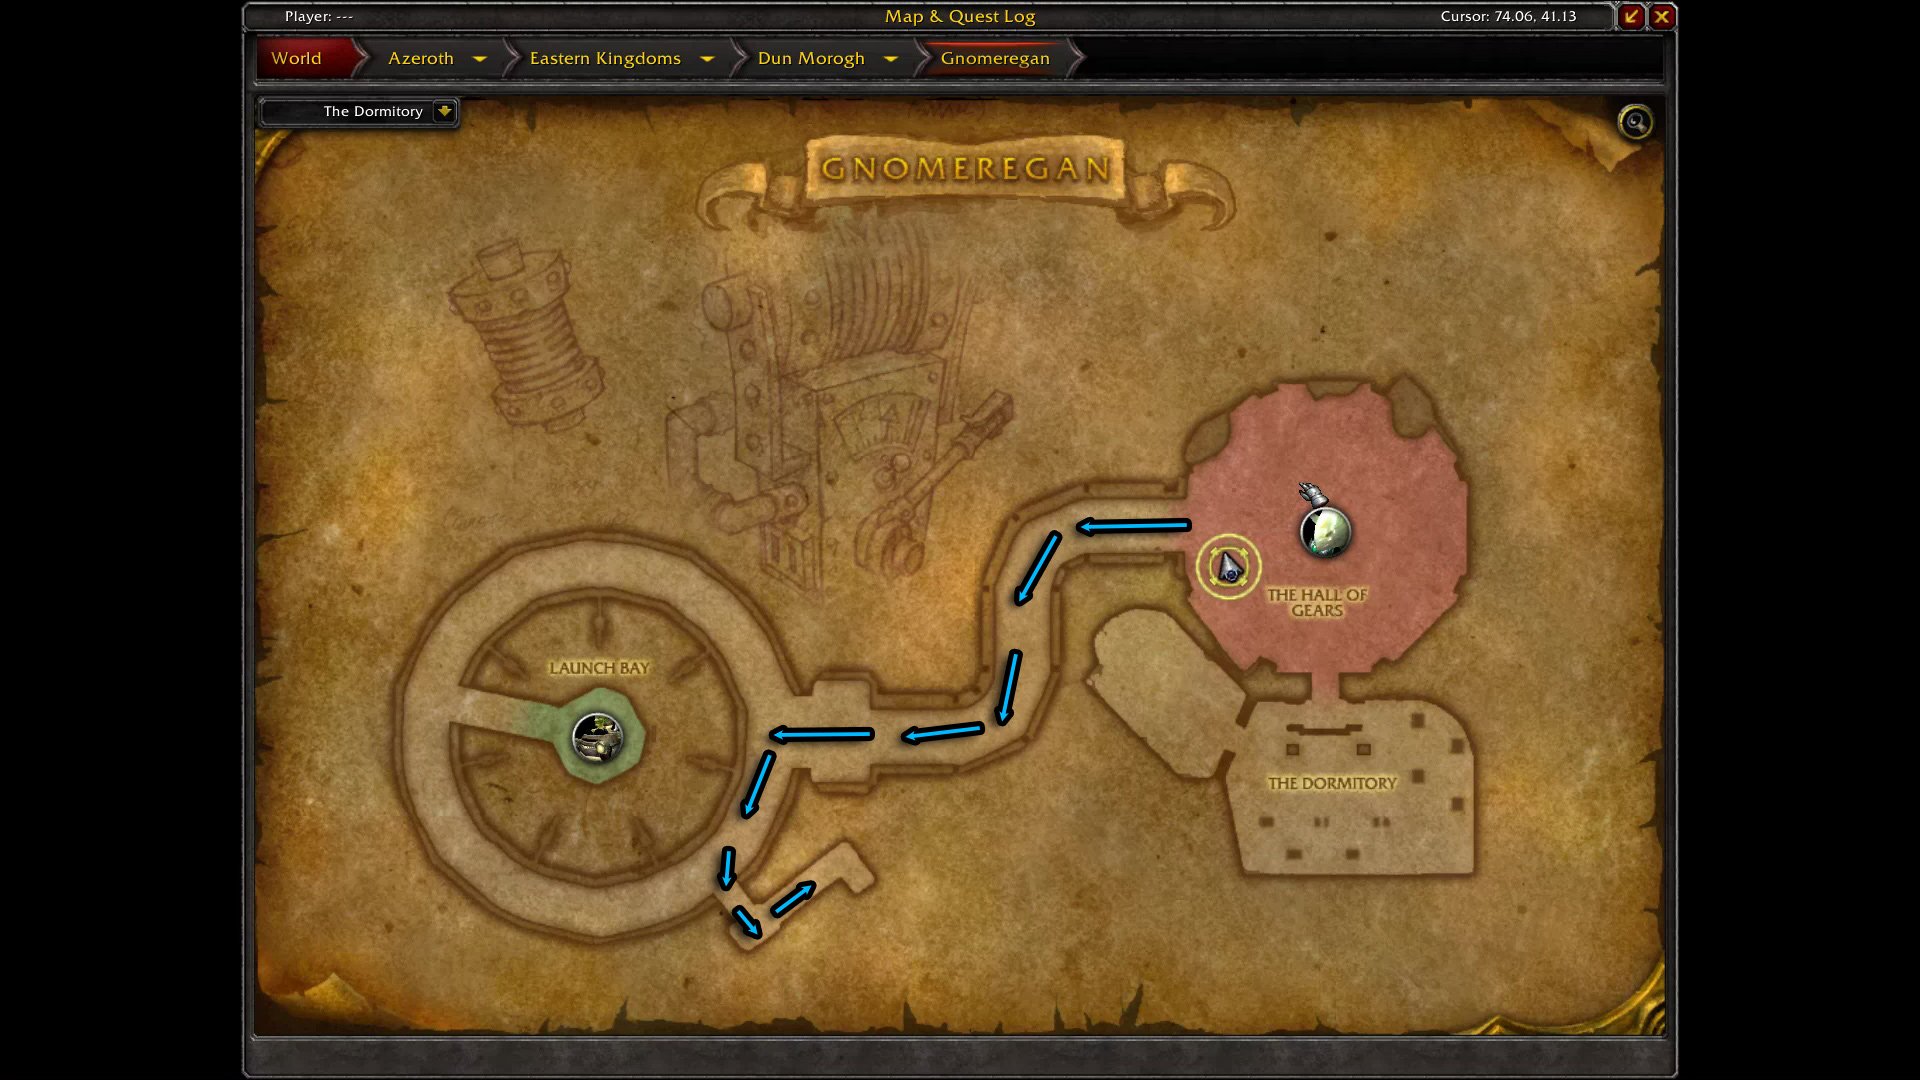
4. After going down the ramp, the map changes to this. The green dot marks the desired destination.
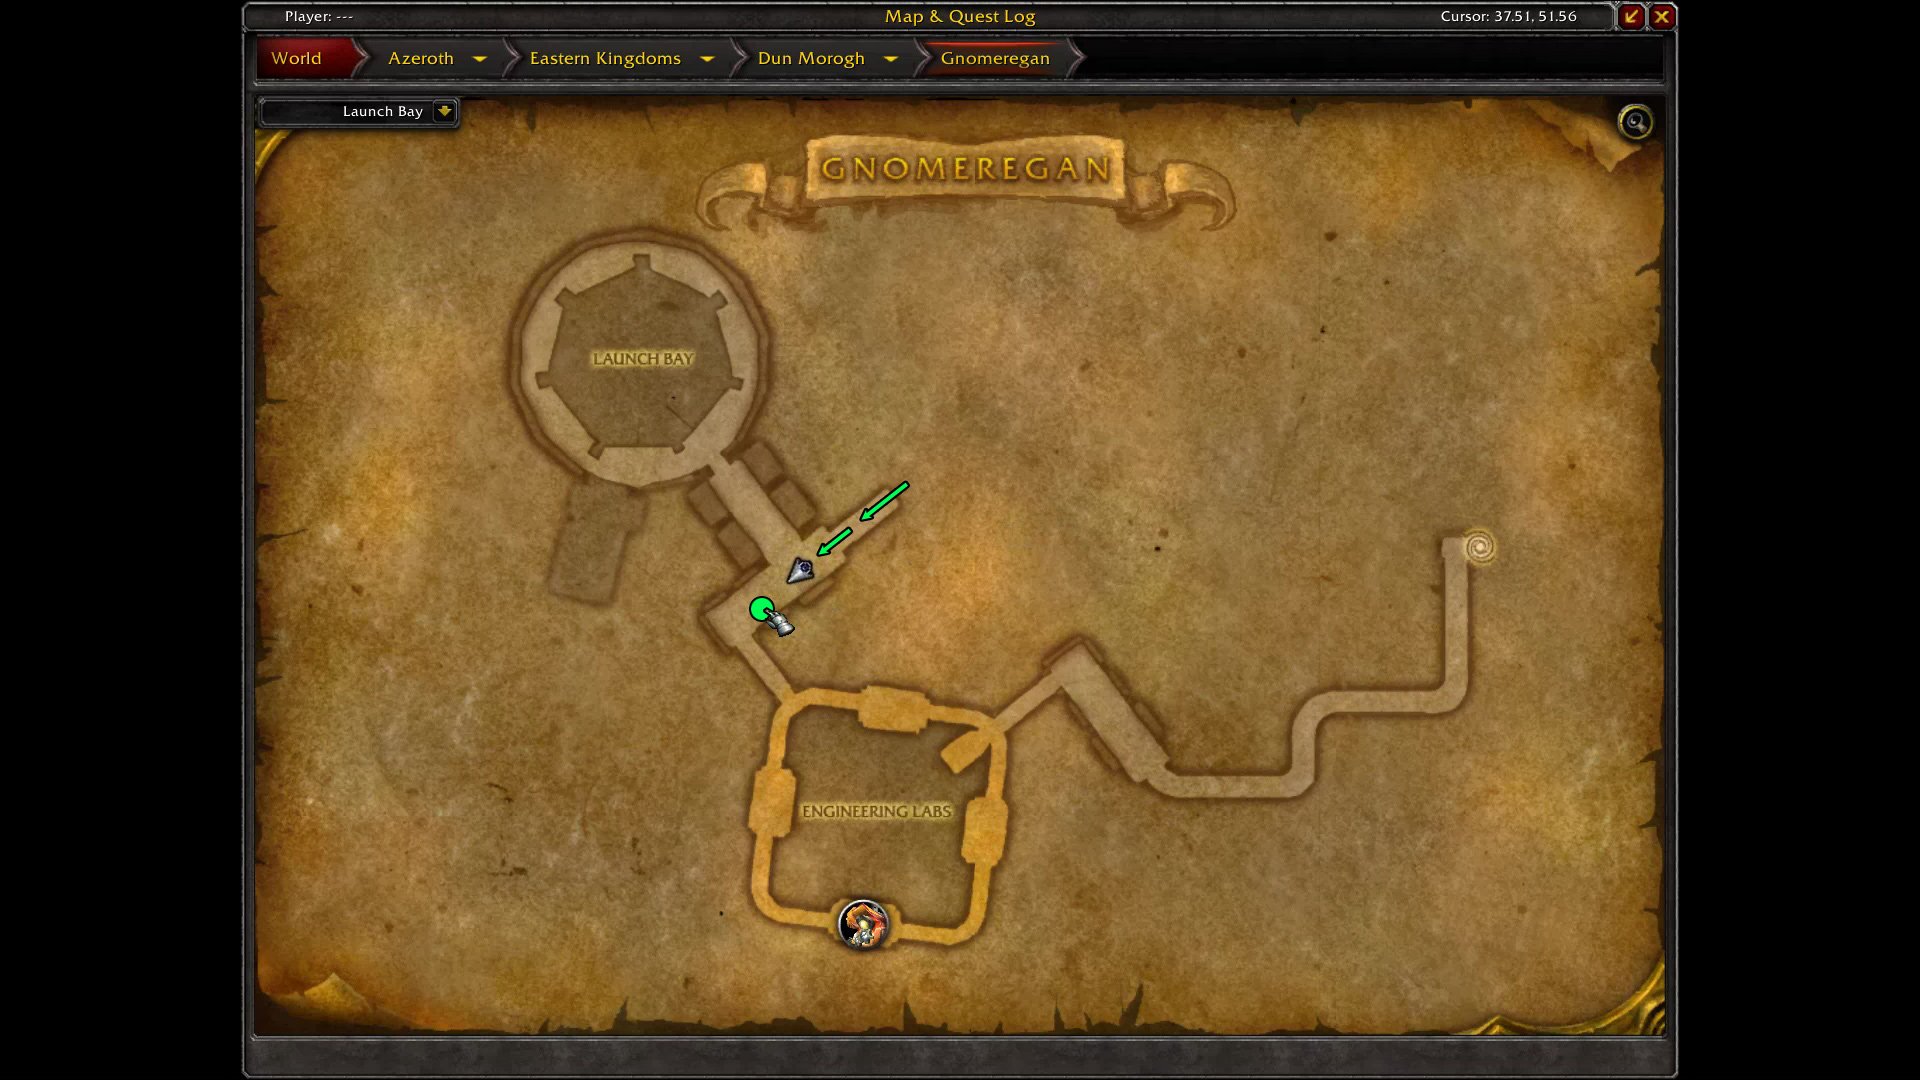
5. You will find 10 Numerical Consoles with 2 levers each, for a total of 20 levers. Click the silver plaque above the consoles
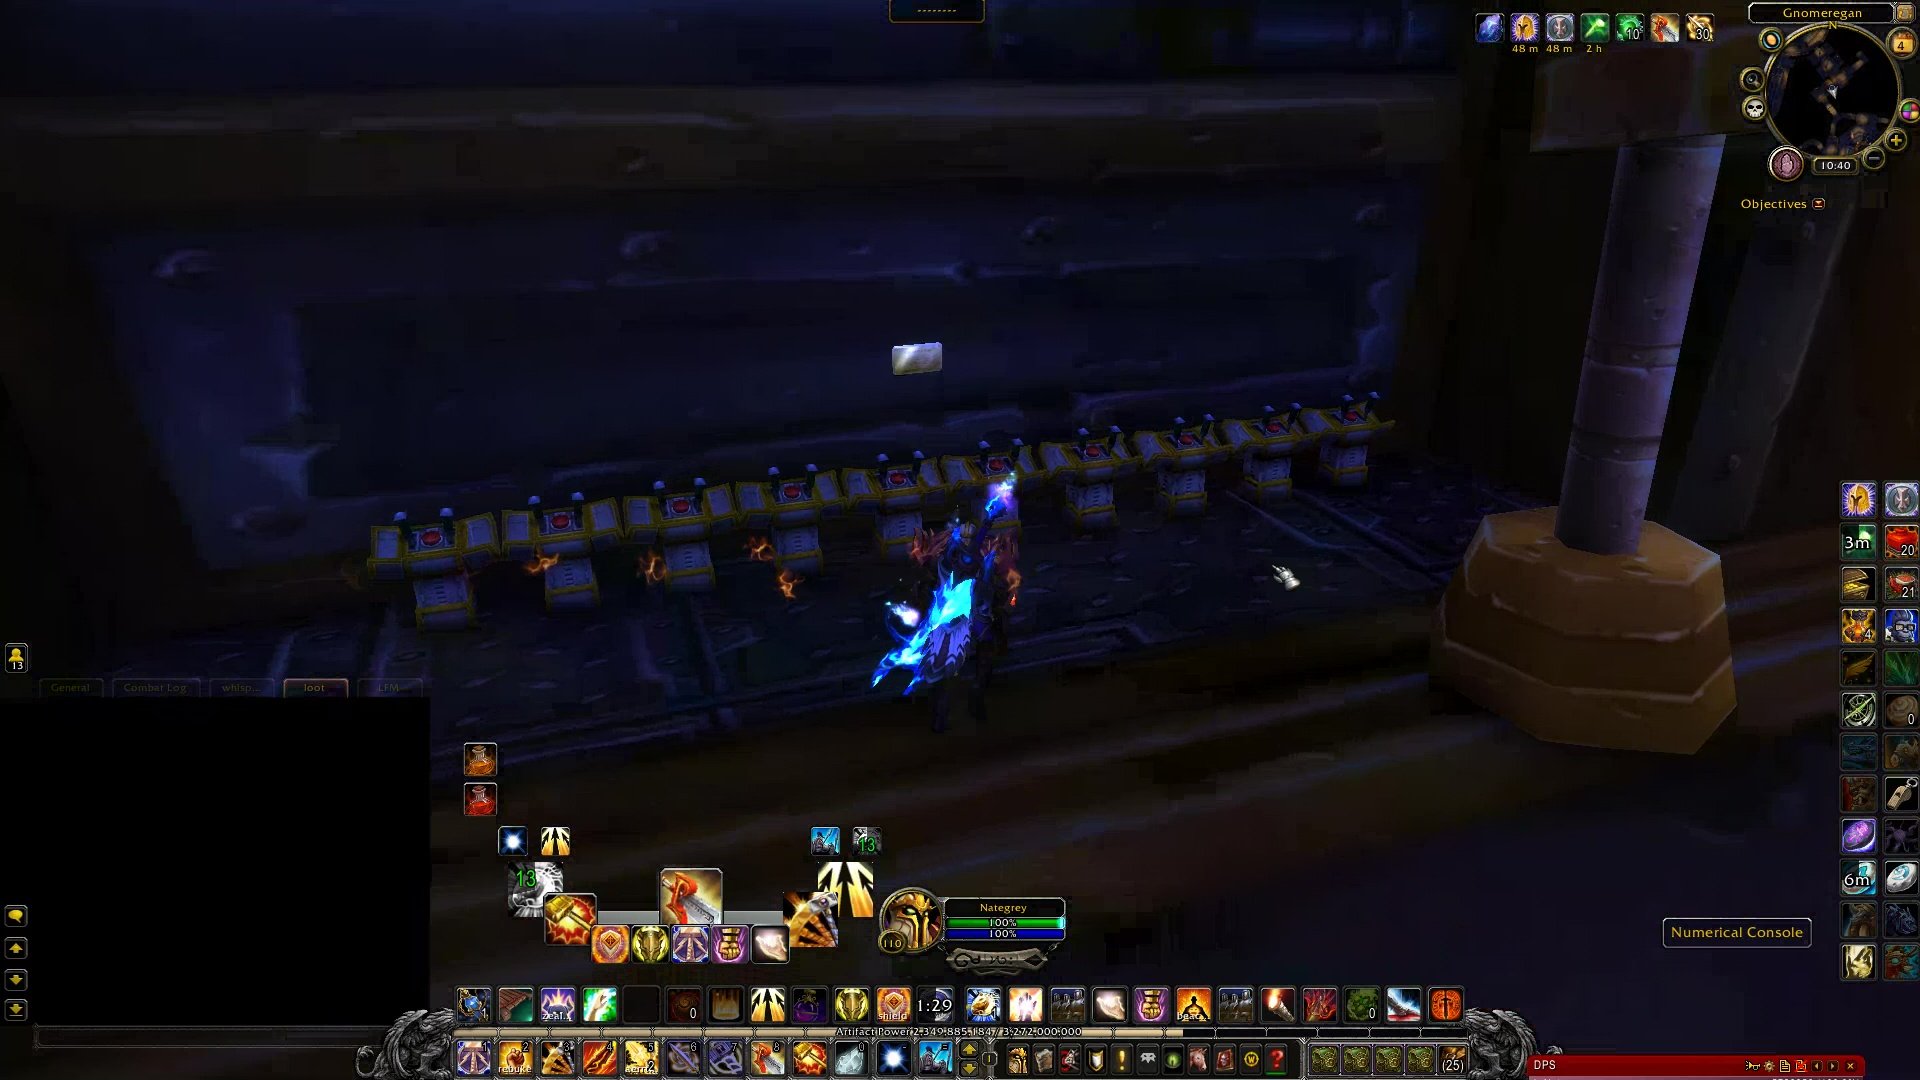
6. When you click a console, this is the dialogue bubble that opens up. All consoles say: "The console displays a number 1."
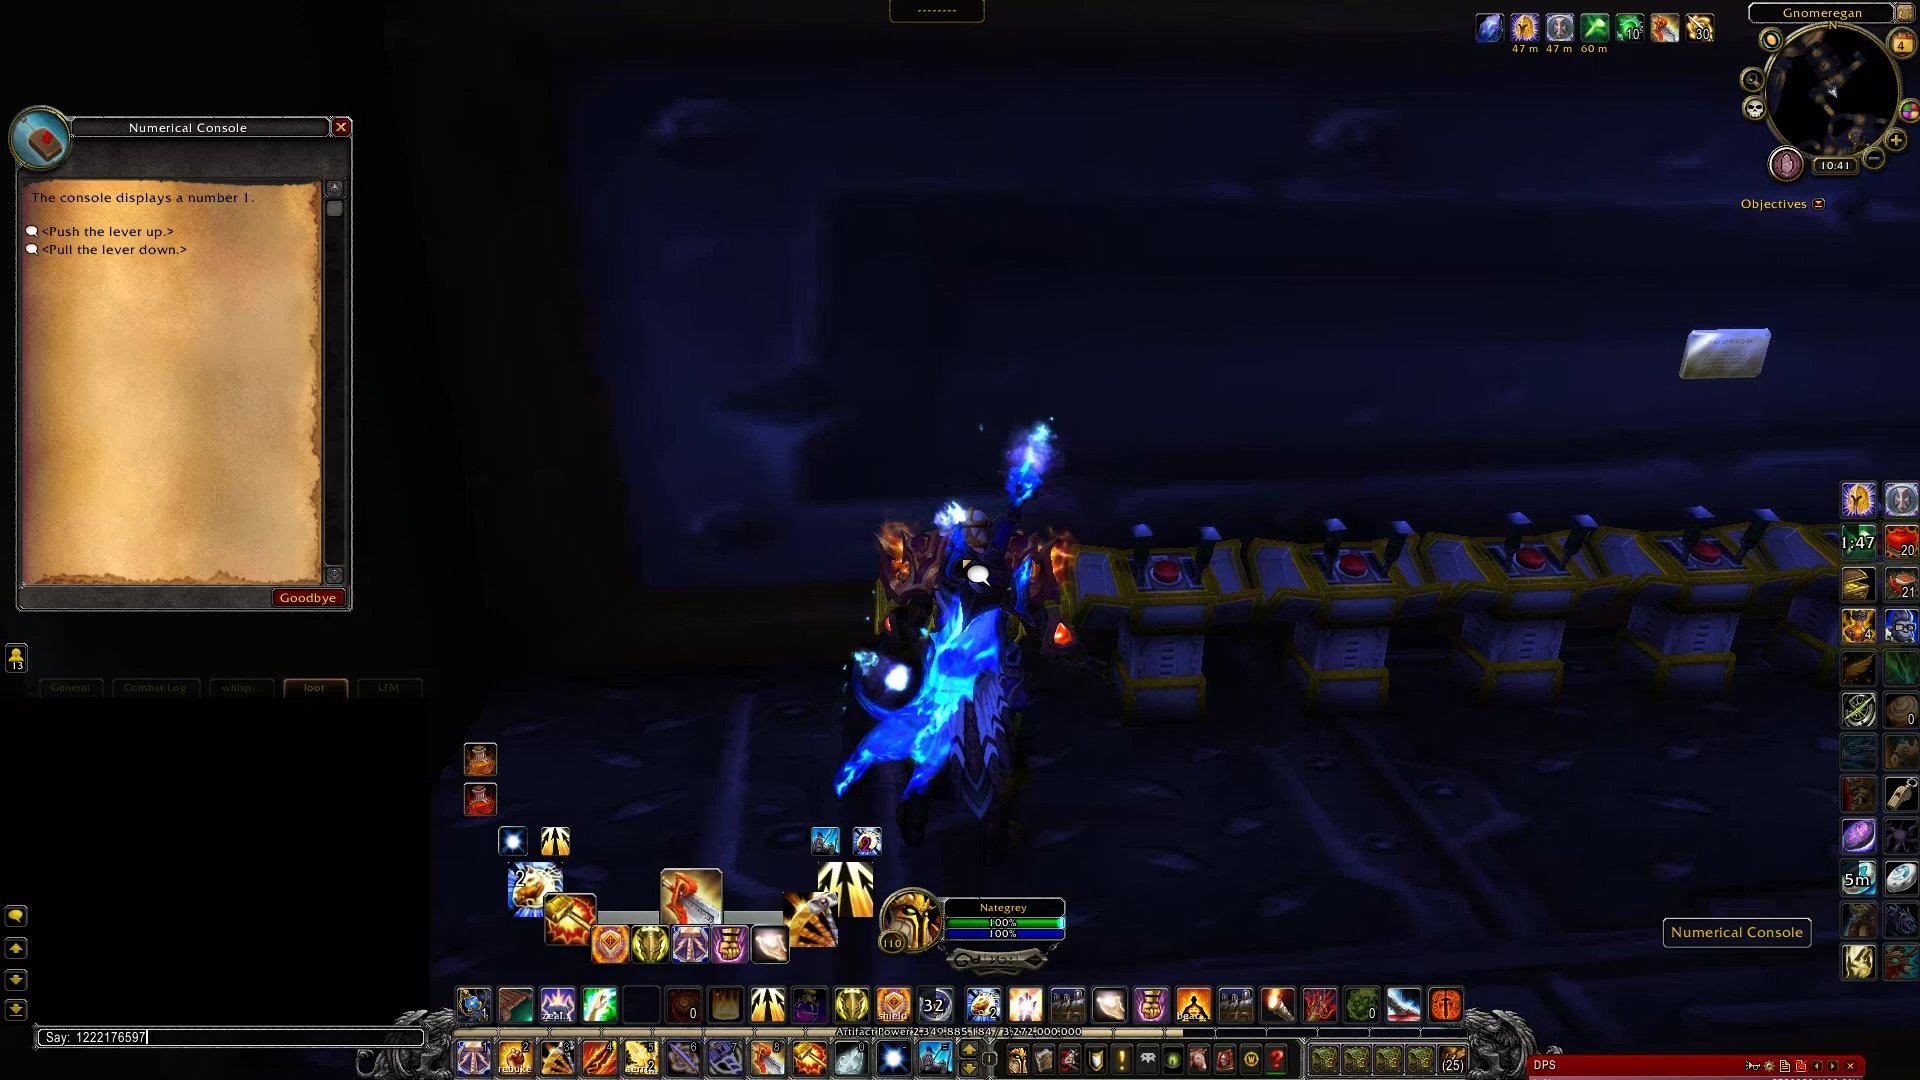
Explanation: Pushing the lever up = Adds +1 and now it will say instead: "The console displays a number 2." If you click the "Push the Lever up" again, it will now say: "The console displays a number 3." and so on. Pushing the lever down = substracts -1. Now that you caught up the drill, let's move on to the next part.
7. These are the numbers that solve the puzzle: 1222176597
From Left to Right:
Console 1 must say: 1
Console 2 must say: 2
Console 3 must say: 2
Console 4 must say: 2
Console 5 must say: 1
Console 6 must say: 7
Console 7 must say: 6
Console 8 must say: 5
Console 9 must say: 9
Console 10 must say: 7
9. When you complete the numerical sequence, all the levers disappear, and a scroll note spawns at the center. Click it.

Next Part: Val'sharah
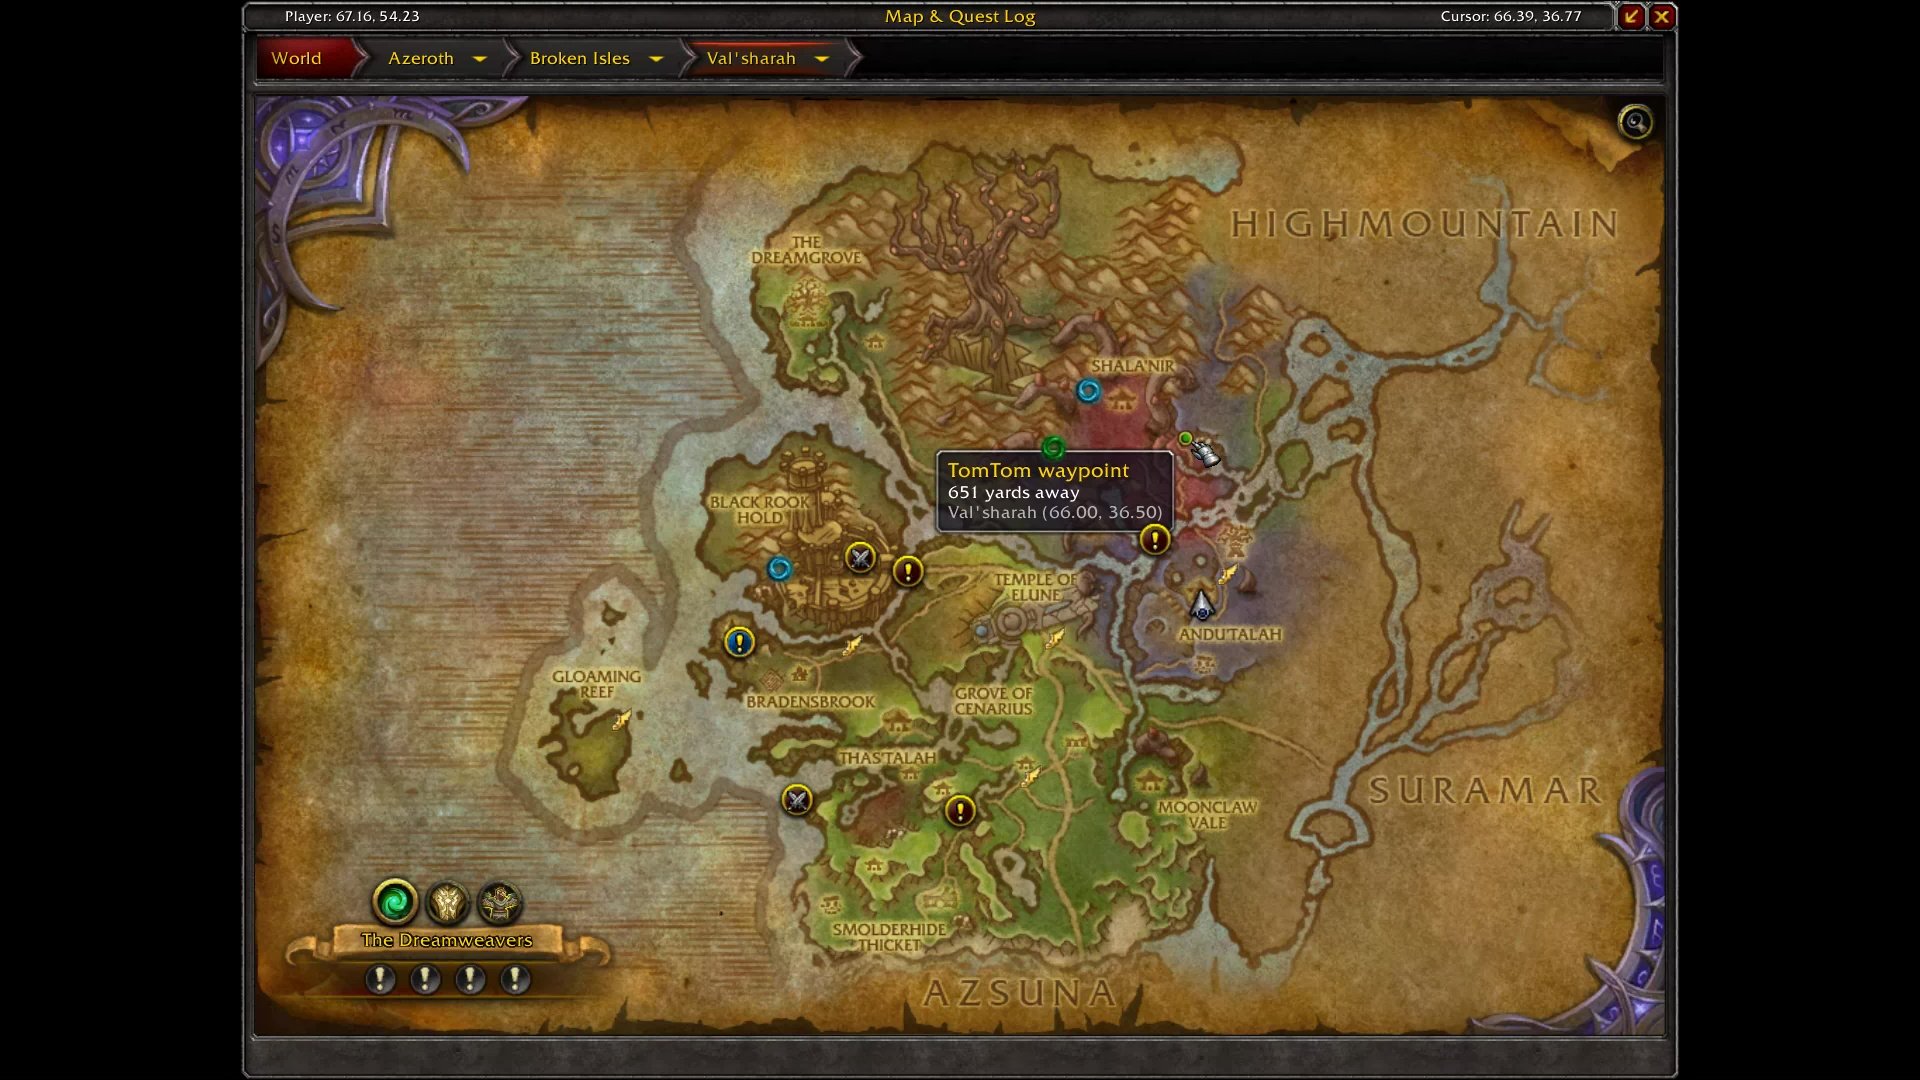
1. Fly to Val'sharah.
2. Once there, if you have the TomTom addon, type this onscreen when in Val'sharah:
/way Val'sharah 66 36.5
3. Open the map to see the destination as a green dot, and fly there.
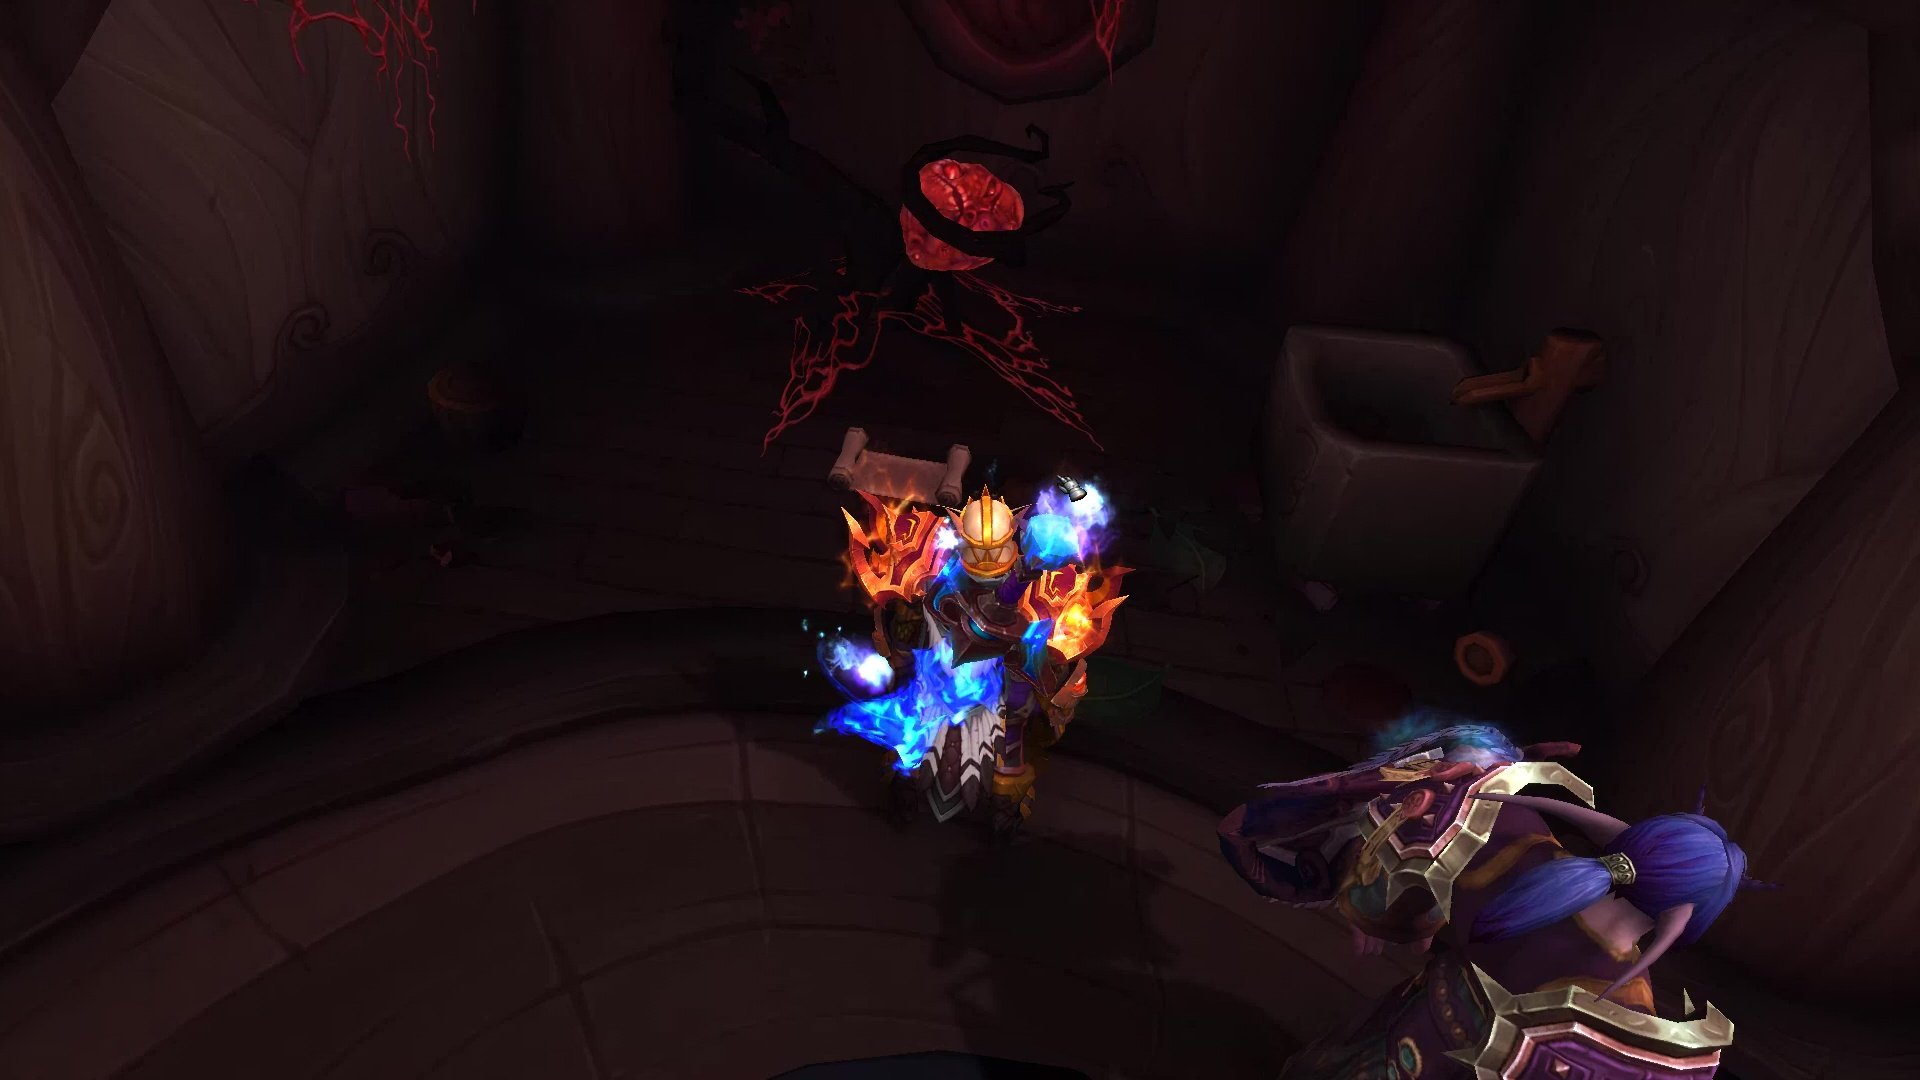
4. Enter the house, and click the Nightmare Tumor to the left of the door.

5. Same as with the Bejeweled game, clicking the tumor gives you a buff that spawns a mini-game.

6. Untangle the red strings by clicking the red balls to switch them with another red ball -- which shifts the position of the strings (or threads). The goal is to isolate strings into separated sectors until they turn blue. Then move on to the next to isolate the remaining strings into new sectors. Once all untangled strings turn blue, the game is won.

7. Go back to the Nightmare Tumor inside the house. A scroll note spawned. Click it.
Next -- Part 7: Kun-Lai Summit
NOTE: The one in Kun-Lai Summit is the most difficult and time-consuming puzzle. The short description is: It is a maze of endless rooms that are mostly the same except for small details that are different. Sometimes a room has one doorway. Sometimes two doorways. The other doorways are blocked by crumbled rocks. Another difference is the torches location, or lack of them. To put into context, I tried finishing the puzzle without the addon helper. Took me three hours.
First, download the Lucid Nightmare Helper addon. Install it in the /WorldofWarcraft/Interface/AddOns folder. It makes the maze experience so much easier. After you install the addon, launch World of Warcraft.
1. Go to Dalaran (Broken Isles).
2. Take the portal to the Vale of Eternal Blossoms (Pandaria).
3. Fly north toward the Kun-Lai Summit zone.
4. Once inside Kun-Lai, if you have the TomTom addon installed, type: /way Kun-Lai Summit 53.4 49
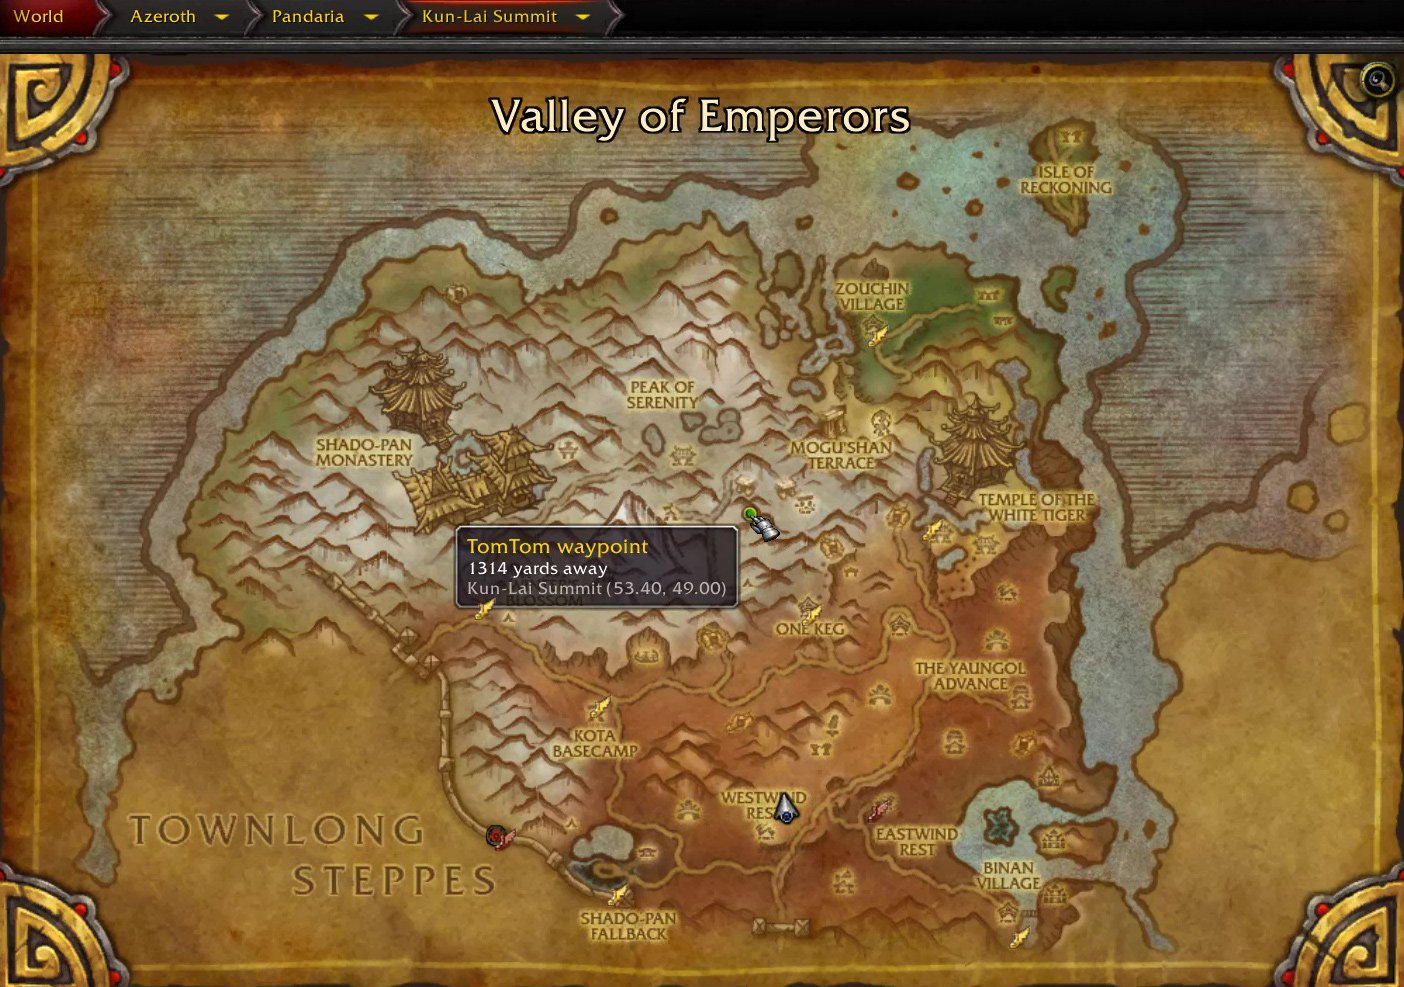
5. This will take you to the Valley of Emperors. The entrance to the destination takes you inside a mausoleum.
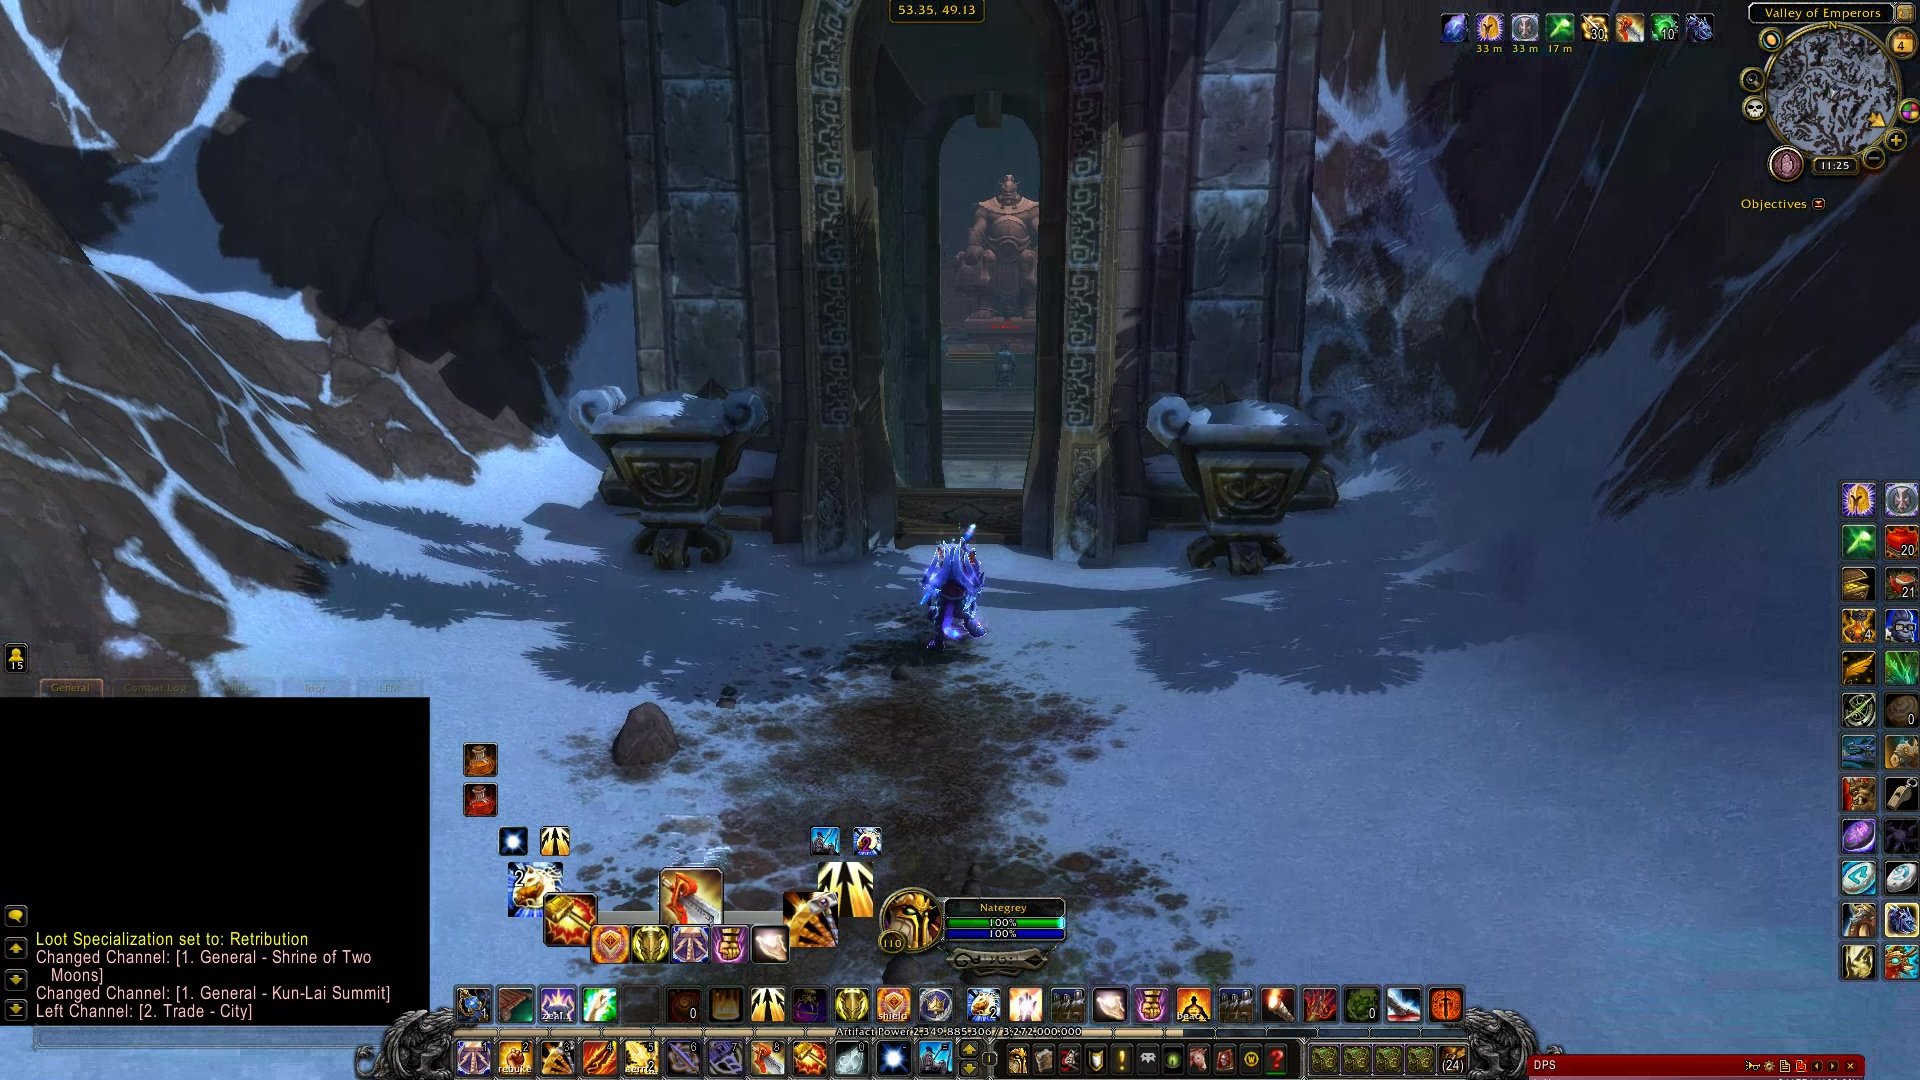
6. Go inside toward the statue. At the foot of the statue you will see a big Urn. Click it, and click the dialogue bubble: "Consume the ashes." Make sure you have at least 3 hours of spare time, because you will be trapped in the Endless Halls -- that's literally the name of the Mogu'shan Palace maze you are teleported into.
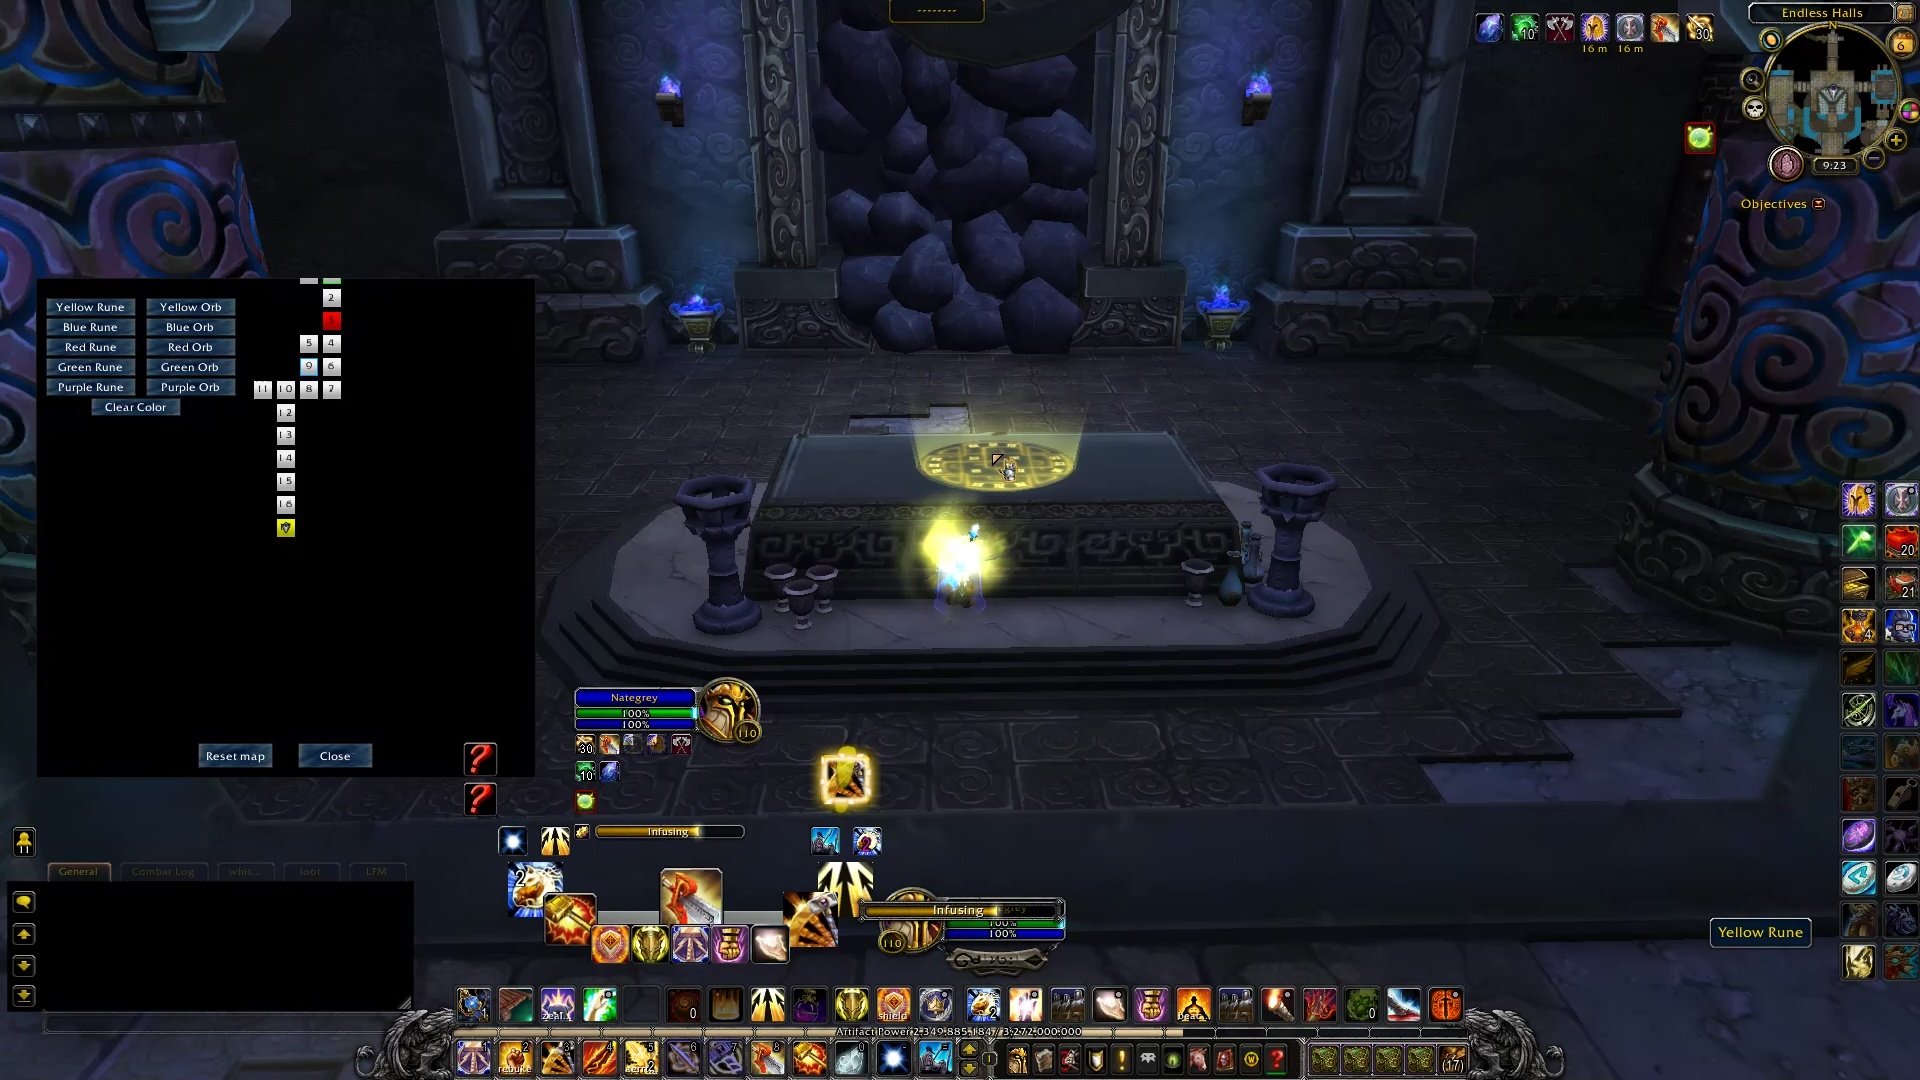
7. Once inside the Endless Halls maze, type: /lucid
This will launch the Lucid Nightmare Helper UI -- which looks like this:
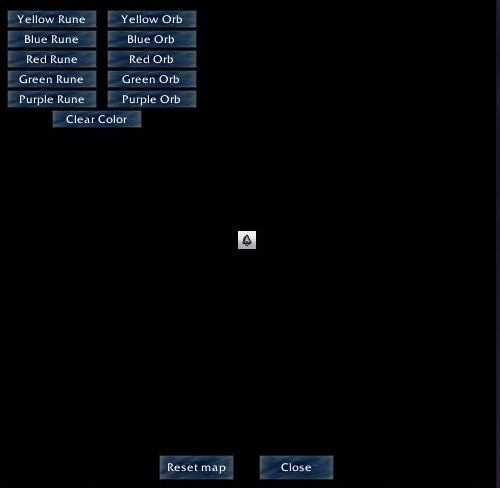
Each time you move to another room, the UI will create a square in the direction you walked: Left, Right, up, or down. In short, this addon draws a map of squares that represent each room you have been at, which helps you backtrack your steps to go a different path when you reach a dead-end.
If you notice the doorways are taking you in a path that collides with other squares in the UI, that means the next door will teleport you somewhere else. Dead end. So you backtrack to the last point you remember there was another path.
A good strategy to remember where a room was that had two doorways is to enter a doorway to create a new square in the UI, then backtrack to the previous room. Then take the second doorway you intended to explore. At least now you have a square drawn telling you a specific room had 2 doorways, and you can backtrack back to that path in the future if you reach a deadend in the other path.
8. While all rooms look similar, the goal is to find rooms that have two glowing torches on each side of the altar.

9.Then find the room with a matching colored rune. Example: Yellow glowing Orb will make your character glow Yellow. So you have to find the room with the Yellow Rune. Click the Yellow rune, and now you move on to the next Orb/Rune objective. There are five colors: Red, Blue, Yellow, Green, and Purple. That means you have to find 5 Orbs and five Runes.
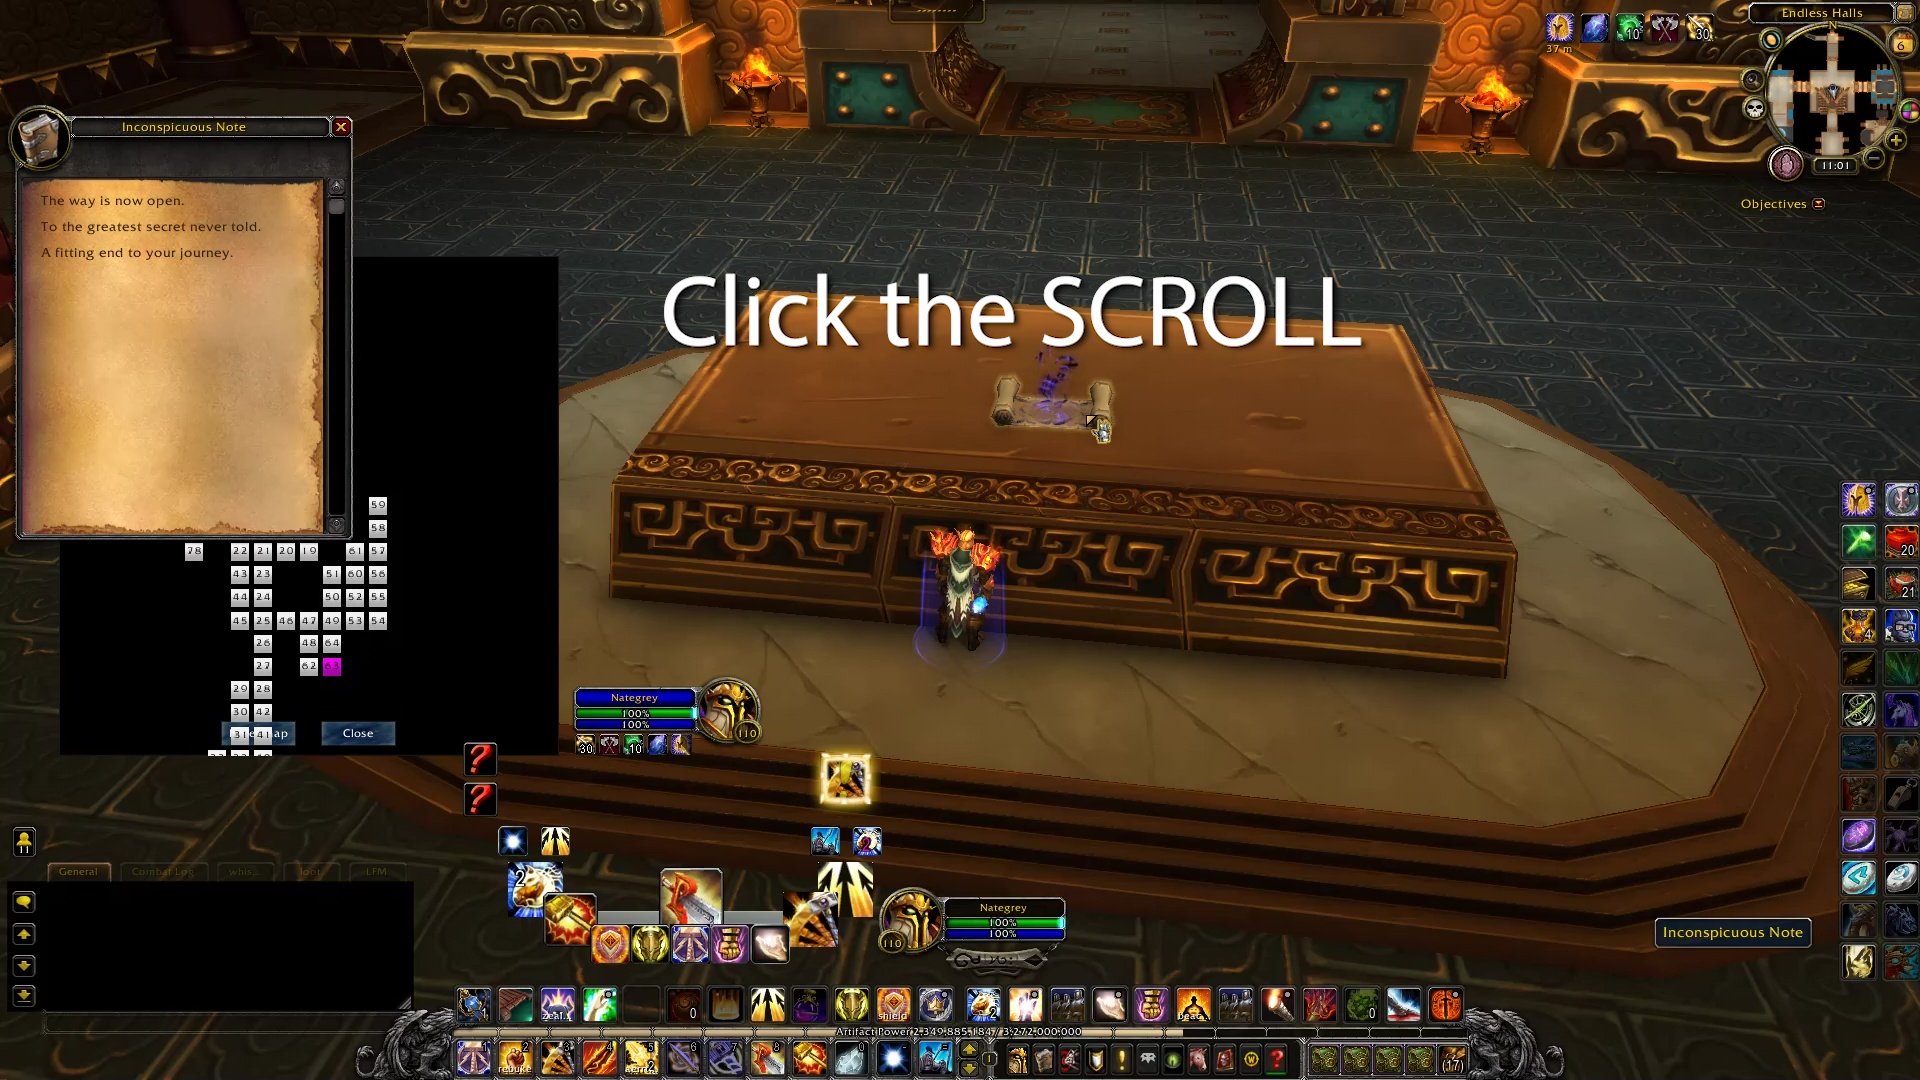
10. Once all 5 runes are infused, the puzzle game has reached the end. Any door you go through will automatically teleport you to the exit. On the other side, you will see a scroll on an altar. Click the scroll. This is the last scroll of the hunt for Lucid Nightmare.
11. Return to the door you teleported in. That is also the maze's exit (upstairs).
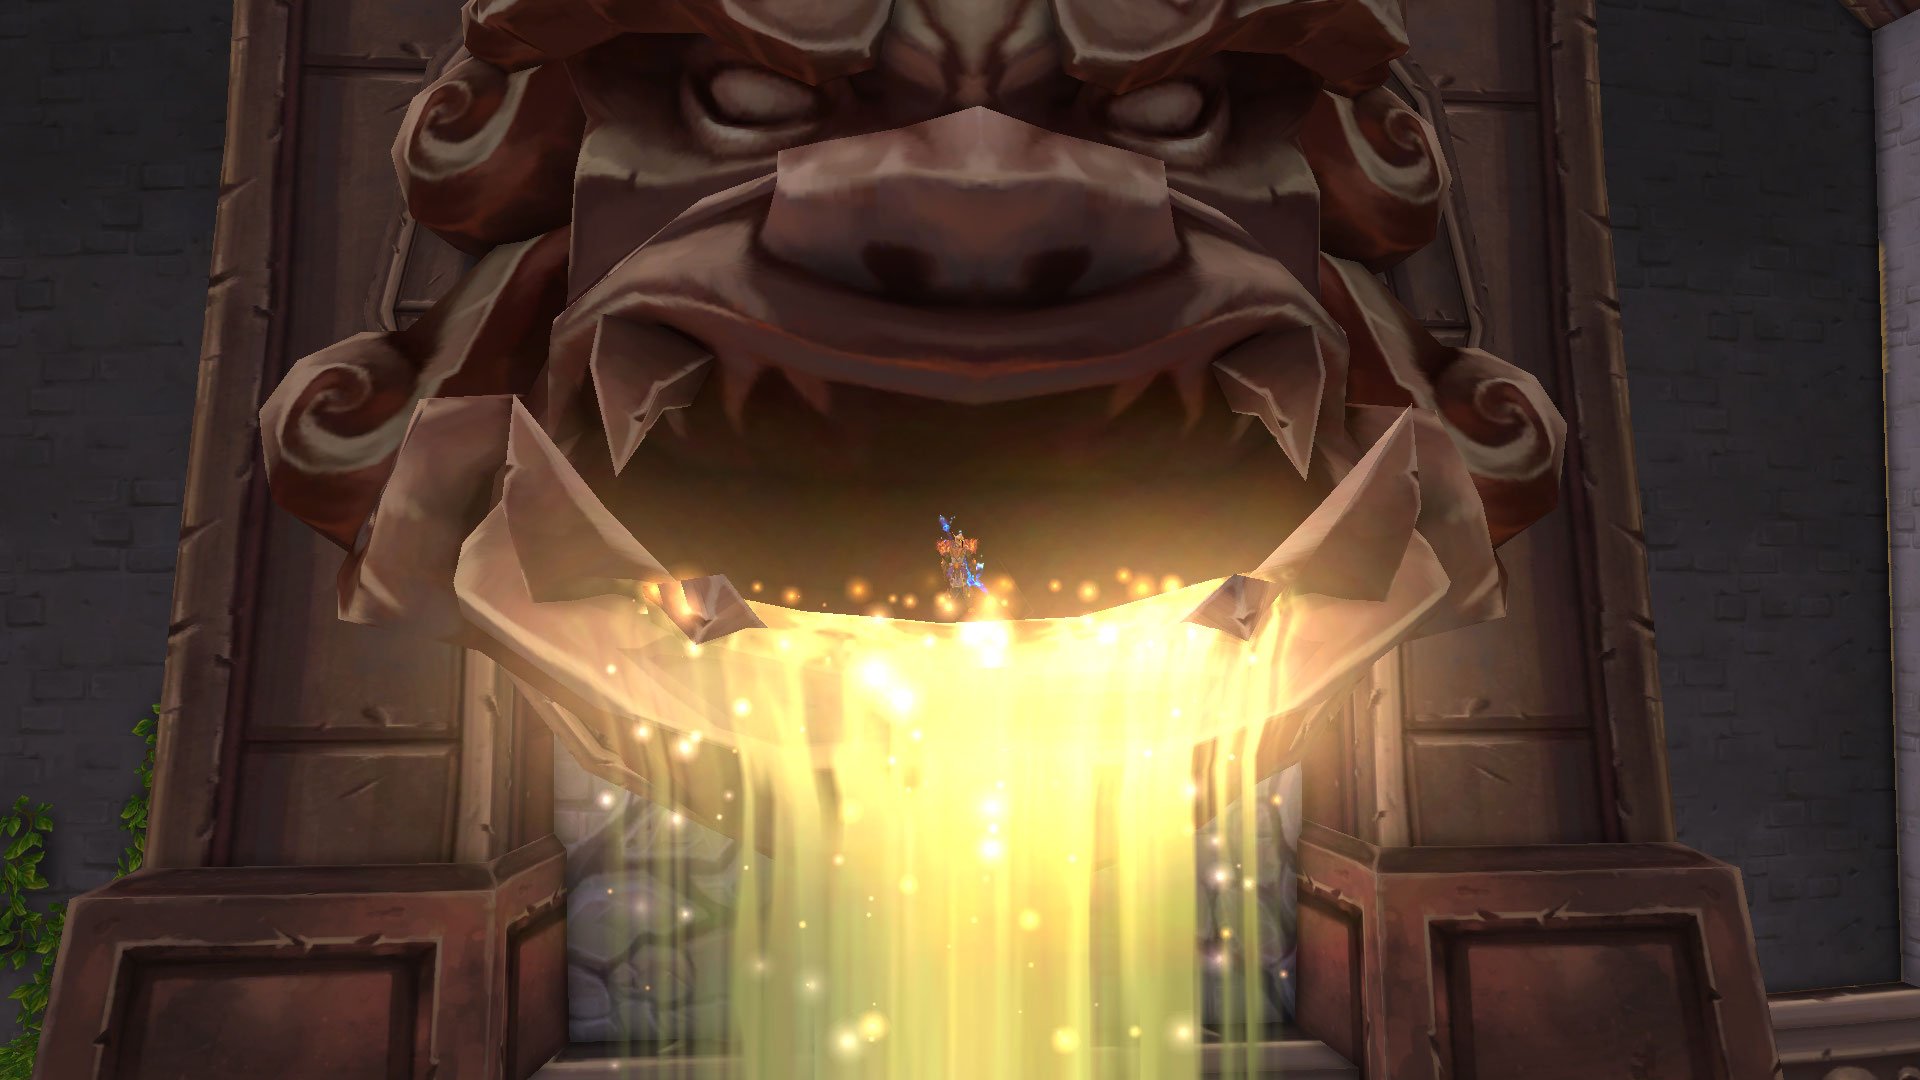
12. You spawn at the mouth of the huge mogu face spewing water from the Terrace of Endless Spring on the side of the Vale of the Four Winds.
13. Use the Hearthstone to return to Dalaran.
With the Kun-Lai Summit's Endless Halls maze completed, that was the last scroll to hunt. Now you will go loot the Lucid Nightmare mount.
1. Use the Hearthstone to take you back to Dalaran (Broken Isles).
2. Go to the center of Dalaran to teleport to the Chamber of the Guardian.
3. Take the portal to Karazhan
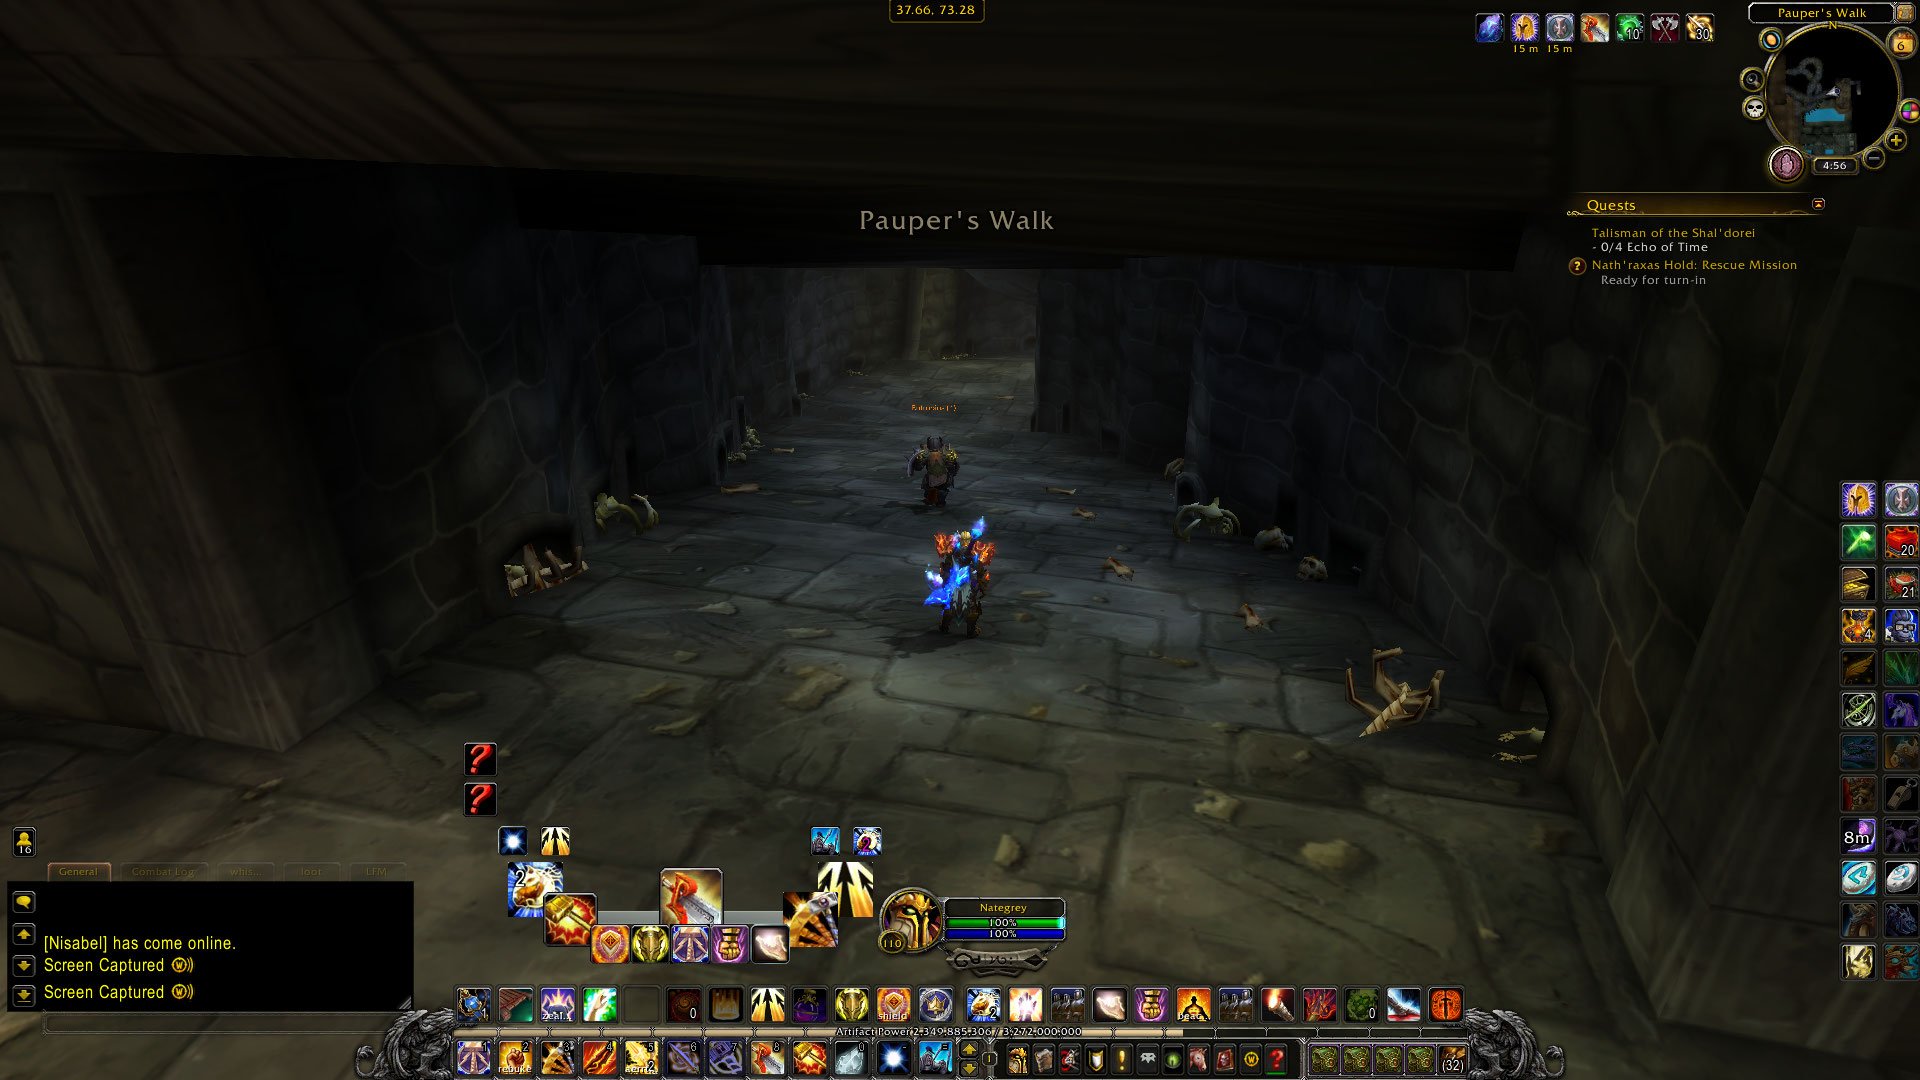
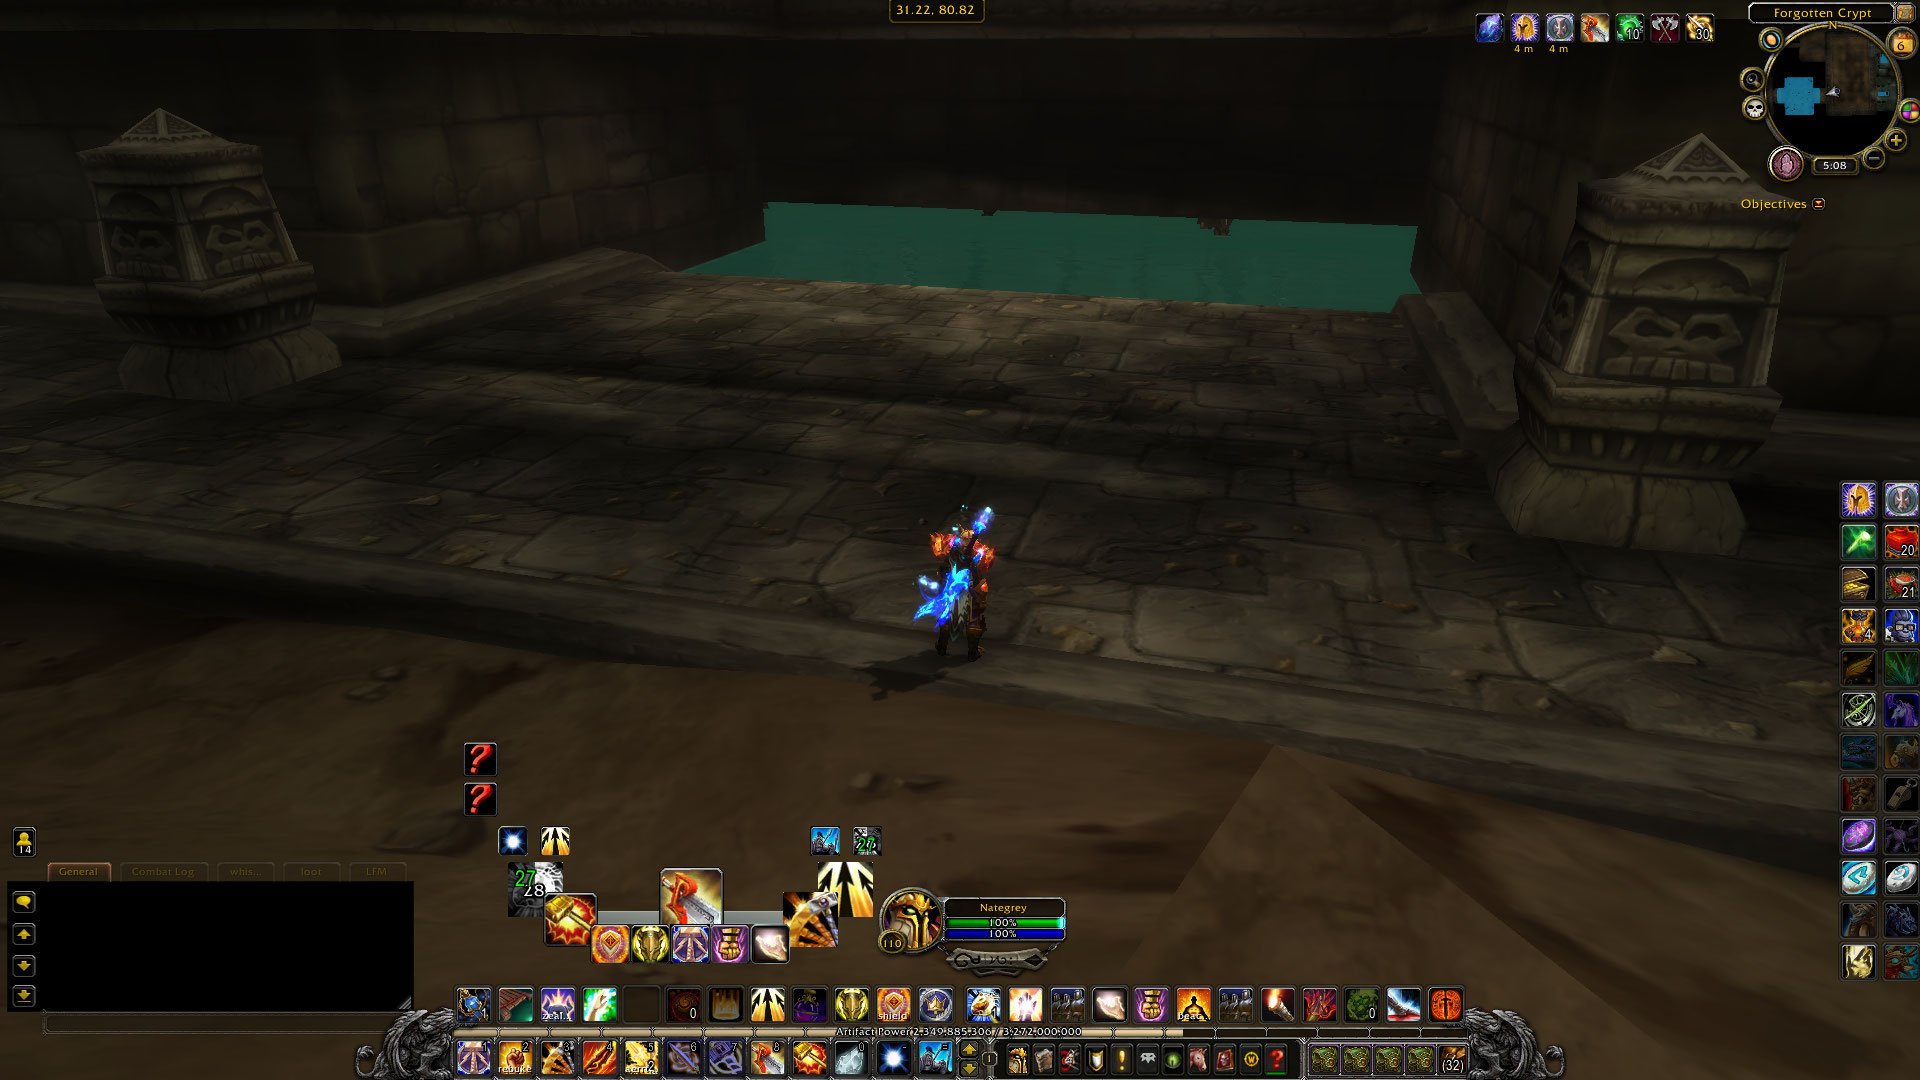
4. Go to the crypt located at the Morgan Plot's Forgotten Crypt (Coordinates: 39.89, 74.09)

5. Once inside the crypt, go down the long ramp named Pauper's Walk, and don't move away from the wall to the right.
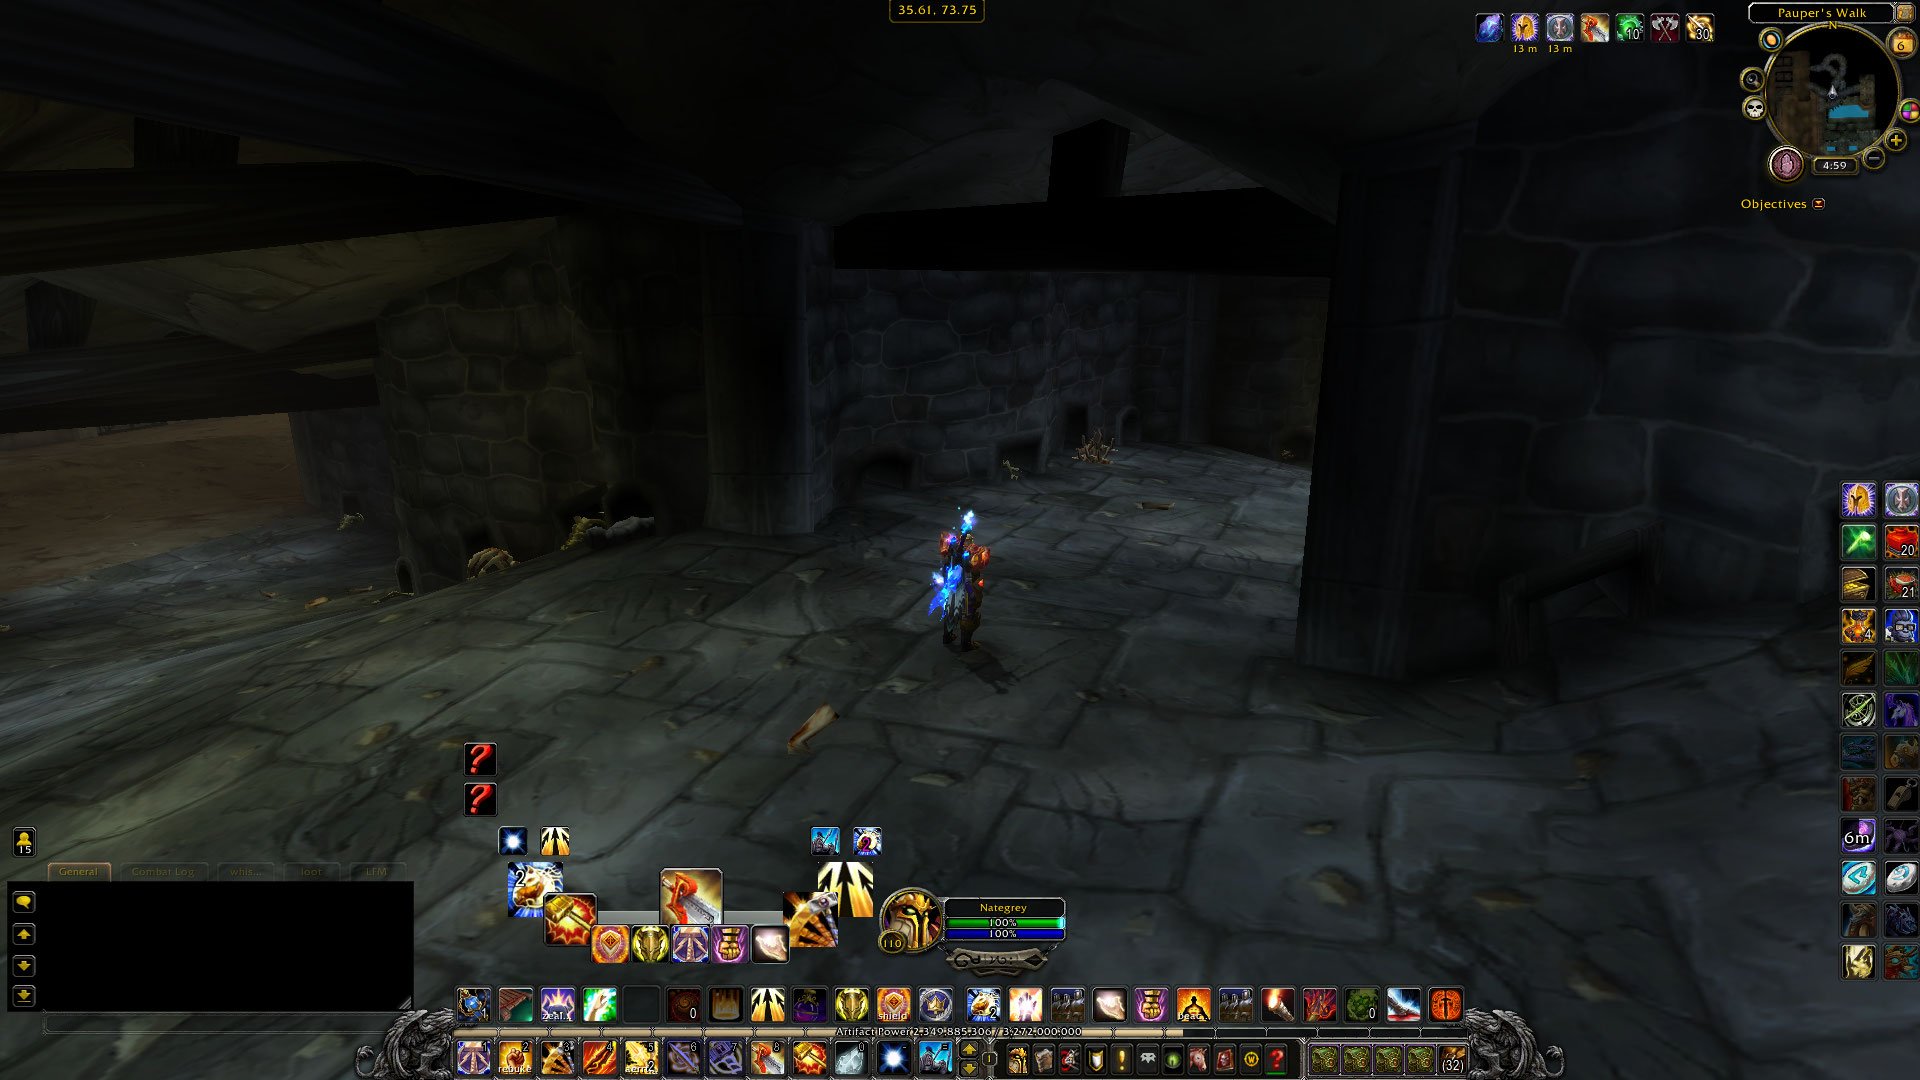
6. Inside the crypt, the first crossroads to the right -- turn right. You are now heading north (coordinates: 35.61, 73.75).
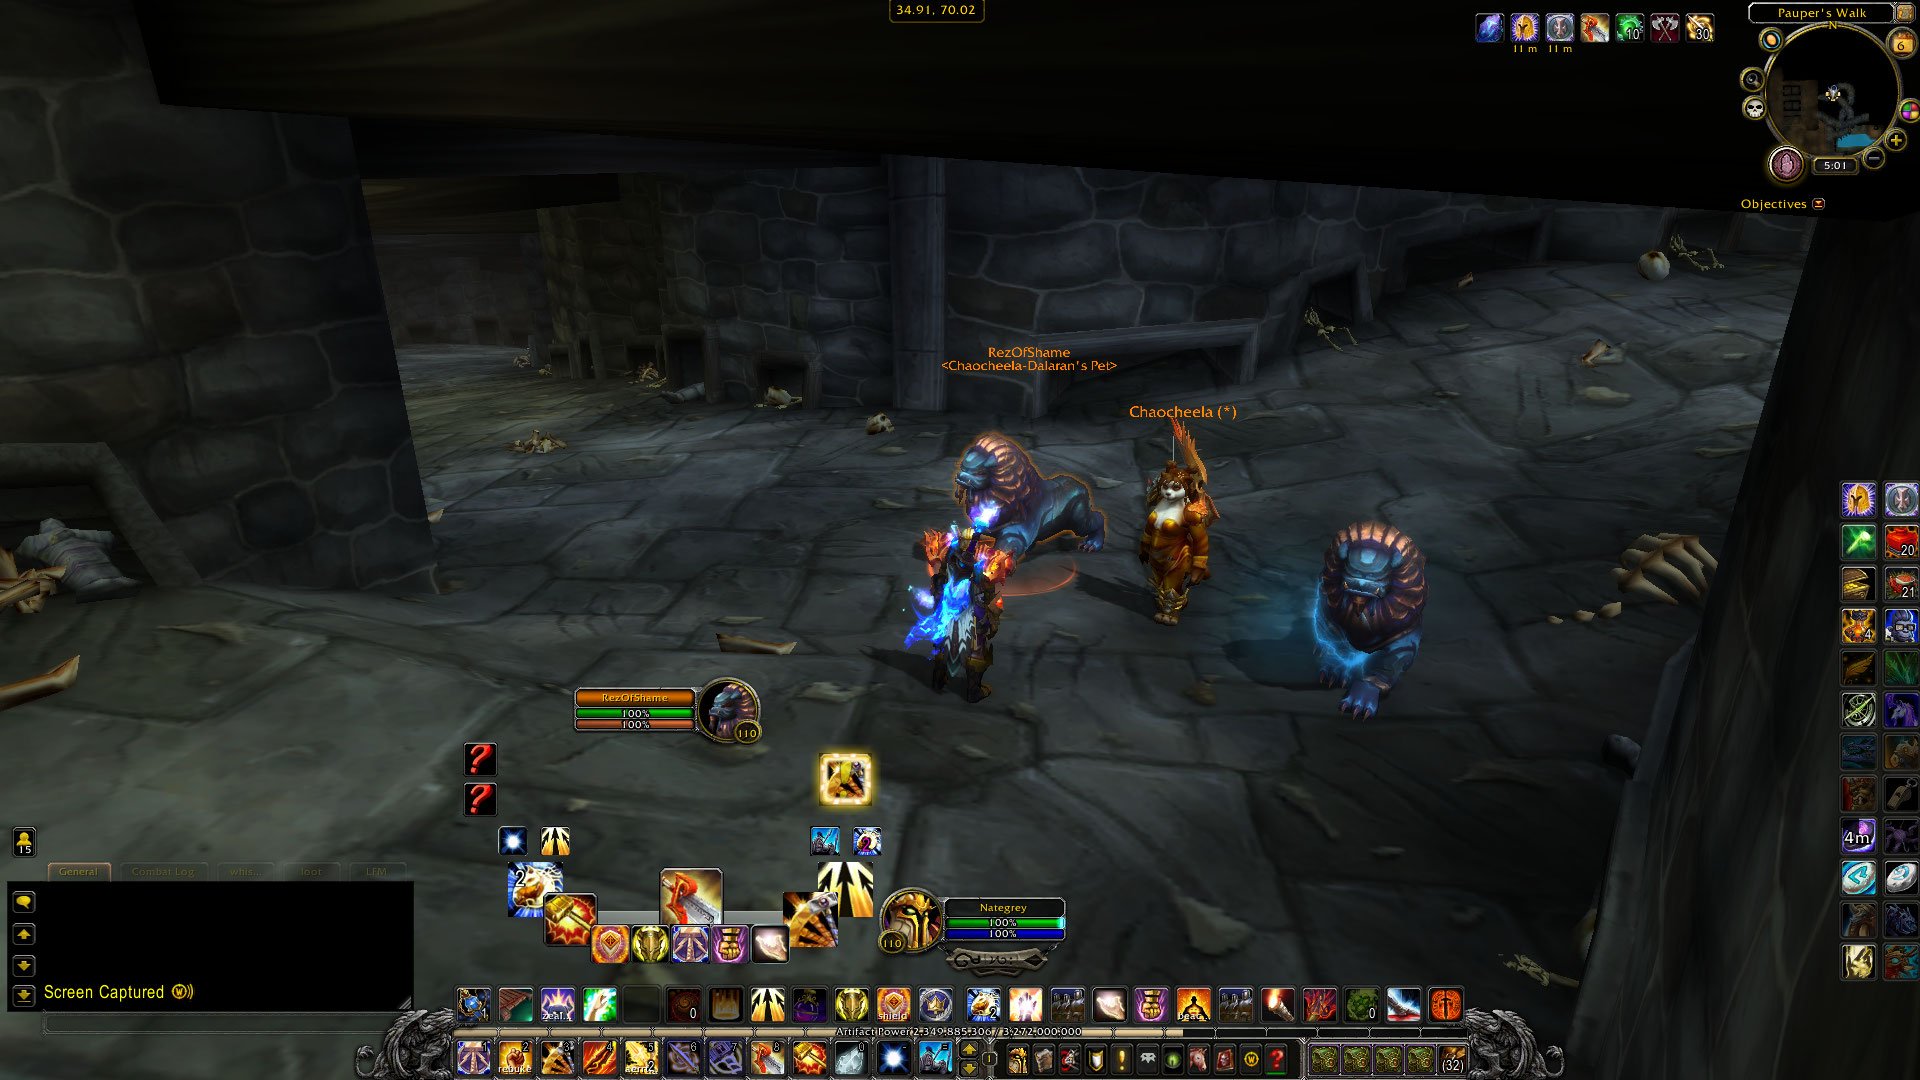
7. Now hug the wall to your left. You will find a crossroads again at 34.91, 70.02. One road goes up to the right. The other one goes down to the left. You have to go down to the left. This path takes you southwards toward the pool.
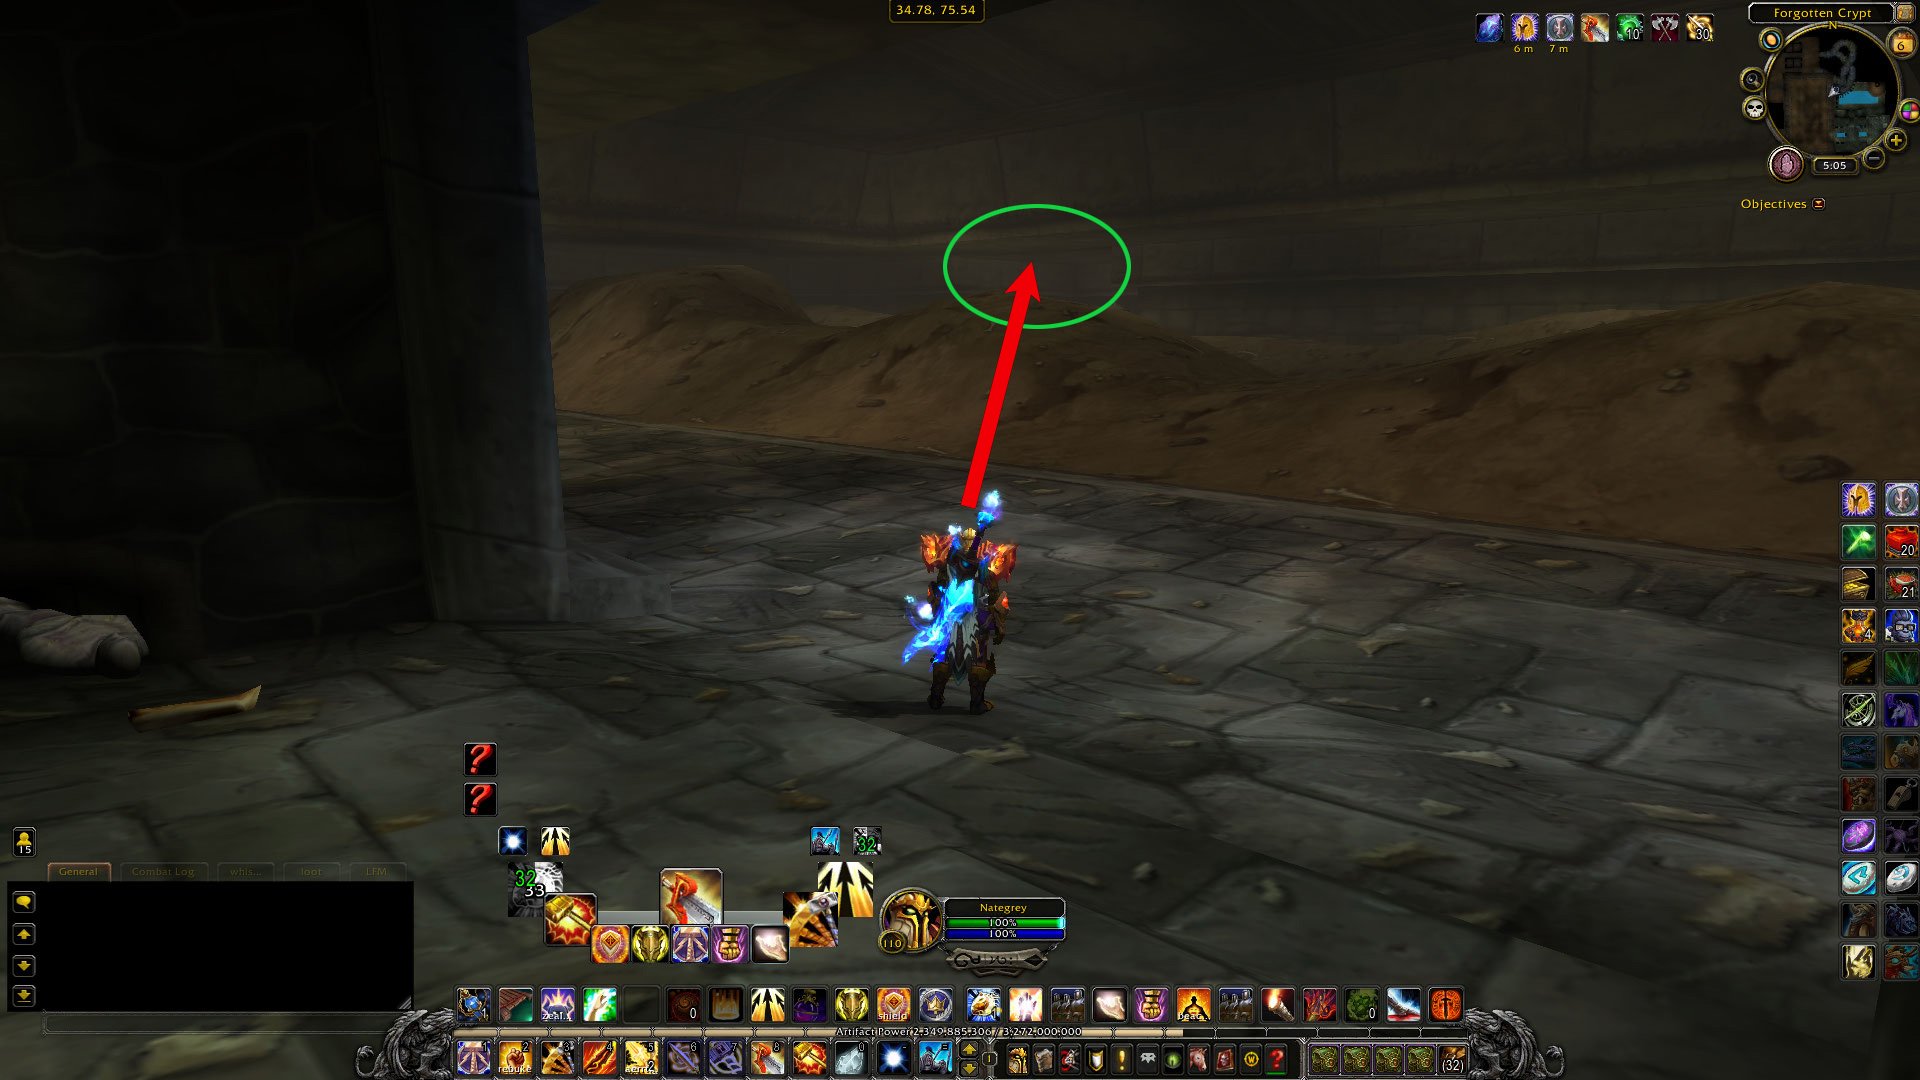
8. At the end of this tunnel, you will find a huge underground chamber with tall dunes of sand. Go into the dunes of sand heading southwest. In the mini-map you will notice a larger pool of water. That's your destination.
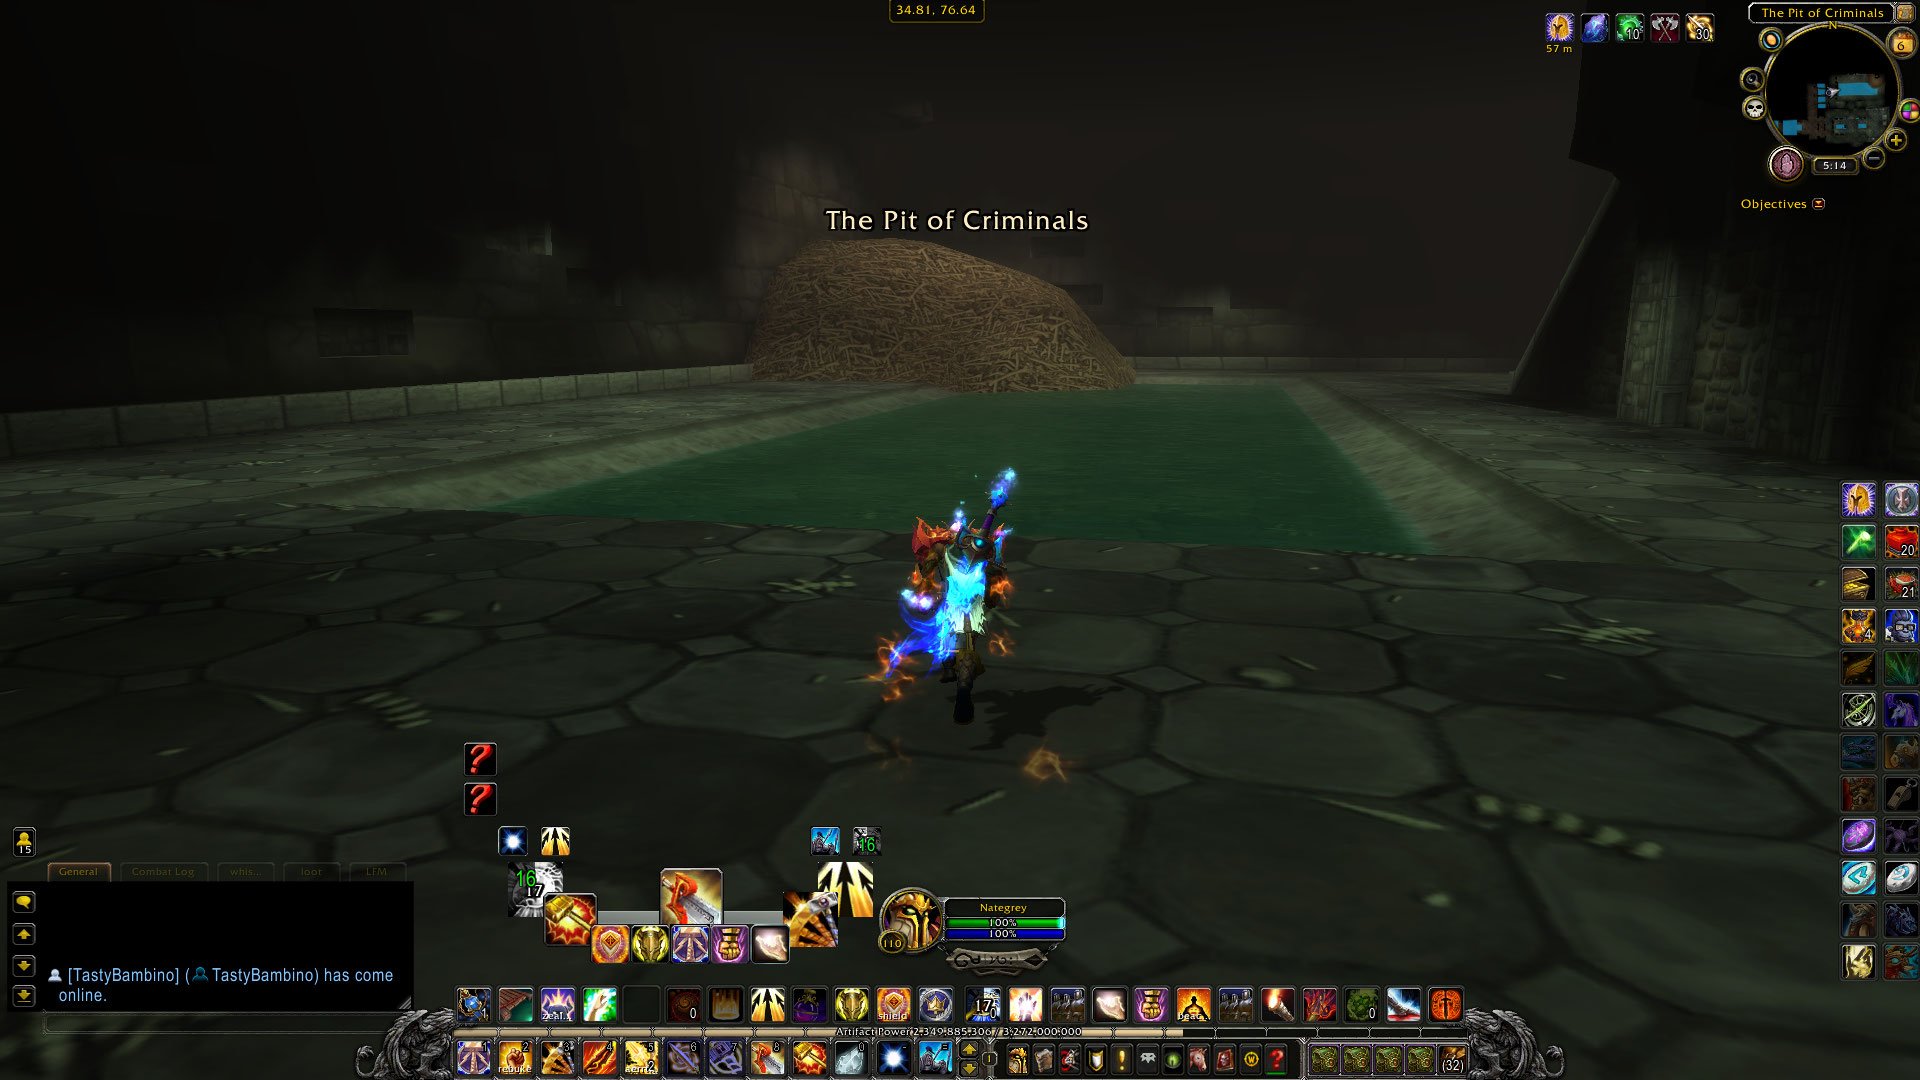
9. Enter the pool of water named The Upside-down Sinners.
10. Dive all the way to the bottom to see an underwater entrance.


11. Now you will find the large chamber named The Pit of Criminals.
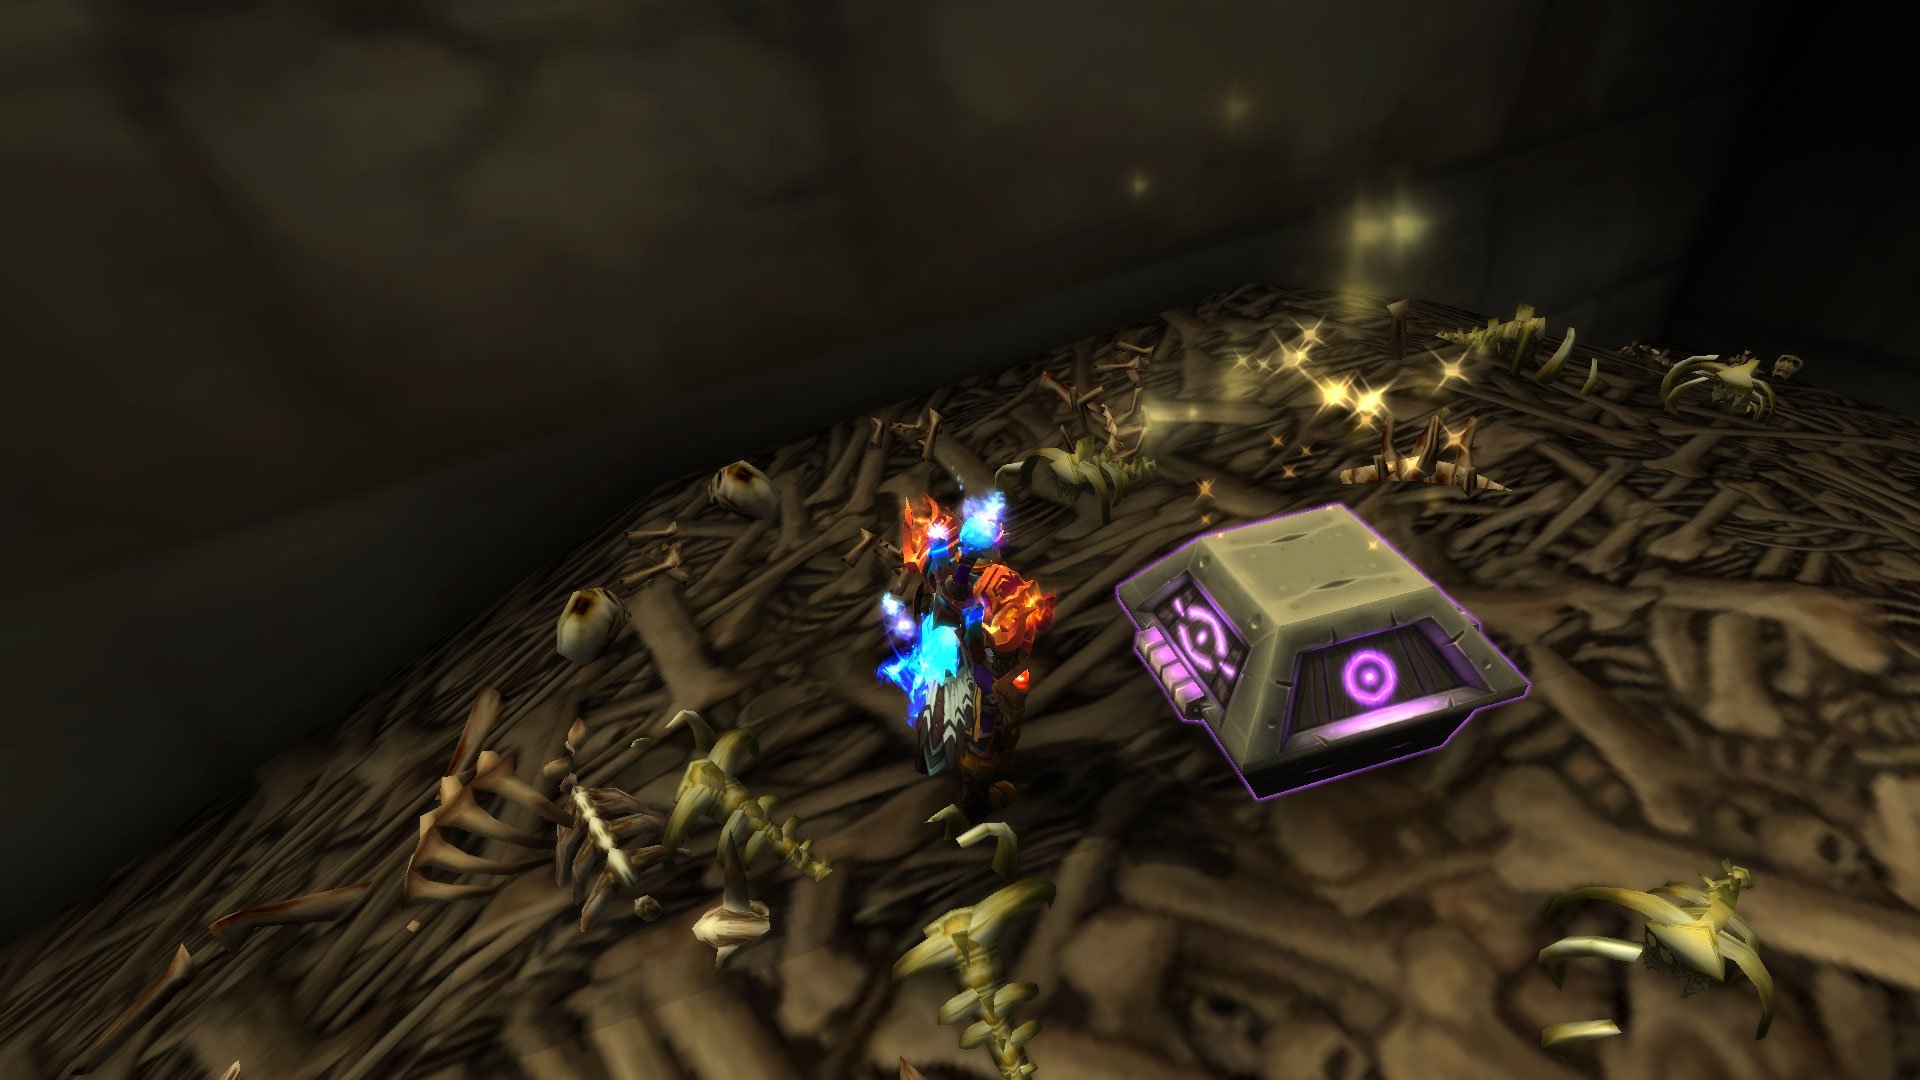
12. There is a purple chest atop a huge pile of bones. That is where you loot the Lucid Nightmare mount. Congrats!
**A more detailed version of the guide including how the Secret Finding Discord Community solved the puzzles for each part of the hunt, and full credits can be found here.
Hope you enjoyed this article. Please, support Blizzplanet via PayPal, and follow us on Twitter, Facebook, YouTube, and Twitch for Blizzard games news updates. |
 |
![Ihgaluk Crag [H] World of Warcraft: Mists of Pandaria Patch 5.2 – Isle of Thunder Quests](https://warcraft.blizzplanet.com/wp-content/themes/Extra/images/post-format-thumb-text.svg)